編輯:關於Android編程
這節課主要學習如何將IntentService中的執行結果返回給請求點。一種推薦的方式就是使用 LocalBroadcastManager來實現,它會將所廣播的Intent限制在APP內部。
為了可以將IntentService的處理結果發送給其它組件,首先需要創建一個Intent對象,並將執行結果放入該Intent內。
接下來要做的就是:將剛才創建好的Intent通過LocalBroadcastManager.sendBroadcast()發送出去。但凡是對該Intent注冊了的,那麼發送該Intent都會收到結果。可以通過getInstance()獲取LocalBroadcastManager的實例。
例子如下:
public final class Constants {
    ...
    // Defines a custom Intent action
    public static final String BROADCAST_ACTION =
        "com.example.android.threadsample.BROADCAST";
    ...
    // Defines the key for the status "extra" in an Intent
    public static final String EXTENDED_DATA_STATUS =
        "com.example.android.threadsample.STATUS";
    ...
}
public class RSSPullService extends IntentService {
...
    /*
     * Creates a new Intent containing a Uri object
     * BROADCAST_ACTION is a custom Intent action
     */
    Intent localIntent =
            new Intent(Constants.BROADCAST_ACTION)
            // Puts the status into the Intent
            .putExtra(Constants.EXTENDED_DATA_STATUS, status);
    // Broadcasts the Intent to receivers in this app.
    LocalBroadcastManager.getInstance(this).sendBroadcast(localIntent);
...
}
下一步就是如何處理接收到的Intent對象了。
如果需要接收廣播出來的Intent,那麼就需要用到BroadcastReceiver了。在BroadcastReceiver的實現類中重寫onReceive()方法。當LocalBroadcastManager將相應的Intent對象廣播出來後,那麼該方法就會被自動回調。
舉個例子:
// Broadcast receiver for receiving status updates from the IntentService
private class ResponseReceiver extends BroadcastReceiver
{
    // Prevents instantiation
    private DownloadStateReceiver() {
    }
    // Called when the BroadcastReceiver gets an Intent it's registered to receive
    @
    public void onReceive(Context context, Intent intent) {
...
        /*
         * Handle Intents here.
         */
...
    }
}
一旦定義好了BroadcastReceiver,那麼就可以為其定義指定的意圖過濾器了。要做到這些,需要創建一個IntentFilter。下面的代碼演示了如何定義一個過濾器:
// Class that displays photos
public class DisplayActivity extends FragmentActivity {
    ...
    public void onCreate(Bundle stateBundle) {
        ...
        super.onCreate(stateBundle);
        ...
        // The filter's action is BROADCAST_ACTION
        IntentFilter mStatusIntentFilter = new IntentFilter(
                Constants.BROADCAST_ACTION);

        // Adds a data filter for the HTTP scheme
        mStatusIntentFilter.addDataScheme("http");
為了將BroadcastReceiver以及IntentFilter注冊到系統,需要先獲取LocalBroadcastManager的實例,然後再調用它的registerReceiver()方法。下面的代碼演示了這個過程:
        // Instantiates a new DownloadStateReceiver
        DownloadStateReceiver mDownloadStateReceiver =
                new DownloadStateReceiver();
        // Registers the DownloadStateReceiver and its intent filters
        LocalBroadcastManager.getInstance(this).registerReceiver(
                mDownloadStateReceiver,
                mStatusIntentFilter);
        ...
BroadcastReceiver可以同時處理多種類型的Intent對象,這項特性可以為每種Action定義不同的代碼,而不需要專門去定義BroadcastReceiver。為同一個BroadcastReceiver定義另外的IntentFilter,只需再創建一個IntentFilter,然後再次注冊一下就好:
        /*
         * Instantiates a new action filter.
         * No data filter is needed.
         */
        statusIntentFilter = new IntentFilter(Constants.ACTION_ZOOM_IMAGE);
        ...
        // Registers the receiver with the new filter
        LocalBroadcastManager.getInstance(getActivity()).registerReceiver(
                mDownloadStateReceiver,
                mIntentFilter);
發送廣播Intent並不會啟動或者恢復Activity。就算是APP處於掛起狀態(處於後台)也同樣會接收到Intent。如果APP處於掛起狀態的話,有任務完成需要通知到用戶,那麼可以使用Notification做到。絕不要啟動Activity來響應接收到的Intent廣播。
原文地址:https://developer.android.com/training/run-background-service/report-status.html
 Android UI設計之(十三)自定義ScrollView,實現QQ空間阻尼下拉刷新和漸變菜單欄效果
之前寫過一篇文章,寫完那篇文章後想趁熱打鐵再寫一篇用ScrollView來實現同樣效果的文章,可是寫了點開頭就沒有繼續寫下去了,當時想的是等用到再寫吧,於是把它扔在了草稿
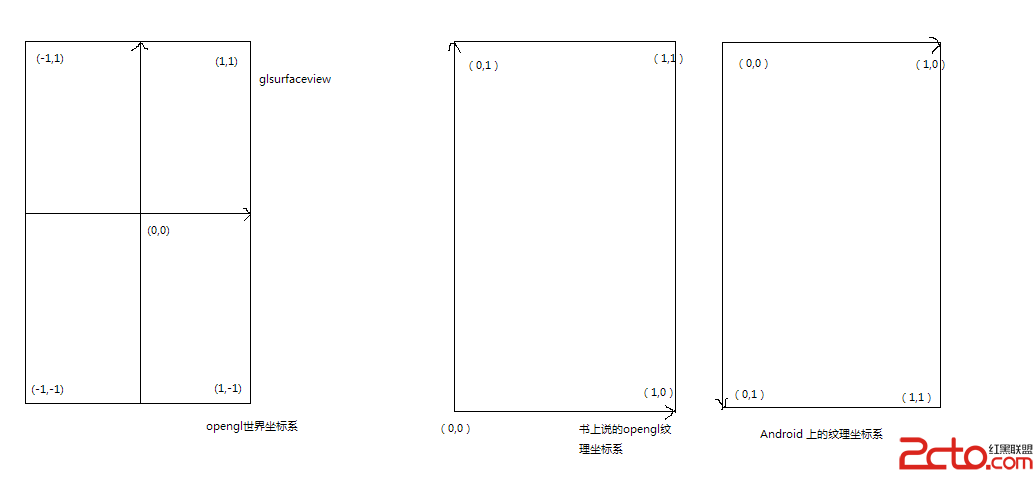
 對Android opengl ES世界坐標系和紋理坐標系的理解
初學opengl ES,每一個教你在屏幕上貼圖的opengl版hello world都有這麼兩數組: static final float COORD[] = {
 android 移植 ffmpeg (一)
最近兩天為了測試使用ffmpeg獲取視頻圖片的效率問題,玩了一把ffmpeg的移植工作. 在這裡作下記錄。所有測試都只在mac系統中測試。 1. 下載ffmpe
 初探Android N 那些讓人感興趣的東西--通知的好用功能
上周寫完那篇Blog之後就一直做著被分配到的Web任務,也就沒繼續捯饬N那些事,然後今天還在看Notification這部分,然後看到了LNotification這個包,