編輯:關於Android編程

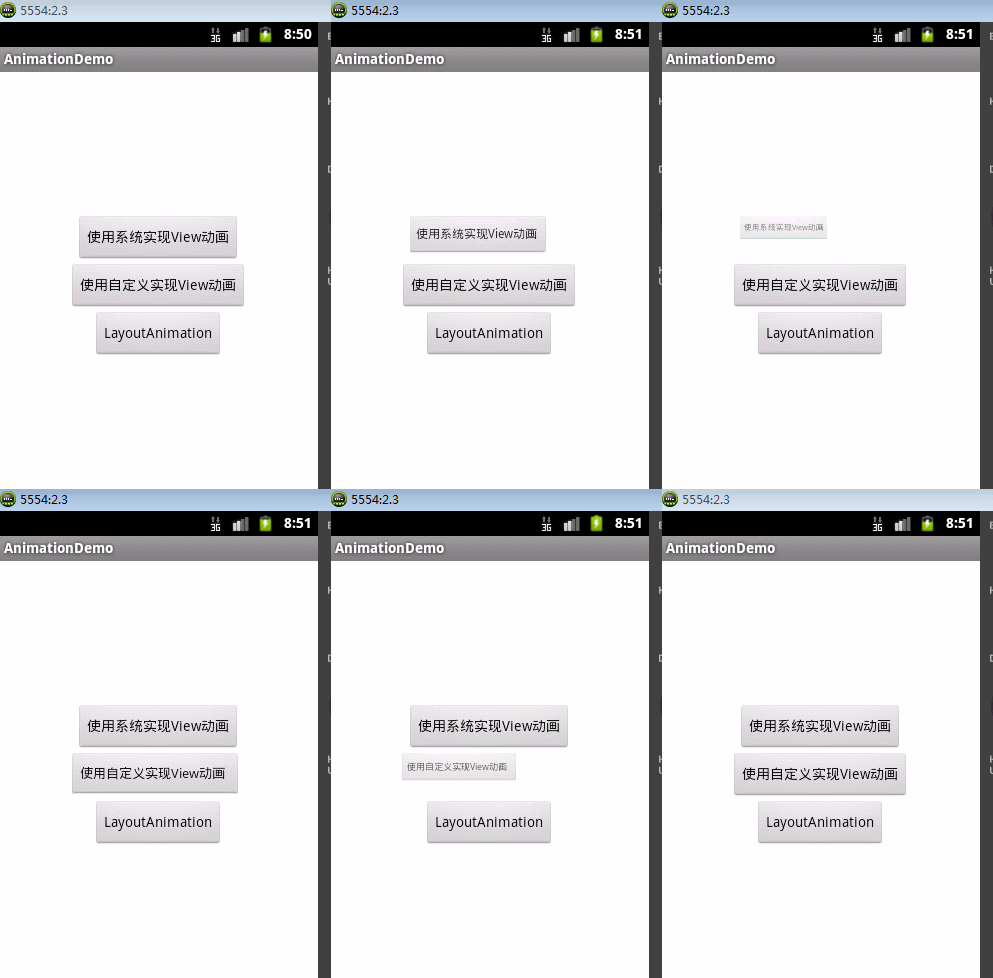
使用動畫的方式有兩種:一種是xml形式、另一種是java代碼。使用起來都比較簡單。還有一種AnimationSet,它是動畫集合,將幾種動畫合在一起使用,下面AnimationSet來寫動畫。
創建縮放/透明動畫
    //創建AnimationSet對象
    aSet = new AnimationSet(false);
    //創建動畫對象
    sAnim = new ScaleAnimation(1, 0.5f, 1, 0.5f);
    //設置動畫執行時間
    sAnim.setDuration(3000);
    //添加動畫到集合中
    aSet.addAnimation(sAnim);
    aAnim = new AlphaAnimation(1, 0.5f);
    aAnim.setDuration(3000);
    aSet.addAnimation(aAnim);
開始執行動畫
    aSet.start() ;
    btn_sys.setAnimation(aSet) ;
就這樣,完成了一個動畫集合的小例子,其它幾種動畫的使用方法類似。
分析源碼之前,我們需要知道這4種動畫其實都是Animation的子類,而如果想要實現動畫效果,則必須重寫applyTransformation()方法,這點可以從這個方法的注釋可以看出。
     /**
     * Helper for getTransformation. Subclasses should implement this to apply
     * their transforms given an interpolation value.  Implementations of this
     * method should always replace the specified Transformation or document
     * they are doing otherwise.
     *
     * @param interpolatedTime The value of the normalized time (0.0 to 1.0)
     *        after it has been run through the interpolation function.
     * @param t The Transformation object to fill in with the current
     *        transforms.
     */
    protected void applyTransformation(float interpolatedTime, Transformation t) {
    }
OK,這裡我們分析ScaleAnimation,其它三個可以自行分析。
首先,我們看下構造函數
    public ScaleAnimation(float fromX, float toX, float fromY, float toY,
            float pivotX, float pivotY) {
        mResources = null;
        mFromX = fromX;
        mToX = toX;
        mFromY = fromY;
        mToY = toY;

        mPivotXType = ABSOLUTE;
        mPivotYType = ABSOLUTE;
        mPivotXValue = pivotX;
        mPivotYValue = pivotY;
        initializePivotPoint();
    }
源碼很簡單,只是將傳遞過來的變量賦值,然後調用initializePivotPoint()方法
    private void initializePivotPoint() {
        if (mPivotXType == ABSOLUTE) {
            mPivotX = mPivotXValue;
        }
        if (mPivotYType == ABSOLUTE) {
            mPivotY = mPivotYValue;
        }
    }
在構造函數執行完之後,馬上就會執行initialize(),獲取縮放中心點坐標
    @Override
    public void initialize(int width, int height, int parentWidth, int parentHeight) {
        super.initialize(width, height, parentWidth, parentHeight);

        mFromX = resolveScale(mFromX, mFromXType, mFromXData, width, parentWidth);
        mToX = resolveScale(mToX, mToXType, mToXData, width, parentWidth);
        mFromY = resolveScale(mFromY, mFromYType, mFromYData, height, parentHeight);
        mToY = resolveScale(mToY, mToYType, mToYData, height, parentHeight);

        mPivotX = resolveSize(mPivotXType, mPivotXValue, width, parentWidth);
        mPivotY = resolveSize(mPivotYType, mPivotYValue, height, parentHeight);
    }
緊接著,當調用animation.start()方法,
    public void setStartTime(long startTimeMillis) {
        mStartTime = startTimeMillis;
        mStarted = mEnded = false;
        mCycleFlip = false;
        mRepeated = 0;
        mMore = true;
    }

    /**
     * Convenience method to start the animation the first time
     * {@link #getTransformation(long, Transformation)} is invoked.
     */
    public void start() {
        setStartTime(-1);
    }
這個只是開啟設置下時間,重要的是view.setAnimation()這個方法。如果上面的例子代碼不書寫view.setAnimation(),則不會出現動畫效果,而如果書寫.start()方法則依然可以執行,只不過再第二次執行時候的是在第一次執行的基礎上,不是我們想要的結果。看源碼
    /**
     * Sets the next animation to play for this view.
     * If you want the animation to play immediately, use
     * {@link #startAnimation(android.view.animation.Animation)} instead.
     * This method provides allows fine-grained
     * control over the start time and invalidation, but you
     * must make sure that 1) the animation has a start time set, and
     * 2) the view's parent (which controls animations on its children)
     * will be invalidated when the animation is supposed to
     * start.
     *
     * @param animation The next animation, or null.
     */
    public void setAnimation(Animation animation) {
        mCurrentAnimation = animation;

        if (animation != null) {
            // If the screen is off assume the animation start time is now instead of
            // the next frame we draw. Keeping the START_ON_FIRST_FRAME start time
            // would cause the animation to start when the screen turns back on
            if (mAttachInfo != null && !mAttachInfo.mScreenOn &&
                    animation.getStartTime() == Animation.START_ON_FIRST_FRAME) {
                animation.setStartTime(AnimationUtils.currentAnimationTimeMillis());
            }
            animation.reset();
        }
    }
從注釋中可以看出,和start方法調用的是同一個方法。接著執行的是applyTransformation()這個方法,此方法是自行實現的,而且沖該方法的注釋可以看出這個方法是是Helper for getTransformation.查看getTransformation()
    /**
     * Gets the transformation to apply at a specified point in time. Implementations of this
     * method should always replace the specified Transformation or document they are doing
     * otherwise.
     *
     * @param currentTime Where we are in the animation. This is wall clock time.
     * @param outTransformation A transformation object that is provided by the
     *        caller and will be filled in by the animation.
     * @return True if the animation is still running
     */
    public boolean getTransformation(long currentTime, Transformation outTransformation) {
        if (mStartTime == -1) {
            mStartTime = currentTime;
        }

        final long startOffset = getStartOffset();
        final long duration = mDuration;
        float normalizedTime;
        if (duration != 0) {
            normalizedTime = ((float) (currentTime - (mStartTime + startOffset))) /
                    (float) duration;
        } else {
            // time is a step-change with a zero duration
            normalizedTime = currentTime < mStartTime ? 0.0f : 1.0f;
        }

        final boolean expired = normalizedTime >= 1.0f;
        mMore = !expired;

        if (!mFillEnabled) normalizedTime = Math.max(Math.min(normalizedTime, 1.0f), 0.0f);

        if ((normalizedTime >= 0.0f || mFillBefore) && (normalizedTime <= 1.0f || mFillAfter)) {
            if (!mStarted) {
                fireAnimationStart();
                mStarted = true;
                if (USE_CLOSEGUARD) {
                    guard.open("cancel or detach or getTransformation");
                }
            }

            if (mFillEnabled) normalizedTime = Math.max(Math.min(normalizedTime, 1.0f), 0.0f);

            if (mCycleFlip) {
                normalizedTime = 1.0f - normalizedTime;
            }

            final float interpolatedTime = mInterpolator.getInterpolation(normalizedTime);
            applyTransformation(interpolatedTime, outTransformation);
        }

        if (expired) {
            if (mRepeatCount == mRepeated) {
                if (!mEnded) {
                    mEnded = true;
                    guard.close();
                    fireAnimationEnd();
                }
            } else {
                if (mRepeatCount > 0) {
                    mRepeated++;
                }

                if (mRepeatMode == REVERSE) {
                    mCycleFlip = !mCycleFlip;
                }

                mStartTime = -1;
                mMore = true;

                fireAnimationRepeat();
            }
        }

        if (!mMore && mOneMoreTime) {
            mOneMoreTime = false;
            return true;
        }

        return mMore;
    }
這個方法中有一個特別重要的代碼: applyTransformation(interpolatedTime, outTransformation);故它會調用applyTransformation方法來通過矩陣實現變換。
上面整體分析了Animation的執行流程,現在就具體來分析下ScaleAnimation是怎麼做到縮放的。其實整個縮放動畫一共就不到300行代碼,而真正起決定作用的又只有幾十行代碼。
    @Override
    protected void applyTransformation(float interpolatedTime, Transformation t) {
        float sx = 1.0f;
        float sy = 1.0f;
        float scale = getScaleFactor();

        if (mFromX != 1.0f || mToX != 1.0f) {
            sx = mFromX + ((mToX - mFromX) * interpolatedTime);
        }
        if (mFromY != 1.0f || mToY != 1.0f) {
            sy = mFromY + ((mToY - mFromY) * interpolatedTime);
        }

        if (mPivotX == 0 && mPivotY == 0) {
            t.getMatrix().setScale(sx, sy);
        } else {
            t.getMatrix().setScale(sx, sy, scale * mPivotX, scale * mPivotY);
        }
    }
由源碼可知最後動畫還是通過矩陣變換來實現的。這裡的interpolatedTime表示差值器,這個概念後面會提到,首先,獲取縮放比例,然後,再根據不同時間段獲取不同的sx值,最後通過矩陣變換來設置。 其實這個方法是會和前面提到過的getTransformation()這個方法一起執行起作用的,兩個方法一直執行都動畫結束。下面將會寫一個Demo來演示這點。
前面使用AnimationSet將ScaleAnimation和AlphaAnimation結合起來,那麼我們可不可以自定義一個Animation來實現這個效果呢?答案是肯定的。
a.首先,繼承Animation
public class ScaleAndAlphaAnimation extends Animation
b.接著就是利用構造函數將需要的參數傳遞進來
    public ScaleAndAlphaAnimation(float fromX, float toX, float fromY, float toY,float fromAlpha, float toAlpha){
        this.mFromX = fromX ;
        this.mFromY = fromY ;
        this.mToX = toX;
        this.mToY = toY ;
        this.mFromAlpha = fromAlpha ;
        this.mToAlpha = toAlpha ;
        System.out.println("ScaleAndAlphaAnimation.ScaleAndAlphaAnimation()");
    }
c.最後就是復寫applyTransformation方法了,這裡我是參照ScaleAnimation和AlphaAnimation源碼來寫的
    @SuppressLint("NewApi") @Override
    protected void applyTransformation(float interpolatedTime, Transformation t) {
        //縮放動畫設置
        float sx = 1.0f;
        float sy = 1.0f;
        float scale = getScaleFactor();
        if (mFromX != 1.0f || mToX != 1.0f) {
            sx = mFromX + ((mToX - mFromX) * interpolatedTime);
        }
        if (mFromY != 1.0f || mToY != 1.0f) {
            sy = mFromY + ((mToY - mFromY) * interpolatedTime);
        }
        t.getMatrix().setScale(sx, sy);
        //透明度動畫設置
        final float alpha = mFromAlpha;
        t.setAlpha(alpha + ((mToAlpha - alpha) * interpolatedTime));
        System.out.println("ScaleAndAlphaAnimation.applyTransformation()");
        //        這在scaleanimation源碼中代表縮放中心掉的位置
        //      if (mPivotX == 0 && mPivotY == 0) {
        //            t.getMatrix().setScale(sx, sy);
        //         }
        //        else {
        //            t.getMatrix().setScale(sx, sy, scale * mPivotX, scale * mPivotY);
        //         }
                }
全部代碼
    public class ScaleAndAlphaAnimation extends Animation{

        private float mFromX ;
        private float mFromY ;
        private float mToX ;
        private float mToY ;
        private float mFromAlpha ;
        private float mToAlpha ;
        //縮放比例
        private float scale = 1 ;

        public ScaleAndAlphaAnimation(float fromX, float toX, float fromY, float toY,float fromAlpha, float toAlpha){
            this.mFromX = fromX ;
            this.mFromY = fromY ;
            this.mToX = toX;
            this.mToY = toY ;
            this.mFromAlpha = fromAlpha ;
            this.mToAlpha = toAlpha ;
            System.out.println("ScaleAndAlphaAnimation.ScaleAndAlphaAnimation()");
        }

        @SuppressLint("NewApi") @Override
        protected void applyTransformation(float interpolatedTime, Transformation t) {
            //縮放動畫設置
            float sx = 1.0f;
            float sy = 1.0f;
            float scale = getScaleFactor();
            if (mFromX != 1.0f || mToX != 1.0f) {
                sx = mFromX + ((mToX - mFromX) * interpolatedTime);
            }
            if (mFromY != 1.0f || mToY != 1.0f) {
                sy = mFromY + ((mToY - mFromY) * interpolatedTime);
            }
            t.getMatrix().setScale(sx, sy);
            //透明度動畫設置
            final float alpha = mFromAlpha;
            t.setAlpha(alpha + ((mToAlpha - alpha) * interpolatedTime));
            System.out.println("ScaleAndAlphaAnimation.applyTransformation()");
    //        這在scaleanimation源碼中代表縮放中心掉的位置
    //      if (mPivotX == 0 && mPivotY == 0) {
    //            t.getMatrix().setScale(sx, sy);
    //         }
    //        else {
    //            t.getMatrix().setScale(sx, sy, scale * mPivotX, scale * mPivotY);
    //         }
            }


        @Override
        public boolean getTransformation(long currentTime,
                Transformation outTransformation) {
            System.out.println("ScaleAndAlphaAnimation.getTransformation()");
            return super.getTransformation(currentTime, outTransformation);
        }

        @SuppressLint("NewApi") @Override
        protected float getScaleFactor() {
            return 0.5f;
        }


        @Override
        public void initialize(int width, int height, int parentWidth,
                int parentHeight) {
            super.initialize(width, height, parentWidth, parentHeight);
            System.out.println("ScaleAndAlphaAnimation.initialize()");
        }
    }
log輸出如下:從這裡可以看出,這幾個方法執行的順序是
構造函數–>initialize()–>接著就是applyTransformation()和getTransformation()的重復執行到動畫結束了。(先applyTransformation()後getTransformation())
    07-12 06:42:57.958: I/System.out(4992): ScaleAndAlphaAnimation.ScaleAndAlphaAnimation()
    07-12 06:42:57.958: I/System.out(4992): ScaleAndAlphaAnimation.initialize()
    07-12 06:42:57.958: I/System.out(4992): ScaleAndAlphaAnimation.applyTransformation()
    07-12 06:42:57.958: I/System.out(4992): ScaleAndAlphaAnimation.getTransformation()
    07-12 06:42:57.958: I/System.out(4992): ScaleAndAlphaAnimation.applyTransformation()
    07-12 06:42:57.968: I/System.out(4992): ScaleAndAlphaAnimation.getTransformation()
    07-12 06:42:57.968: I/System.out(4992): ScaleAndAlphaAnimation.applyTransformation()
    07-12 06:42:57.998: I/System.out(4992): ScaleAndAlphaAnimation.getTransformation()
    07-12 06:42:57.998: I/System.out(4992): ScaleAndAlphaAnimation.applyTransformation()
    07-12 06:42:58.028: I/System.out(4992): ScaleAndAlphaAnimation.getTransformation()
OK,這篇就介紹到這裡,下篇繼續分析動畫。
源碼將會在下篇一起給。
 Android設計之美:MVP模式創建輪播圖(Banner)
准備工作:利用github第三方添加輪播圖 基於MVP模式搭建架構 調試添加輪播圖:可參考:github輪播圖Banner添加依賴://添加Retrofit的依賴和Gli
 android 自定義狀態欄和導航欄分析與實現
效果 android 4.4之後,系統是支持自定義狀態欄和導航欄的,舉個最典型的例子就是bilibili客戶端了(iOS版本和android版本能用兩套完全不一樣符合各
 Android自定義Toast
沒什麼技術難點,照著api做的。 這是效果圖 我們先對Toast自定義一個布局: 下面是關鍵代碼,我
 Android 後台服務簡要概述
本篇文章主要講述android servivce相關知識,其中會穿插一些其他的知識點,作為初學者的教程。老鳥繞路本文會講述如下內容:- 為什麼要用Service- Ser
 android listview scroll滑屏顯示sqlite分頁,類似聊天記錄,listview動態添加sqlite分頁數據
前言:最近做基於openfire聊天(仿QQ、微信)翻頁查看聊天記錄,為