編輯:關於Android編程
這一節我們介紹第三個用適配器的控件,ExpandableListView可折疊列表。這個控件可以實現我們在QQ中非常常見好友分組功能,ExpandableListView是ListView的子類,用法跟ListView差不多,下面我們來學習這個控件的基本使用:
常用屬性:
android:childDivider:指定各組內子類表項之間的分隔條,圖片不會完全顯示,分離子列表項的是一條直線 android:childIndicator:顯示在子列表旁邊的Drawable對象,可以是一個圖像 android:childIndicatorEnd:子列表項指示符的結束約束位置 android:childIndicatorLeft:子列表項指示符的左邊約束位置 android:childIndicatorRight:子列表項指示符的右邊約束位置 android:childIndicatorStart:子列表項指示符的開始約束位置 android:groupIndicator:顯示在組列表旁邊的Drawable對象,可以是一個圖像 android:indicatorEnd:組列表項指示器的結束約束位置 android:indicatorLeft:組列表項指示器的左邊約束位置 android:indicatorRight:組列表項指示器的右邊約束位置 android:indicatorStart:組列表項指示器的開始約束位置實現ExpandableAdapter的三種方式:
自定義類繼承BaseExpandableListAdpter實現ExpandableAdapter。 使用SimpleExpandableListAdpater將兩個List集合包裝成ExpandableAdapter 使用simpleCursorTreeAdapter將Cursor中的數據包裝成SimpleCuroTreeAdapter在這裡,我們使用的是第一種方式,自定義一個類,實現BaseExpandableListAdapter,下面看具體實現:
布局代碼:
item_group
item_child
activity_main布局
自定義適配器代碼:
package com.example.expandablelistviewdemo;

import android.content.Context;
import android.view.LayoutInflater;
import android.view.View;
import android.view.ViewGroup;
import android.widget.BaseExpandableListAdapter;
import android.widget.ImageView;
import android.widget.TextView;

import java.util.List;

/**
 * Created by Devin on 2016/7/12.
 */
public class CustomAdapter extends BaseExpandableListAdapter {

private List groupList;
private List> childList;
private Context mContext;

public CustomAdapter(Context mContext, List groupList, List> childList) {
    this.mContext = mContext;
    this.groupList = groupList;
    this.childList = childList;
}

/**
 * Gets the number of groups.
 *
 * @return
 */
@Override
public int getGroupCount() {
    return groupList.size();
}

/**
 * Gets the number of children in a specified group.
 *
 * @param i
 * @return
 */
@Override
public int getChildrenCount(int i) {
    return childList.get(i).size();
}

/**
 * Gets the data associated with the given group
 *
 * @param i
 * @return
 */
@Override
public Object getGroup(int i) {
    return groupList.get(i);
}

/**
 * Gets the data associated with the given child within the given group.
 *
 * @param i
 * @param i1
 * @return
 */
@Override
public Object getChild(int i, int i1) {
    return childList.get(i).get(i1);
}

/**
 * Gets the ID for the group at the given position.
 *
 * @param i
 * @return
 */
@Override
public long getGroupId(int i) {
    return i;
}

/**
 * Gets the ID for the given child within the given group.
 *
 * @param i
 * @param i1
 * @return
 */
@Override
public long getChildId(int i, int i1) {
    return i1;
}

/**
 * Indicates whether the child and group IDs are stable across changes to the underlying data.
 *
 * @return
 */
@Override
public boolean hasStableIds() {
    return false;
}

/**
 * Gets a View that displays the given group
 *
 * @param i
 * @param b
 * @param view
 * @param viewGroup
 * @return
 */
@Override
public View getGroupView(int i, boolean b, View view, ViewGroup viewGroup) {
    GroupViewHolder groupViewHolder = null;
    if (view == null) {
        view = LayoutInflater.from(mContext).inflate(R.layout.item_group, viewGroup, false);
        groupViewHolder = new GroupViewHolder();
        groupViewHolder.tv_group_name = (TextView) view.findViewById(R.id.tv_group_name);
        view.setTag(groupViewHolder);
    } else {
        groupViewHolder = (GroupViewHolder) view.getTag();
    }
    groupViewHolder.tv_group_name.setText(groupList.get(i).getGroupName());
    return view;
}

/**
 * Gets a View that displays the data for the given child within the given group.
 *
 * @param i
 * @param i1
 * @param b
 * @param view
 * @param viewGroup
 * @return
 */
@Override
public View getChildView(int i, int i1, boolean b, View view, ViewGroup viewGroup) {
    ChildViewHolder childViewHolder = null;
    if (view == null) {
        view = LayoutInflater.from(mContext).inflate(R.layout.item_child, viewGroup, false);
        childViewHolder = new ChildViewHolder();
        childViewHolder.iv_child_icon = (ImageView) view.findViewById(R.id.iv_child_icon);
        childViewHolder.tv_child_name = (TextView) view.findViewById(R.id.tv_child_name);
        view.setTag(childViewHolder);
    } else {
        childViewHolder = (ChildViewHolder) view.getTag();
    }
    childViewHolder.iv_child_icon.setImageResource(R.mipmap.ic_launcher);
    childViewHolder.tv_child_name.setText(childList.get(i).get(i1).getChildName());
    return view;
}

/**
 * 這個方法需要返回true,不然不能實現子節點的點擊事件
 * Whether the child at the specified position is selectable.
 *
 * @param i
 * @param i1
 * @return
 */
@Override
public boolean isChildSelectable(int i, int i1) {
    return true;
}

private static class GroupViewHolder {
    TextView tv_group_name;
}

private static class ChildViewHolder {
    ImageView iv_child_icon;
    TextView tv_child_name;
}
}
兩個普通javaBean代碼:
package com.example.expandablelistviewdemo;

/**
 * Created by Devin on 2016/7/12.
 */
public class Group {
private String groupName;

public Group() {
}

public Group(String groupName) {
    this.groupName = groupName;
}

public String getGroupName() {
    return groupName;
}

public void setGroupName(String groupName) {
    this.groupName = groupName;
}
}
package com.example.expandablelistviewdemo;

/**
 * Created by Devin on 2016/7/12.
 */
public class Child {
private String childName;

public Child() {
}

public Child(String childName) {
    this.childName = childName;
}


public String getChildName() {
    return childName;
}

public void setChildName(String childName) {
    this.childName = childName;
}
}
最後是activity代碼:
package com.example.expandablelistviewdemo;

import android.support.v7.app.AppCompatActivity;
import android.os.Bundle;
import android.view.View;
import android.widget.ExpandableListView;
import android.widget.Toast;

import java.util.ArrayList;
import java.util.List;

public class MainActivity extends AppCompatActivity {
private List groupList;
private List> childList;
private ExpandableListView ex_list;
private CustomAdapter customAdapter;

@Override
protected void onCreate(Bundle savedInstanceState) {
    super.onCreate(savedInstanceState);
    setContentView(R.layout.activity_main);
    ex_list = (ExpandableListView) findViewById(R.id.ex_list);
    initData();
    customAdapter = new CustomAdapter(this, groupList, childList);
    ex_list.setAdapter(customAdapter);
    //子節點的點擊事件
    ex_list.setOnChildClickListener(new ExpandableListView.OnChildClickListener() {
        @Override
        public boolean onChildClick(ExpandableListView expandableListView, View view, int i, int i1, long l) {
            Toast.makeText(MainActivity.this, "你點擊的是:" + childList.get(i).get(i1).getChildName(), Toast.LENGTH_SHORT).show();
            return true;
        }
    });
}

private void initData() {
    groupList = new ArrayList<>();
    childList = new ArrayList<>();

    groupList.add(new Group("載貨汽車"));
    groupList.add(new Group("越野汽車"));
    groupList.add(new Group("自卸汽車"));
    groupList.add(new Group("專用汽車"));
    groupList.add(new Group("客車"));
    groupList.add(new Group("牽引車"));
    groupList.add(new Group("轎車"));
    groupList.add(new Group("半掛車"));


    List child1 = new ArrayList<>();
    child1.add(new Child("微型貨車"));
    child1.add(new Child("輕型貨車"));
    child1.add(new Child("中型貨車"));
    child1.add(new Child("重型貨車"));
    childList.add(child1);

    List child2 = new ArrayList<>();
    child2.add(new Child("輕型越野車"));
    child2.add(new Child("中型越野車"));
    child2.add(new Child("重型越野車"));
    child2.add(new Child("超重型越野車"));
    childList.add(child2);

    List child3 = new ArrayList<>();
    child3.add(new Child("輕型自卸車"));
    child3.add(new Child("中型自卸車"));
    child3.add(new Child("重型自卸車"));
    child3.add(new Child("礦用自卸車"));
    childList.add(child3);

    List child4 = new ArrayList<>();
    child4.add(new Child("箱式汽車"));
    child4.add(new Child("罐式汽車"));
    child4.add(new Child("起重舉升車"));
    child4.add(new Child("倉柵式車"));
    child4.add(new Child("特種結構車"));
    child4.add(new Child("專用自卸車"));
    childList.add(child4);


    List child5 = new ArrayList<>();
    child5.add(new Child("微型客車"));
    child5.add(new Child("輕型客車"));
    child5.add(new Child("中型客車"));
    child5.add(new Child("大型客車"));
    child5.add(new Child("特大型客車"));
    childList.add(child5);

    List child6 = new ArrayList<>();
    child6.add(new Child("半掛牽引車"));
    child6.add(new Child("全掛牽引車"));
    childList.add(child6);

    List child7 = new ArrayList<>();
    child7.add(new Child("微型轎車"));
    child7.add(new Child("普通級轎車"));
    child7.add(new Child("中級轎車"));
    child7.add(new Child("中高級轎車"));
    child7.add(new Child("高級轎車"));
    childList.add(child7);

    List child8 = new ArrayList<>();
    child8.add(new Child("輕型半掛車"));
    child8.add(new Child("中型半掛車"));
    child8.add(new Child("重型半掛車"));
    child8.add(new Child("超重半掛車"));
    childList.add(child8);
}
}
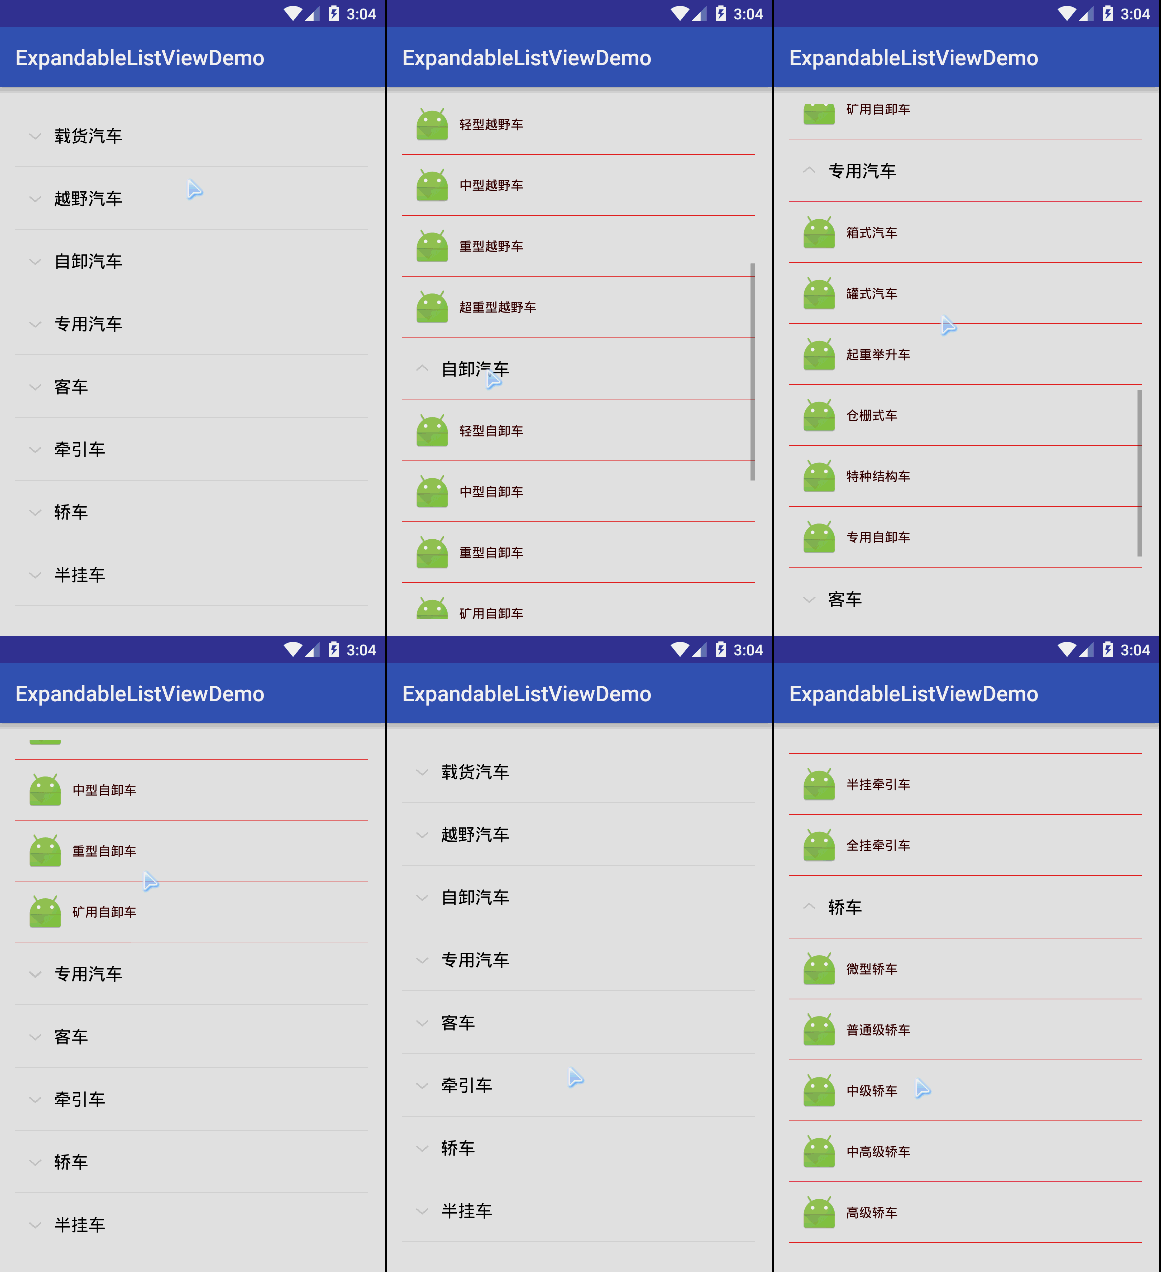
最終實現效果圖:

ExpandableListView控件就簡單介紹到這裡,這裡只是基本的實現,有需求的可以擴展。
照例附上國內鏡像API
下面我們學習另外一個控件StackView棧視圖
stackView是一個將一組View逐個展示給用戶的控件,它是一組view的集合,這些view一個壓著一個,view之間可以進行隨意切換。下面我們通過實例了解StackView的使用方法
布局文件代碼:
Activity代碼:
package com.example.expandablelistviewdemo;

import android.content.Context;
import android.graphics.Color;
import android.os.Bundle;
import android.support.annotation.Nullable;
import android.support.v7.app.AppCompatActivity;
import android.view.View;
import android.view.ViewGroup;
import android.widget.BaseAdapter;
import android.widget.Button;
import android.widget.LinearLayout;
import android.widget.StackView;

/**
 * Created by Devin on 2016/7/12.
 */
public class StackViewActivity extends AppCompatActivity {
private StackView sk;
private Button btn_previous;
private Button btn_next;
private int[] mColors = {Color.BLUE, Color.CYAN, Color.GRAY, Color.GREEN, Color.RED};

@Override
protected void onCreate(@Nullable Bundle savedInstanceState) {
    super.onCreate(savedInstanceState);
    setContentView(R.layout.activity_stackview);
    sk = (StackView) findViewById(R.id.sk);
    btn_next = (Button) findViewById(R.id.btn_next);
    btn_previous = (Button) findViewById(R.id.btn_previous);
    ColorAdapter adapter = new ColorAdapter(getApplicationContext(), mColors);
    sk.setAdapter(adapter);
    btn_previous.setOnClickListener(new View.OnClickListener() {
        @Override
        public void onClick(View view) {
            sk.showPrevious();
        }
    });
    btn_next.setOnClickListener(new View.OnClickListener() {
        @Override
        public void onClick(View view) {
            sk.showNext();
        }
    });
}

/**
 * 自定義適配器
 */
private class ColorAdapter extends BaseAdapter {

    private Context mContext;

    private int[] mColors;

    public ColorAdapter(Context context, int[] colors) {
        mContext = context;
        mColors = colors;
    }

    public int getCount() {
        return mColors == null ? 0 : mColors.length;
    }

    public Object getItem(int position) {
        return mColors == null ? null : mColors[position];
    }

    public long getItemId(int position) {
        return position;
    }

    public View getView(int position, View view, ViewGroup parent) {
        LinearLayout.LayoutParams colorLayoutParams = new LinearLayout.LayoutParams(400, 400);

        LinearLayout colorLayout = new LinearLayout(mContext);
        colorLayout.setBackgroundColor(mColors[position]);
        colorLayout.setLayoutParams(colorLayoutParams);

        return colorLayout;
    }
}
}
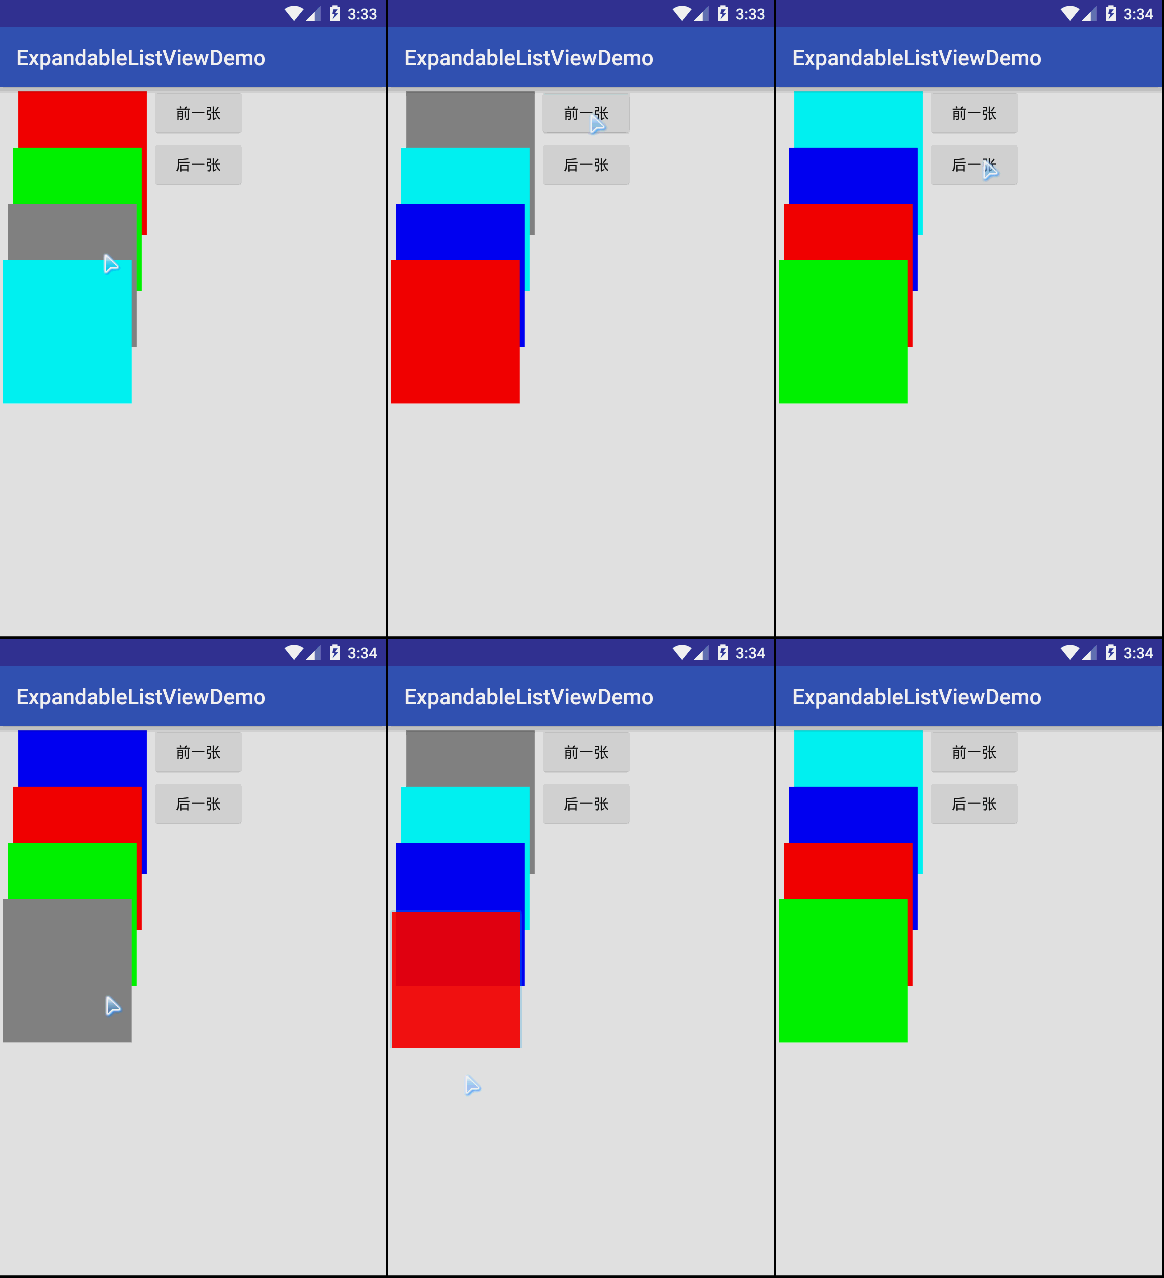
最後實現效果圖

可以通過手勢拖拽切換,也可以點擊按鈕切換。StackView就簡單介紹到這裡,有需求的同學可以擴展,可以實現比較好的效果。StackView是androidAPI3.0以後的。
 引用Android Design包出現的錯誤
在用Android Studio開發的過程中,一遇到廢棄、不被推薦的方法和類,我就想做點什麼去掉上面的橫線。然後,被一個不是問題的問題困擾了很久。之前我們在創建固定Tab
 制作一個簡單的新聞客戶端
前面介紹了在Android中實現網絡通信,這篇文章將是對前面介紹的技術的一個綜合運用,制作一個簡單的新聞客戶端,在這個新聞客戶端中用到了ListView、ListView
 Android 自定義SeekBar,讓進度條變得個性起來
許多應用可能需要加入進度,例如下載、播放視頻、音頻、讀取數據庫等等,都需要一個等待狀態的進度條。原生的進度條的確不美觀,今天這篇小案例,就讓咱們的進度條“靓起
 發現----Android Demo
時間悄悄的走,轉眼來實習已經三個月了,三個月的時間,小編慢慢的成長著,從剛開始的電商項目到現在的車段子項目,小編在走過一個又一個項目的同時,走過了一個又一個戰勝自己的奇跡