一、概述
每一個應用程序默認的標題欄(注意與狀態欄的區別)只有一行文字(新建工程時的名字),而且顏色、大小等都是固定的,給人的感覺比較單調。但當程序需要美化的時候,那麼修改標題欄是就是其中一項內容,雖然Android已經定義了很多樣式資源,但更多時候我們需要使用的是自己定義的樣式。
二、要求
使用自己定義的樣式來修改程序的標題欄。
三、實現
新建工程MyTitle,不用修改main.xml文件,在/res/layout目錄下新建布局文件title.xml,在裡面添加一個TextView和一個Button,完整的title.xml文件如下:
代碼如下
android:layout_width="fill_parent"
android:layout_height="match_parent"
android:orientation="horizontal"
>
android:layout_width="wrap_content"
android:layout_height="wrap_content"
android:text="這是定制的標題欄"
android:textStyle="bold"
android:textColor="#FFFF0000"
/>
android:id="@+id/button"
android:layout_width="wrap_content"
android:layout_height="wrap_content"
android:text="點我"
/>
在/res/values目錄下新建titlestyle.xml文件,在裡面定義兩個style,一個用來修改標題欄的大小,一個用來修改標題欄的背景顏色,如下:
代碼如下
#FF0000FF
40dip
@style/TitleBackgroundColor
修改AndroidManifest.xml文件,在application標簽下添加一行:
代碼如下
android:theme="@style/titlestyle"
最後,修改MyTitleActivity.java文件,設置使用自定義的標題欄,實現Button按鈕的監聽,如下:
代碼如下
package com.nan.title;
import android.app.Activity;
import android.os.Bundle;
import android.view.View;
import android.view.Window;
import android.widget.Button;
import android.widget.Toast;
public class MyTitleActivity extends Activity
{
private Button mButton = null;
/** Called when the activity is first created. */
@Override
public void onCreate(Bundle savedInstanceState)
{
super.onCreate(savedInstanceState);
//使用自定義標題欄
requestWindowFeature(Window.FEATURE_CUSTOM_TITLE);
setContentView(R.layout.main);
//使用布局文件來定義標題欄
getWindow().setFeatureInt(Window.FEATURE_CUSTOM_TITLE, R.layout.title);
mButton = (Button)this.findViewById(R.id.button);
//按鈕監聽
mButton.setOnClickListener(new View.OnClickListener()
{
@Override
public void onClick(View v)
{
// TODO Auto-generated method stub
displayToast("Clicked!");
}
});
}
//顯示Toast函數
private void displayToast(String s)
{
Toast.makeText(this, s, Toast.LENGTH_SHORT).show();
}
}
注意上面程序的第20~23行的順序不能調亂。
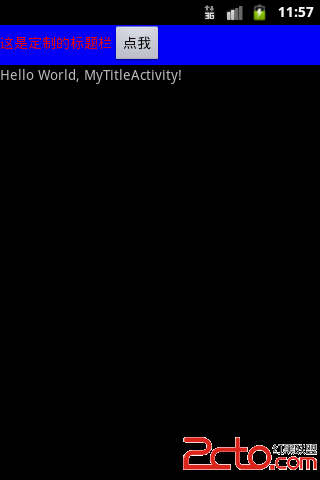
運行該程序:
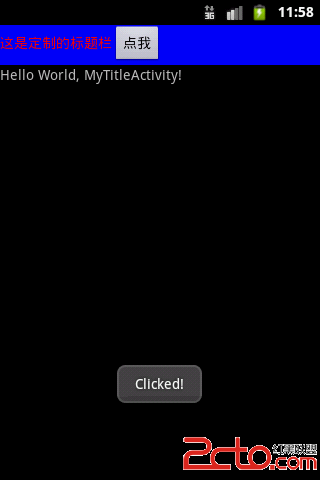
點擊一下“點我”按鈕:


 Android service進程保護
 Android studio導入開源項目
 Android學習路線(十二)Activity生命周期——啟動一個Activity
 Android學習路線(十三)Activity生命周期——停止和恢復(Pausing and Resuming )一個Activity