編輯:關於Android編程
Bluetooth
Android平台包括藍牙網絡協議棧,它允許設備以無線方式與其他藍牙設備進行數據交換的支持。應用程序框架提供了訪問通過Android藍牙API的藍牙功能。這些API使應用程序無線方式連接到其它藍牙設備,實現點對點和多點無線功能。
使用藍牙的API,Android應用程序可以執行以下操作:
掃描其他藍牙設備
查詢本地藍牙適配器配對的藍牙設備
建立RFCOMM通道
連接到通過服務發現其他設備
傳送數據和從其他設備
管理多個連接
本文介紹如何使用傳統藍牙。經典藍牙是有關電池密集型操作,如流媒體和Android設備之間的通信是正確的選擇。對於低功耗的要求藍牙設備的Andr??oid 4.3(API等級18)引入了低功耗藍牙API支持。要了解更多信息,請參閱藍牙低功耗。
基礎
本文介紹了如何使用Android的藍牙API來完成必要的四大任務,使用藍牙通信:建立藍牙,發現要麼在當地配對或可用,連接設備的設備和設備之間的數據傳輸。
所有藍牙API都是在android.bluetooth封裝。這裡有您需要創建藍牙連接的類和接口的摘要:
BluetoothAdapter
代表本地藍牙適配器(藍牙無線電)。該BluetoothAdapter是入口點所有藍牙互動。利用這一點,你會發現其他藍牙設備,查詢保稅(配對)的設備列表,使用已知的MAC地址實例化一個BluetoothDevice類,並創建一個BluetoothServerSocket監聽來自其他設備的通信。
BluetoothDevice類
表示遠程藍牙設備。使用這個請求通過繞裝置的BluetoothSocket或查詢的信息與遠程設備的連接,如它的名稱,地址,類別,和結合狀態。
的BluetoothSocket
表示為藍牙套接字接口(類似於TCP插座)。這是連接點,它允許應用程序通過InputStream和OutputStream其它藍牙設備交換數據。
BluetoothServerSocket
表示偵聽傳入請求(類似於TCP ServerSocket的)一個開放的服務器套接字。為了連接兩個Android設備,一台設備必須打開這個類的服務器套接字。當一個遠程藍牙設備建立連接請求到該裝置中,當連接被接受的BluetoothServerSocket將返回一個連接的BluetoothSocket。
BluetoothClass
描述的一般特征和藍牙設備的能力。這是一個只讀設置定義設備的主要和次要設備類和它的服務性質。但是,這並不能可靠地描述了設備支持的所有藍牙配置文件和服務,而且是作為一個提示設備類型非常有用。
BluetoothProfile
表示藍牙配置文件的接口。藍牙配置文件是設備間基於藍牙的通信的無線接口規范。一個例子是免提模式。對於配置文件的詳細討論,請參閱使用配置文件
藍牙耳機
藍牙耳機提供了支持,與手機一起使用。這包括藍牙耳機和免提(V1.5)型材。
BluetoothA2dp
如何定義高品質音頻,可從流一個設備到另一個通過藍牙連接。 “A2DP”代表高級音頻傳輸模式。
BluetoothHealth
表示控制藍牙服務醫療設備規范代理。
BluetoothHealthCallback
您用來實現BluetoothHealth回調的一個抽象類。您必須擴展這個類,並實現回調方法來接收有關在應用程序的注冊狀態和藍牙信道狀態的變化更新。
BluetoothHealthAppConfiguration
表示藍牙醫療第三方應用注冊與遠程藍牙設備的健康通信的應用程序配置。
BluetoothProfile.ServiceListener
該通知時,他們已經被連接到或從服務斷開BluetoothProfile的IPC客戶端的接口(即,運行一個特定的輪廓內部服務)。
藍牙權限
為了使用應用程序中的藍牙功能,您必須聲明藍牙權限藍牙。你需要這個權限才能執行任何藍牙通信,比如請求連接,接受連接,傳輸數據。
如果你希望你的應用程序來啟動設備發現或操縱藍牙設置,您還必須聲明BLUETOOTH_ADMIN許可。大多數應用程序需要這個權限僅用於發現本地的藍牙設備的能力。通過此權限授予其他的能力不應該被使用,除非應用程序是一個“電源管理”,將根據用戶的請求修改藍牙設置。注:如果您使用BLUETOOTH_ADMIN許可,則還必須具備藍牙權限。
聲明在您的應用程序清單文件的藍牙權限(S)。例如:
請參閱有關聲明應用程序權限的詳細信息<使用許可權>引用。...
BluetoothAdapter mBluetoothAdapter = BluetoothAdapter.getDefaultAdapter();
if (mBluetoothAdapter == null) {
  // Device does not support Bluetooth
}
啟用藍牙
if (!mBluetoothAdapter.isEnabled()) {
  Intent enableBtIntent = new Intent(BluetoothAdapter.ACTION_REQUEST_ENABLE);
  startActivityForResult(enableBtIntent, REQUEST_ENABLE_BT);
}
將出現一個對話框,要求用戶權限才能啟用藍牙功能,如圖1。如果用戶回答“是”,系統將開始啟用藍牙,一旦該過程完成後(或失敗),焦點將返回到應用程序。Set所有這一切從BluetoothDevice類對象所需要的,以發起連接的MAC地址。在這個例子中,它的儲存做為所顯示給用戶一個ArrayAdapter的一部分。 MAC地址可在以後以發起連接被提取。您可以了解更多有關創建大約連接設備部分的連接。pairedDevices = mBluetoothAdapter.getBondedDevices(); // If there are paired devices if (pairedDevices.size() > 0) { // Loop through paired devices for (BluetoothDevice device : pairedDevices) { // Add the name and address to an array adapter to show in a ListView mArrayAdapter.add(device.getName() + "\n" + device.getAddress()); } }
// Create a BroadcastReceiver for ACTION_FOUND
private final BroadcastReceiver mReceiver = new BroadcastReceiver() {
  public void onReceive(Context context, Intent intent) {
    String action = intent.getAction();
    // When discovery finds a device
    if (BluetoothDevice.ACTION_FOUND.equals(action)) {
      // Get the BluetoothDevice object from the Intent
      BluetoothDevice device = intent.getParcelableExtra(BluetoothDevice.EXTRA_DEVICE);
      // Add the name and address to an array adapter to show in a ListView
      mArrayAdapter.add(device.getName() + "\n" + device.getAddress());
    }
  }
};
// Register the BroadcastReceiver
IntentFilter filter = new IntentFilter(BluetoothDevice.ACTION_FOUND);
registerReceiver(mReceiver, filter); // Don't forget to unregister during onDestroy
所有這一切從BluetoothDevice類對象所需要的,以發起連接的MAC地址。在這個例子中,它的儲存做為所顯示給用戶一個ArrayAdapter的一部分。 MAC地址可在以後以發起連接被提取。您可以了解更多有關創建大約連接設備部分的連接。Intent discoverableIntent = new Intent(BluetoothAdapter.ACTION_REQUEST_DISCOVERABLE); discoverableIntent.putExtra(BluetoothAdapter.EXTRA_DISCOVERABLE_DURATION, 300); startActivity(discoverableIntent);將顯示一個對話框,要求用戶權限,使設備可發現,如圖2。如果用戶回答“是”,則該設備將成為發現了指定的時間量。那麼你的活動將接收呼叫到的onActivityResult())回調,結果代碼等於該設備是可發現的持續時間。如果用戶回答“否”,或者如果發生錯誤,結果代碼將被RESULT_CANCELED。
連接設備
為了創建兩個設備上的應用程序之間的連接,必須同時實現服務器端和客戶端的機制,因為一台設備必須打開一個服務器套接字,另一個必須發起連接(使用服務器設備的MAC地址啟動連接)。服務器和客戶端被認為是相互連接時,他們每個人都有在同一個RFCOMM通道連接的BluetoothSocket。在這一點上,每個設備都可以獲取輸入和輸出流和數據傳輸可以開始,這是在大約管理一個連接的部分討論。本節將介紹如何啟動兩個設備之間的連接。
服務器設備和客戶端設備的每個獲得以不同的方式所需的BluetoothSocket。服務器將收到它時,傳入的連接被接受。當它打開一個RFCOMM通道到服務器的客戶端將收到它。

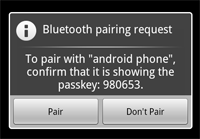
圖3:藍牙配對對話框。
一種實現方法是自動准備每個設備作為服務器,讓每個人都有一台服務器套接字打開並偵聽連接。然後或者可以發起與其他的連接,並成為客戶端。另外,一台設備可以明確的“主機”的連接,並打開需求的服務器插座和其他設備可以簡單地啟動連接。
注意:如果兩個設備都沒有進行過配對,那麼Android框架會自動顯示在連接過程中的配對請求通知或對話框給用戶,作為嘗試連接的設備所以當如圖3所示,你的應用程序不需要關注設備是否被配對。你的RFCOMM連接嘗試將阻塞,直到用戶已成功配對,或者如果用戶拒絕配對,如果配對失敗或者超時就會失敗。
連接作為服務器
當你想連接兩個設備,一個必須由持開放BluetoothServerSocket充當服務器。服務器套接字的目的是監聽傳入的連接請求和當一個被接受時,提供一個連接的BluetoothSocket。當的BluetoothSocket從BluetoothServerSocket獲得的,該BluetoothServerSocket可以(也應該)被丟棄,除非你想接受更多的連接。
關於UUID
通用唯一標識符(UUID)是用來唯一標識信息的字符串ID標准化的128位格式。一個UUID的一點是,它足夠大,你可以選擇任何隨機的,也不會發生沖突。在這種情況下,它是用來唯一標識應用程序的藍牙服務。要獲得UUID與你的應用程序中使用,則可以使用Web上的許多隨機UUID生成器之一,則初始化fromString(String)將UUID。
這裡是基本的程序建立一個服務器套接字並接受連接:
通過調用listenUsingRfcommWithServiceRecord(字符串,UUID)獲取BluetoothServerSocket。
該字符串是你的服務,系統會自動寫入到一個新的服務發現協議在設備上(SDP)數據庫條目的識別名稱(名稱是任意的,可以簡單地將您的應用程序名稱)。的UUID也包含在SDP條目和將用於與所述客戶端設備的連接協定的基礎。也就是說,當客戶端試圖與此設備連接,其將攜帶唯一標識與它要連接的服務一個UUID。這些的UUID必須以使連接被接受(在下一步驟)相匹配。
開始通過調用accept()方法監聽連接請求。
這是一個阻塞調用。當任一連接被接受或者已經發生異常它將返回。一個連接被接受,只有當遠程設備已派出匹配與此監聽套接字服務器中注冊的一個UUID的連接請求。如果成功,accept()方法將返回一個連接的BluetoothSocket。
除非你想接受更多的連接,調用close()。
這將釋放服務器插槽及其所有資源,但不會關閉一個已經被接受返回的連接的BluetoothSocket()。不像TCP / IP,RFCOMM只允許每個通道的一個連接的客戶端的時間,因此,在大多數情況下,它是有道理的接受連接套接字後立即關閉()的調用BluetoothServerSocket。
的接受()調用不應該在主活動UI線程,因為它是一個阻塞調用,並防止與應用程序的任何其它交互來執行。它通常情理之中的事了BluetoothServerSocket或全部的BluetoothSocket工作,你的應用程序管理的一個新的線程。要中止阻塞調用,如接受(),從另一個線程調用clZ喎?/kf/ware/vc/" target="_blank" class="keylink">vc2WjqKOp1NpCbHVldG9vdGhTZXJ2ZXJTb2NrZXSjqLvytcRCbHVldG9vdGhTb2NrZXSjqbrN1+jI+7X308O9q8GivLS3tbvYoaPQ6NKq16LS4rXEysfU2kJsdWV0b290aFNlcnZlclNvY2tldLvytcRCbHVldG9vdGhTb2NrZXS1xMv509C3vbeoysfP37PMsLLIq7XEoaM8YnI+Cjxicj4KPGJyPgrA/Txicj4KPGJyPgo8YnI+Cs/Cw+bKx73Tyty0q8jrway907XEt/7O8cb31+m8/rXEvPK7r7Dmsb6jujxicj4KPC9wPgo8cD48L3A+CjxwcmUgY2xhc3M9"brush:java;">private class AcceptThread extends Thread {
private final BluetoothServerSocket mmServerSocket;
public AcceptThread() {
// Use a temporary object that is later assigned to mmServerSocket,
// because mmServerSocket is final
BluetoothServerSocket tmp = null;
try {
// MY_UUID is the app's UUID string, also used by the client code
tmp = mBluetoothAdapter.listenUsingRfcommWithServiceRecord(NAME, MY_UUID);
} catch (IOException e) { }
mmServerSocket = tmp;
}
public void run() {
BluetoothSocket socket = null;
// Keep listening until exception occurs or a socket is returned
while (true) {
try {
socket = mmServerSocket.accept();
} catch (IOException e) {
break;
}
// If a connection was accepted
if (socket != null) {
// Do work to manage the connection (in a separate thread)
manageConnectedSocket(socket);
mmServerSocket.close();
break;
}
}
}
/** Will cancel the listening socket, and cause the thread to finish */
public void cancel() {
try {
mmServerSocket.close();
} catch (IOException e) { }
}
}
在本實施例中,只有一個傳入的連接是需要的,所以只要一個連接被接受以及的BluetoothSocket被獲取時,應用程序發送所獲取的BluetoothSocket到一個單獨的線程,關閉BluetoothServerSocket並中斷環路。
需要注意的是accept()返回的BluetoothSocket的時候,插座已連接,所以你不應該調用connect()(當你從客戶端做的)。
管理器連接插座()是在將啟動該線程用於傳送數據,這是在大約管理一個連接部分中所討論的應用的一個虛構的方法。
通常你應該盡快關閉BluetoothServerSocket為你做偵聽傳入連接。在這個例子中,接近()被盡快的BluetoothSocket獲取調用。您可能還需要提供你的線程公開的方法,可以在你需要停止監聽服務器套接字上的事件關閉的BluetoothSocket私人。
連接作為客戶端
為了與遠程設備(設備保持一個開放的服務器套接字)的連接,您必須首先獲取表示遠程設備BluetoothDevice類的對象。 (獲取一個BluetoothDevice類是覆蓋在關於查找設備上面的部分。)然後,您必須使用BluetoothDevice類收購的BluetoothSocket,並啟動連接。
這裡的基本步驟:
使用BluetoothDevice類,通過調用createRfcommSocketToServiceRecord(UUID)獲得的BluetoothSocket。
這一個初始化的BluetoothSocket將連接到BluetoothDevice類。這裡傳遞的UUID必須開業時其BluetoothServerSocket(帶listenUsingRfcommWithServiceRecord(字符串,UUID))由服務器設備使用的UUID相匹配。使用相同的UUID是一個簡單的硬編碼的UUID字符串到您的應用程序,然後從服務器端和客戶端的代碼都引用它的問題。
啟動通過調用連接的連接()。
在此呼叫時,系統會以匹配的UUID遠程設備上執行的SDP查找。如果查找成功與遠程設備接受連接,它會共享連接過程中使用和connect()將返回RFCOMM通道。這種方法是一個阻塞調用。如果因任何原因,連接失敗或者connect()方法超時(約12秒後),那麼它會拋出異常。
由於連接()是一個阻塞調用,這個連接過程應始終在一個線程執行從主線程的活動分開。
注意:您應始終確保設備未進行設備發現,當你調用connect()。如果發現是正在進行中,那麼連接嘗試將顯著減緩,更可能失敗。
例
這裡是發起藍牙連接一個線程的一個基本的例子:
private class ConnectThread extends Thread {
  private final BluetoothSocket mmSocket;
  private final BluetoothDevice mmDevice;

  public ConnectThread(BluetoothDevice device) {
    // Use a temporary object that is later assigned to mmSocket,
    // because mmSocket is final
    BluetoothSocket tmp = null;
    mmDevice = device;

    // Get a BluetoothSocket to connect with the given BluetoothDevice
    try {
      // MY_UUID is the app's UUID string, also used by the server code
      tmp = device.createRfcommSocketToServiceRecord(MY_UUID);
    } catch (IOException e) { }
    mmSocket = tmp;
  }

  public void run() {
    // Cancel discovery because it will slow down the connection
    mBluetoothAdapter.cancelDiscovery();

    try {
      // Connect the device through the socket. This will block
      // until it succeeds or throws an exception
      mmSocket.connect();
    } catch (IOException connectException) {
      // Unable to connect; close the socket and get out
      try {
        mmSocket.close();
      } catch (IOException closeException) { }
      return;
    }

    // Do work to manage the connection (in a separate thread)
    manageConnectedSocket(mmSocket);
  }

  /** Will cancel an in-progress connection, and close the socket */
  public void cancel() {
    try {
      mmSocket.close();
    } catch (IOException e) { }
  }
}
注意到cancelDiscovery()由連接之前被調用。你應該總是連接之前做到這一點,它是安全的,而無需實際檢查它是否正在運行或不調用(但如果你想查詢,調用isDiscovering())。private class ConnectedThread extends Thread {
private final BluetoothSocket mmSocket;
private final InputStream mmInStream;
private final OutputStream mmOutStream;
public ConnectedThread(BluetoothSocket socket) {
mmSocket = socket;
InputStream tmpIn = null;
OutputStream tmpOut = null;
// Get the input and output streams, using temp objects because
// member streams are final
try {
tmpIn = socket.getInputStream();
tmpOut = socket.getOutputStream();
} catch (IOException e) { }
mmInStream = tmpIn;
mmOutStream = tmpOut;
}
public void run() {
byte[] buffer = new byte[1024]; // buffer store for the stream
int bytes; // bytes returned from read()
// Keep listening to the InputStream until an exception occurs
while (true) {
try {
// Read from the InputStream
bytes = mmInStream.read(buffer);
// Send the obtained bytes to the UI activity
mHandler.obtainMessage(MESSAGE_READ, bytes, -1, buffer)
.sendToTarget();
} catch (IOException e) {
break;
}
}
}
/* Call this from the main activity to send data to the remote device */
public void write(byte[] bytes) {
try {
mmOutStream.write(bytes);
} catch (IOException e) { }
}
/* Call this from the main activity to shutdown the connection */
public void cancel() {
try {
mmSocket.close();
} catch (IOException e) { }
}
}
構造函數獲取必要的數據流和執行一次,該線程將等待數據來通過InputStream的。當讀取(字節[])與從流的字節返回時,數據是使用從父類中的成員處理程序發送到主活性。然後它返回,並等待從流更多的字節。BluetoothHeadset mBluetoothHeadset;
// Get the default adapter
BluetoothAdapter mBluetoothAdapter = BluetoothAdapter.getDefaultAdapter();
// Establish connection to the proxy.
mBluetoothAdapter.getProfileProxy(context, mProfileListener, BluetoothProfile.HEADSET);
private BluetoothProfile.ServiceListener mProfileListener = new BluetoothProfile.ServiceListener() {
public void onServiceConnected(int profile, BluetoothProfile proxy) {
if (profile == BluetoothProfile.HEADSET) {
mBluetoothHeadset = (BluetoothHeadset) proxy;
}
}
public void onServiceDisconnected(int profile) {
if (profile == BluetoothProfile.HEADSET) {
mBluetoothHeadset = null;
}
}
};
// ... call functions on mBluetoothHeadset
// Close proxy connection after use.
mBluetoothAdapter.closeProfileProxy(mBluetoothHeadset);
供應商特定的AT命令 Android中launchMode模式詳解
關於Android中launchMode的文章介紹的真心不少,廣為流傳而且介紹的最詳細的莫過於這篇文章http://blog.csdn.net/android_tutor
 Android 檢查更新、下載、安裝功能的實現
android檢查更新、下載、安裝前言:由於友盟更新即將下線,我們就修改了更新邏輯,自己檢查更新、下載、安裝,但是檢查更新還是要依賴於友盟中的在線參數:1.MainAct
 android判斷app前後台狀態
項目中需要在應用從後台切換到前台時做操作,自己實現了功能,但對這塊的機制不太了解,So.找了相關的資料來學習總結下。!!!部分資料來源https://github.com
 Android學習路線(四)構建一個簡單的UI
Android應用的圖形化用戶界面的構建使用的是View 和 ViewGroup 對象的層次嵌套。 View 對象通常是UI部件,例如 buttons 或者 text