編輯:關於Android編程
github地址:https://github.com/JimiSmith/PinnedHeaderListView
關於實現類似聯系人列表,組的頭部總是懸浮在listview最頂部的效果,github上面有兩個比較好的實現,分別是pinnedSectionListview和pinnedHeaderListView,之所以選擇後者進行源碼解析,是因為後者的源碼比較簡單,便於我們理解實現的精髓所在。
如果你想直接實現Android仿聯系人列表分組懸浮列表,
自定義PinnedHeaderListView,看這裡 http://blog.csdn.net/u010335298/article/details/51150346
翻開源碼,我們一共可以找到四個有用的類,分別是:
1. PinnedHeaderListView: 實現組的頭部總是懸浮在頂部的listview
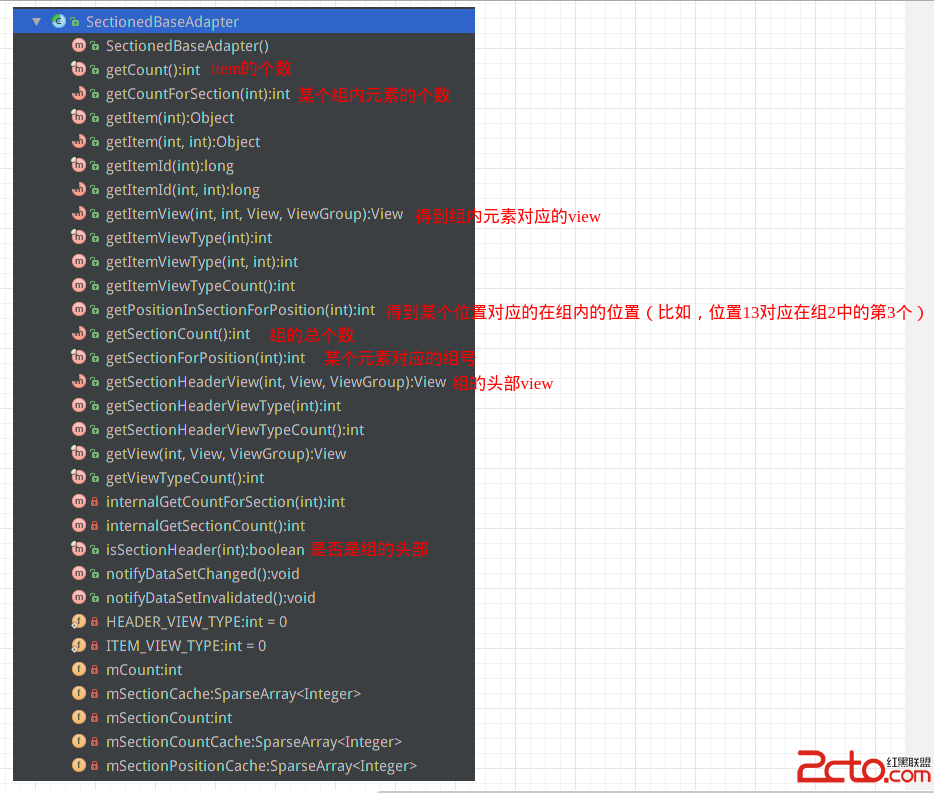
2. SectionedBaseAdapter: 封裝的adapter的抽象類
3. PinnedHeaderListViewMainActivity: 具體使用的activity
4. TestSectionedAdapter: 實現了抽象類SectionedBaseAdapter的adapter
首先,我們來看抽象類SectionedBaseAdapter的實現

public abstract class SectionedBaseAdapter extends BaseAdapter implements PinnedHeaderListView.PinnedSectionedHeaderAdapter 可以看到,SectionedBaseAdapter繼承BaseAdapter,
同時實現了PinnedHeaderListView.PinnedSectionedHeaderAdapter這個接口
我們來看PinnedHeaderListView.PinnedSectionedHeaderAdapter的定義:
    public static interface PinnedSectionedHeaderAdapter {
        public boolean isSectionHeader(int position); //是否是組的頭部

        public int getSectionForPosition(int position); //根據位置判斷對應的組號

        public View getSectionHeaderView(int section, View convertView, ViewGroup parent); // 得到組的頭部view

        public int getSectionHeaderViewType(int section); //

        public int getCount();

    }
看一下SectionedBaseAdapter的實現:
 /*********************************************************************************************************
     *
     *
     * 以下 , 實現了PinnedSectionedHeaderAdapter接口
     *
     *
     * *********************************************************************************************************/
    /**
     * 是否是組的頭部
     * @param position
     * @return
     */
    public final boolean isSectionHeader(int position) {
        int sectionStart = 0;
        for (int i = 0; i < internalGetSectionCount(); i++) {
            if (position == sectionStart) {
                return true;
            } else if (position < sectionStart) {
                return false;
            }
            sectionStart += internalGetCountForSection(i) + 1;
        }
        return false;
    }

    /**
     * 根據位置得到對應的組號
     * @param position
     * @return
     */
    public final int getSectionForPosition(int position) {
        // first try to retrieve values from cache
        Integer cachedSection = mSectionCache.get(position);
        if (cachedSection != null) {
            return cachedSection;
        }
        int sectionStart = 0;
        for (int i = 0; i < internalGetSectionCount(); i++) {
            int sectionCount = internalGetCountForSection(i);
            int sectionEnd = sectionStart + sectionCount + 1;
            if (position >= sectionStart && position < sectionEnd) {
                mSectionCache.put(position, i);
                return i;
            }
            sectionStart = sectionEnd;
        }
        return 0;
    }

    /**
     *
     * @param section
     * @param convertView
     * @param parent
     * @return
     */
    public abstract View getSectionHeaderView(int section, View convertView, ViewGroup parent);

    /**
     *
     * @param section
     * @return
     */
    public int getSectionHeaderViewType(int section) {
        return HEADER_VIEW_TYPE;
    }

    @Override
    public final int getCount() {
        if (mCount >= 0) {
            return mCount;
        }
        int count = 0;
        for (int i = 0; i < internalGetSectionCount(); i++) {
            count += internalGetCountForSection(i);
            count++; // for the header view
        }
        mCount = count;
        return count;
    }

    /*********************************************************************************************************
     * 以上 , 實現了PinnedSectionedHeaderAdapter接口
     *********************************************************************************************************/
可以看到,具體的getSectionHeaderView是要在我們自己的adapter中實現的。
getView方法
/**
     * 根據position是不是sectionHeader,來判斷是調用返回getSectionHeaderView,還是調用返回getItemView
     * @param position
     * @param convertView
     * @param parent
     * @return
     */
    @Override
    public final View getView(int position, View convertView, ViewGroup parent) {
        if (isSectionHeader(position)) {
            return getSectionHeaderView(getSectionForPosition(position), convertView, parent);
        }
        return getItemView(getSectionForPosition(position), getPositionInSectionForPosition(position), convertView, parent);
    }
可以看到,getView跟據是否是組的頭部,分別調用了getSectionHeaderView和getItemView,
getSectionHeaderView和getItemView都是抽象方法,都需要我們在自己定義的adapter中去實現。
@Override
    public final int getCount() {
        if (mCount >= 0) {
            return mCount;
        }
        int count = 0;
        for (int i = 0; i < internalGetSectionCount(); i++) {
            count += internalGetCountForSection(i);//添加組?元素的個數
            count++; // 添加組頭部
        }
        mCount = count;
        return count;
    }
可以看出,count包括了所有的組內元素的個數和所有的組頭部個數
 /*********************************************************************************************************
     * 以上 , 實現了PinnedSectionedHeaderAdapter接口
     *********************************************************************************************************/

    /**
     * 得到在組中的位置
     * @param position
     * @return
     */
    public int getPositionInSectionForPosition(int position) {
        // first try to retrieve values from cache
        Integer cachedPosition = mSectionPositionCache.get(position);
        if (cachedPosition != null) {
            return cachedPosition;
        }
        int sectionStart = 0;
        for (int i = 0; i < internalGetSectionCount(); i++) {
            int sectionCount = internalGetCountForSection(i);
            int sectionEnd = sectionStart + sectionCount + 1;
            if (position >= sectionStart && position < sectionEnd) {
                int positionInSection = position - sectionStart - 1;
                mSectionPositionCache.put(position, positionInSection);
                return positionInSection;
            }
            sectionStart = sectionEnd;
        }
        return 0;
    }
把從cache中得到的忽略,從for循環開始看
循環每個組內,可以看到,if (position >= sectionStart && position < sectionEnd),即position在組內的話,得到在組中的位置,返回在組中的位置
/**
     * 根據位置得到對應的組號
     * @param position
     * @return
     */
    public final int getSectionForPosition(int position) {
        // first try to retrieve values from cache
        Integer cachedSection = mSectionCache.get(position);
        if (cachedSection != null) {
            return cachedSection;
        }
        int sectionStart = 0;
        for (int i = 0; i < internalGetSectionCount(); i++) {
            int sectionCount = internalGetCountForSection(i);
            int sectionEnd = sectionStart + sectionCount + 1;
            if (position >= sectionStart && position < sectionEnd) {
                mSectionCache.put(position, i);
                return i;
            }
            sectionStart = sectionEnd;
        }
        return 0;
    }
從for循環開始看,if (position >= sectionStart && position < sectionEnd),即position在組內,返回組號。
/**
     * 是否是組的頭部
     * @param position
     * @return
     */
    public final boolean isSectionHeader(int position) {
        int sectionStart = 0;
        for (int i = 0; i < internalGetSectionCount(); i++) {
            if (position == sectionStart) {
                return true;
            } else if (position < sectionStart) {
                return false;
            }
            sectionStart += internalGetCountForSection(i) + 1;
        }
        return false;
    }
也是遍歷所有的組,如果position == sectionStart,也就是是組的頭部,返回true.
public class PinnedHeaderListView extends ListView implements OnScrollListener , AdapterView.OnItemClickListener{PinnedHeaderListView繼承自ListView,實現了OnScrollListener和OnItemClickListener,
在構造函數中setOnScrollListener(this)和setOnItemClickListener(this);
public PinnedHeaderListView(Context context) {
        super(context);
        super.setOnScrollListener(this);
        super.setOnItemClickListener(this);
    }
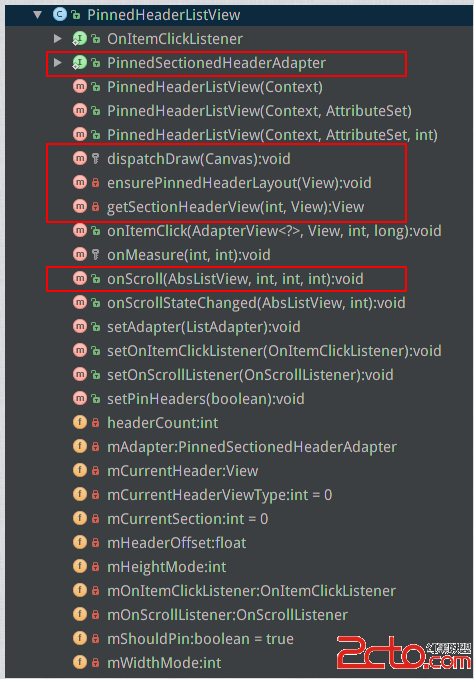
我們來看PinnedHeaderListView的代碼結構:

紅框標出的都是比較重要的方法,我們會進行一一講解
首選,接口PinnedSectionHeaderAdapter我們已經講過了
我們從onScroll方法開始看
 @Override
    public void onScroll(AbsListView view, int firstVisibleItem, int visibleItemCount, int totalItemCount) {
        if (mOnScrollListener != null) {
            mOnScrollListener.onScroll(view, firstVisibleItem, visibleItemCount, totalItemCount);
        }

        headerCount = getHeaderViewsCount();
        if (mAdapter == null || mAdapter.getCount() == 0 || !mShouldPin || (firstVisibleItem < headerCount)) {
            mCurrentHeader = null;
            mHeaderOffset = 0.0f;
            for (int i = firstVisibleItem; i < firstVisibleItem + visibleItemCount; i++) {
                View header = getChildAt(i);
                if (header != null) {
                    header.setVisibility(VISIBLE);
                }
            }
            return;
        }

        firstVisibleItem -= getHeaderViewsCount();//去掉header view的影響

        int section = mAdapter.getSectionForPosition(firstVisibleItem); //得到組號
        int viewType = mAdapter.getSectionHeaderViewType(section);
        mCurrentHeader = getSectionHeaderView(section, mCurrentHeaderViewType != viewType ? null : mCurrentHeader);
        //layout header,使它在最頂端
        ensurePinnedHeaderLayout(mCurrentHeader);
        mCurrentHeaderViewType = viewType;

        mHeaderOffset = 0.0f;

        for (int i = firstVisibleItem; i < firstVisibleItem + visibleItemCount; i++) {
            if (mAdapter.isSectionHeader(i)) {
                View header = getChildAt(i - firstVisibleItem);
                float headerTop = header.getTop();
                float pinnedHeaderHeight = mCurrentHeader.getMeasuredHeight();
                header.setVisibility(VISIBLE);
                if (pinnedHeaderHeight >= headerTop && headerTop > 0) { // 下一個組的頭部快滑動到頂部,距離頂部的距離小於現在在頂部懸浮的head的高度了
                    mHeaderOffset = headerTop - header.getHeight(); //MheaderOffset是小於0的
                } else if (headerTop <= 0) { //下一個組的頭部滑動到了頂部了
                    header.setVisibility(INVISIBLE);
                }
            }
        }

        invalidate();
    }
我們一行一行的來看,
if (mOnScrollListener != null) {
            mOnScrollListener.onScroll(view, firstVisibleItem, visibleItemCount, totalItemCount);
        }
這裡是對onScrollListener的set,因為我們在構造函數中setOnScrollListener(this),這句代碼保證了用戶也可以設置自己的onScrollListener
headerCount = getHeaderViewsCount();得到header的個數
 if (mAdapter == null || mAdapter.getCount() == 0 || !mShouldPin || (firstVisibleItem < headerCount)) {
            mCurrentHeader = null;
            mHeaderOffset = 0.0f;
            for (int i = firstVisibleItem; i < firstVisibleItem + visibleItemCount; i++) {
                View header = getChildAt(i);
                if (header != null) {
                    header.setVisibility(VISIBLE);
                }
            }
            return;
        }
如果adapter為空,或者adapter的count為0,或者我們設置了不頂部懸浮組頭部等這些條件的話,就return,不再繼續操作
 firstVisibleItem -= getHeaderViewsCount();//去掉header view的影響
 int section = mAdapter.getSectionForPosition(firstVisibleItem); //得到組號
 int viewType = mAdapter.getSectionHeaderViewType(section);
 mCurrentHeader = getSectionHeaderView(section, mCurrentHeaderViewType != viewType ? null : mCurrentHeader);
可以看出,通過getSectionForPosition方法得到了組號,然後根據getSectionHeaderView方法得到我們應該懸浮的組的header view
 //layout header,使它在最頂端
 ensurePinnedHeaderLayout(mCurrentHeader);
 mCurrentHeaderViewType = viewType;
ensurePinnedHeaderLayout,顧名思義,確保pinned header 執行layout,而layout是為了保證pinned header的相對父布局的位置,我們看ensurePinnedHeaderLayout方法的實現
/**
     * layout header,使它在最頂端
     * @param header 組對應的頭部view
     */
    private void ensurePinnedHeaderLayout(View header) {
        if (header.isLayoutRequested()) {
            int widthSpec = MeasureSpec.makeMeasureSpec(getMeasuredWidth(), mWidthMode);

            int heightSpec;
            ViewGroup.LayoutParams layoutParams = header.getLayoutParams();
            if (layoutParams != null && layoutParams.height > 0) {
                heightSpec = MeasureSpec.makeMeasureSpec(layoutParams.height, MeasureSpec.EXACTLY);
            } else {
                heightSpec = MeasureSpec.makeMeasureSpec(0, MeasureSpec.UNSPECIFIED);
            }
            header.measure(widthSpec, heightSpec);
            header.layout(0, 0, header.getMeasuredWidth(), header.getMeasuredHeight());
        }
    }
可以看出,對header執行了measure和layout,layout時left=0,top=0,也就是讓header一直在頂部。
我們繼續看scroll函數
mHeaderOffset = 0.0f;
for (int i = firstVisibleItem; i < firstVisibleItem + visibleItemCount; i++) {
     if (mAdapter.isSectionHeader(i)) {
          View header = getChildAt(i - firstVisibleItem);
          float headerTop = header.getTop();
          float pinnedHeaderHeight = mCurrentHeader.getMeasuredHeight();
          header.setVisibility(VISIBLE);
          if (pinnedHeaderHeight >= headerTop && headerTop > 0) {
          // 下一個組的頭部快滑動到頂部,距離頂部的距離小於現在在頂部懸浮的head的高度了
              mHeaderOffset = headerTop - header.getHeight(); //MheaderOffset是小於0的
          } else if (headerTop <= 0) { //下一個組的頭部滑動到了頂部了
              header.setVisibility(INVISIBLE);
          }
     }
}

invalidate();
使mHeaderOffset 置零
遍歷所有可見的item,找到是sectionHeader的第i個item,得到header
看這一句話,if (pinnedHeaderHeight >= headerTop && headerTop > 0),意思是說,如果可見的元素中,第一個是SectionHeader的view距離頂部的距離小於現在懸浮在頂部的組的頭部的高度,進行以下操作
mHeaderOffset = headerTop - header.getHeight(); //MheaderOffset是小於0的給mHeaderOffset賦值。
我們來看mHeaderOffset在哪裡用到的。是在disPatchDraw中用到了
dispatchDraw
  @Override
    protected void dispatchDraw(Canvas canvas) {
        super.dispatchDraw(canvas);
        if (mAdapter == null || !mShouldPin || mCurrentHeader == null )
            return;
        int saveCount = canvas.save();
        //沿y軸向下移動mHeaderOffset距離,把畫布移動到(0,mHeaderOffset)
        //注意,此處mHeaderOffset是<=0的,所以等於說是把畫布往上移動了一段距離
        canvas.translate(0, mHeaderOffset);
        canvas.clipRect(0, 0, getWidth(), mCurrentHeader.getMeasuredHeight()); // needed
        // for
        // <
        // HONEYCOMB
        mCurrentHeader.draw(canvas);
        canvas.restoreToCount(saveCount);
    }
可以看出mHeaderOffset小於0的時候,正懸浮在頂部的view向上移動了mHeaderOffset距離。
到此為止,onScroll函數執行完畢了。
源碼的onItemClick是有一些問題的,我在源碼的基礎上進行了修改。我們來看
先定義接口OnItemClickListener
 public interface OnItemClickListener {

        void onSectionItemClick(AdapterView adapterView, View view, int section, int position, long id);

        void onSectionClick(AdapterView adapterView, View view, int section, long id);

        void onHeaderClick(AdapterView adapterView, View view, int position, long id);

        void onFooterClick(AdapterView adapterView, View view, int position, long id);

    }
onSectionItemClick: 組的item被點擊的點擊回調
onSectionClick: 組的頭部被點擊的點擊回調
onHeaderClick: list view的頭部view被點擊的點擊回調
onFooterClick: list view的footer被點擊的點擊回調
onItemClick方法
 @Override
    public void onItemClick(AdapterView parent, View view, int position, long id) {
    //header view
        if(position < headerCount){
            if(mOnItemClickListener  !=null){
                mOnItemClickListener.onHeaderClick(parent, view, position, id);
            }
            return;
        }
        //footer view
        if(mAdapter!= null && position >= headerCount + mAdapter.getCount()){
            if(mOnItemClickListener  !=null){
                mOnItemClickListener.onFooterClick(parent, view, position - headerCount - mAdapter.getCount(), id);
            }
            return;
        }
        //section header or section item
        position = position - headerCount;
        SectionedBaseAdapter adapter;
        if (parent.getAdapter().getClass().equals(HeaderViewListAdapter.class)) {
            HeaderViewListAdapter wrapperAdapter = (HeaderViewListAdapter) parent.getAdapter();
            adapter = (SectionedBaseAdapter) wrapperAdapter.getWrappedAdapter();
        } else {
            adapter = (SectionedBaseAdapter) parent.getAdapter();
        }
        int section = adapter.getSectionForPosition(position);
        int p = adapter.getPositionInSectionForPosition(position);

        if (p == -1) {//click section header
            if( mOnItemClickListener != null){
                mOnItemClickListener.onSectionClick(parent, view, section, id);
            }
        } else {//click section item
            if( mOnItemClickListener != null){
                mOnItemClickListener.onSectionItemClick(parent, view, section, p, id);
            }

        }
} 如何在IIS添加MIME擴展類型
在iis7中默認的MIME類型並不包含所有的後綴名文件,像現在比較熱門的apk,ipa文件都是需要手動添加的。那如何在IIS添加MIME類型?步驟如下:1、打開iis7,
 SpannableString 的一些效果顯示
一個人需要隱藏多少秘密才能巧妙地度過一生 — 倉央嘉措前言上次看到一款學習的 App,有這樣一個功能,在一個 TextView 中有一段英文,點擊英文單詞通過
 Android Studio 打印調試信息
之前開發單片機軟件還是上位機都習慣使用printf(),相信很多很會有和我一樣的習慣。開始學習安卓了,當然也很在意安卓的這個打印調試應該怎麼做呢?這裡使用的是日志記錄中添
 Android筆記之 網絡http通信
0、在認識HTTP前先認識URL 在我們認識HTTP之前,有必要先弄清楚URL的組成,例如: http://www.******.com/china/index.htm