編輯:關於Android編程
前面兩篇分別介紹了:
Android-Universal-Image-Loader (圖片異步加載緩存庫)的使用配置
Android-Universal-Image-Loader (圖片異步加載緩存庫)的源碼解讀
通過前兩篇,我們了解了 UIL的使用配置,UIL將服務器上的一張圖片保存到本地,加載到內存的過程,以及UIL對DiscCache和MemoryCache的策略,但是還有一部分比較重要,因為它是我們的開發日常中經常要處理的一個問題:Bitmap的優化。換句話說:如何將一個大的圖片,加載到內存並顯示,如果我們不處理,那麼很容易發生OOM。
那麼UIL作為一款經典圖片緩存框架接下來,我們就學習一下UIL中如何優化Bitmap,避免發生OOM的,以後在我們項目開發的時候就可以用相同的方法去解決類似的問題。
首先我們先不用UIL ,直接加載一張大圖片會發生什麼?

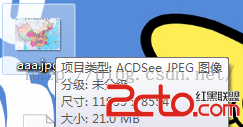
將上述21M的本地圖片aaa.jpg直接通過加載到內存
private String uri_virtual="/mnt/sdcard/UIL/Document/pics/aaa.jpg";
Bitmap bm=BitmapFactory.decodeFile(uri_virtual);
errImage.setImageBitmap(bm);
運行一下程序會發現發生了crash

在logcat中報錯如下

這是一個非常常見的錯誤:內存溢出(Out Of Memory)。
導致這個錯誤的原因一般是 加載了一個超過dalivk heap 的size(一般16M) 的文件,或者 內存使用頻繁,釋放不及時,導致內存不夠用。
解決OOM的方法就是: 使用弱引用WeakReference,手動釋放內存System.gc(),將Bitmap壓縮 等。
那麼我們在用UIL去加載這一張大圖片:
		image = (ImageView) findViewById(R.id.iv);
		DisplayImageOptions displayOptions = new DisplayImageOptions.Builder()
				.cacheInMemory(true).bitmapConfig(Bitmap.Config.RGB_565)
				.cacheOnDisk(true).build();
		ImageLoader.getInstance().displayImage(uri_virtual, image,
				displayOptions);
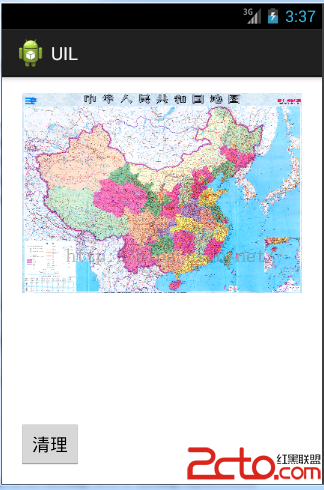
發現加載成功:

可見UIL 內部對其進行了處理,使其加載成功。
	// 嘗試 本地文件中是否有緩存
	File imageFile = configuration.diskCache.get(uri);
	if (imageFile != null && imageFile.exists() && imageFile.length() > 0) {
		L.d(LOG_LOAD_IMAGE_FROM_DISK_CACHE, memoryCacheKey);
		loadedFrom = LoadedFrom.DISC_CACHE;
		checkTaskNotActual();
		bitmap = decodeImage(Scheme.FILE.wrap(imageFile.getAbsolutePath()));
	}
這裡07行,執行了一個decodeImage 的方法,根據返回值 跟傳入的參數,我們不難看出,這個方法的作用是,根據本地圖片的路徑,將其轉成bitmap加載進內存。
	private Bitmap decodeImage(String imageUri) throws IOException {
		ViewScaleType viewScaleType = imageAware.getScaleType();
		ImageDecodingInfo decodingInfo = new ImageDecodingInfo(memoryCacheKey, imageUri, uri, targetSize, viewScaleType,
				getDownloader(), options);
		return decoder.decode(decodingInfo);
	}
從上面的 decodeImage 方法的實現來看,最終 將本地文件轉成bitmap 是由decoder.decode(decodingInfo) 來完成的。那麼就去看decode() 方法:
ImageDecoder 是一個接口,BaseImageDecoder實現了ImageDecoder ,實現了decode 方法:
	/**
	 * Decodes image from URI into {@link Bitmap}. Image is scaled close to incoming {@linkplain ImageSize target size}
	 * during decoding (depend on incoming parameters).
	 * @param decodingInfo Needed data for decoding image: 如果 具體View  沒有指定 wh  為手機分辨率 px 否則為 設置的px值
	 * @return Decoded bitmap
	 * @throws IOException                   if some I/O exception occurs during image reading
	 * @throws UnsupportedOperationException if image URI has unsupported scheme(protocol)
	 */
	@Override
	public Bitmap decode(ImageDecodingInfo decodingInfo) throws IOException {
		Bitmap decodedBitmap;
		ImageFileInfo imageInfo;
		InputStream imageStream = getImageStream(decodingInfo);
		if (imageStream == null) {
			L.e(ERROR_NO_IMAGE_STREAM, decodingInfo.getImageKey());
			return null;
		}
		try {
			imageInfo = defineImageSizeAndRotation(imageStream, decodingInfo);
			imageStream = resetStream(imageStream, decodingInfo);
			Options decodingOptions = prepareDecodingOptions(imageInfo.imageSize, decodingInfo);
			decodedBitmap = BitmapFactory.decodeStream(imageStream, null, decodingOptions);
		} finally {
			IoUtils.closeSilently(imageStream);
		}
		if (decodedBitmap == null) {
			L.e(ERROR_CANT_DECODE_IMAGE, decodingInfo.getImageKey());
		} else {
			decodedBitmap = considerExactScaleAndOrientatiton(decodedBitmap, decodingInfo, imageInfo.exif.rotation,
					imageInfo.exif.flipHorizontal);
		}
		return decodedBitmap;
	}
再看方法以前,我先解釋一下ImageDecodingInfo 這是一個非常重要的類,它裡面封裝了我們布局裡設置子的ImageView的一些屬性,比如 android:layout_width android:layout_height
以及一些Options 屬性。
destOptions.inDensity
destOptions.inDither
destOptions.inInputShareable
destOptions.inJustDecodeBounds
destOptions.inPreferredConfig
destOptions.inPurgeable
destOptions.inSampleSize
destOptions.inScaled
destOptions.inScreenDensity
destOptions.inTargetDensity
destOptions.inTempStorage
destOptions.inPreferQualityOverSpeed
destOptions.inBitmap
destOptions.inMutable
而對Bitmap的壓縮,都是按照bitmap的這些屬性來做的。 介紹完了ImageDecodingInfo ,我們接著回到上面的decode() 方法,我們看到13行 拿到了InputStream 接下來 在19行,根據InputSream 拿到了本地圖片的分辨率信息,一起看一下defineImageSizeAndRotation() 方法:
	/**
	 * //options.outWidth:11935options.outHeight:8554  根據文件流 拿到 本地圖片的分辨率
	 * @param imageStream: 文件流
	 * @param decodingInfo: 本地圖片的文件信息
	 * @return
	 * @throws IOException
	 */
	protected ImageFileInfo defineImageSizeAndRotation(InputStream imageStream, ImageDecodingInfo decodingInfo)
			throws IOException {
		Options options = new Options();
		options.inJustDecodeBounds = true;
		BitmapFactory.decodeStream(imageStream, null, options);
		ExifInfo exif;
		String imageUri = decodingInfo.getImageUri();
		if (decodingInfo.shouldConsiderExifParams() && canDefineExifParams(imageUri, options.outMimeType)) {
			exif = defineExifOrientation(imageUri);
		} else {
			exif = new ExifInfo();
		}
		//options.outWidth:11935options.outHeight:8554  根據文件流 拿到 本地圖片的分辨率
		return new ImageFileInfo(new ImageSize(options.outWidth, options.outHeight, exif.rotation), exif);
	}
關鍵是 10 11 12 這三行,首先設置Options.inJustDecodeBounds=true 這樣設置

       /**
	 * @param imageSize 本地圖片的大小
	 * @param decodingInfo :需要的編譯規格  比如 設定過 wh  或者默認的  手機分辨率
	 * @return
	 */
	protected Options prepareDecodingOptions(ImageSize imageSize, ImageDecodingInfo decodingInfo) {
		ImageScaleType scaleType = decodingInfo.getImageScaleType();
		int scale;
		if (scaleType == ImageScaleType.NONE) {
			scale = 1;
		} else if (scaleType == ImageScaleType.NONE_SAFE) {
			scale = ImageSizeUtils.computeMinImageSampleSize(imageSize);
		} else {
			ImageSize targetSize = decodingInfo.getTargetSize();
			boolean powerOf2 = scaleType == ImageScaleType.IN_SAMPLE_POWER_OF_2;
			scale = ImageSizeUtils.computeImageSampleSize(imageSize, targetSize, decodingInfo.getViewScaleType(), powerOf2);
		}
		if (scale > 1 && loggingEnabled) {
			L.d(LOG_SUBSAMPLE_IMAGE, imageSize, imageSize.scaleDown(scale), scale, decodingInfo.getImageKey());
		}
		Options decodingOptions = decodingInfo.getDecodingOptions();
		decodingOptions.inSampleSize = scale;
		// insampleSize =n  表示 縮小到原來的 1/n  比如    1/2 占的容量變小 對已經產生的bitmap 不生效,只能對 BitmapFactory
        // 只能用BitmapFactory生成的Bitmap才有用,如BitmapFactory.decodeResource(res, id, options)這種方法。把options放到參數裡面就可以了。
		return decodingOptions;
	}
這個方法只做了一件事,decodingOptions.inSampleSize = scale;就是設置inSampleSize的值,Options.inSampleSize的意思就是縮小到原來的幾分之一,值越大,表示縮放的倍數越大,可見上面的注釋。
我覺得獲取inSampleSize = scale的值,是本篇文章最重要得地方,那麼我們接下來,就詳細看一下如何獲取inSampleSize的值
直接看16行執行的方法computeImageSampleSize()
public static int computeImageSampleSize(ImageSize srcSize, ImageSize targetSize, ViewScaleType viewScaleType,
			boolean powerOf2Scale) {
		final int srcWidth = srcSize.getWidth();
		final int srcHeight = srcSize.getHeight();
		final int targetWidth = targetSize.getWidth();
		final int targetHeight = targetSize.getHeight();
		int scale = 1;
		switch (viewScaleType) {
			case FIT_INSIDE: // 過按比例縮小或原來的size使得圖片長/寬等於或小於View的長/寬
				if (powerOf2Scale) {
					final int halfWidth = srcWidth / 2;
					final int halfHeight = srcHeight / 2;
					while ((halfWidth / scale) > targetWidth || (halfHeight / scale) > targetHeight) { // ||
						scale *= 2;
					}
				} else {
					scale = Math.max(srcWidth / targetWidth, srcHeight / targetHeight); // max
				}
				break;
			case CROP://  按比例擴大圖片的size居中顯示,使得圖片長(寬)等於或大於View的長(寬)
				if (powerOf2Scale) {
					final int halfWidth = srcWidth / 2;
					final int halfHeight = srcHeight / 2;
					while ((halfWidth / scale) > targetWidth && (halfHeight / scale) > targetHeight) { // &&
						scale *= 2;
					}
				} else {
					scale = Math.min(srcWidth / targetWidth, srcHeight / targetHeight); // min
				}
				break;
		}

		if (scale < 1) {
			scale = 1;
		}
		scale = considerMaxTextureSize(srcWidth, srcHeight, scale, powerOf2Scale);
		return scale;
	}
注釋了兩種type ,大圖片肯定是要縮放,而縮放的規格就是 13 14行的運算
while ((halfWidth / scale) > targetWidth || (halfHeight / scale) > targetHeight) { // ||
						scale *= 2;
					}
根據本地圖片的寬度1/2除以 scale,與 我們布局中設置的寬度(如果沒設置 寬高為手機分辨率)比較,直到小於我們設置的ImageView寬 高時,拿到此時的scale值,接下來在經過36行considerMaxTextureSize() 方法去確定最終的scale值
	private static int considerMaxTextureSize(int srcWidth, int srcHeight, int scale, boolean powerOf2) {
		final int maxWidth = maxBitmapSize.getWidth();
		final int maxHeight = maxBitmapSize.getHeight();
		while ((srcWidth / scale) > maxWidth || (srcHeight / scale) > maxHeight) {
			if (powerOf2) {
				scale *= 2;
			} else {
				scale++;
			}
		}
		return scale;
	}
這個方法是為了進一步確定scale的值,應該是盡可能的大,這裡涉及到 OpenGL ES 的一些東西,我們先不管。
上過程最終得到的scale 設置給了decodingOptions.inSampleSize = scale。
然後通過前面的 decodedBitmap = BitmapFactory.decodeStream(imageStream, null, decodingOptions);最終拿到了適合的Bitmap,接下來的過程就是設置顯示的過程,這裡就不在分析了。
	public Bitmap decode(ImageDecodingInfo decodingInfo) throws IOException {
		Bitmap decodedBitmap;
		ImageFileInfo imageInfo;
		InputStream imageStream = getImageStream(decodingInfo);
		if (imageStream == null) {
			L.e(ERROR_NO_IMAGE_STREAM, decodingInfo.getImageKey());
			return null;
		}
		try {
			imageInfo = defineImageSizeAndRotation(imageStream, decodingInfo);
			imageStream = resetStream(imageStream, decodingInfo);
			Options decodingOptions = prepareDecodingOptions(imageInfo.imageSize, decodingInfo);
			decodedBitmap = BitmapFactory.decodeStream(imageStream, null, decodingOptions);
			Log.e("decode"," bytecount: "+decodedBitmap.getByteCount()+"   density:"+decodedBitmap.getDensity()+" H:"
					+decodedBitmap.getHeight()+"  W:"+decodedBitmap.getWidth());
		} finally {
			IoUtils.closeSilently(imageStream);
		}
		if (decodedBitmap == null) {
			L.e(ERROR_CANT_DECODE_IMAGE, decodingInfo.getImageKey());
		} else {
			decodedBitmap = considerExactScaleAndOrientatiton(decodedBitmap, decodingInfo, imageInfo.exif.rotation,
					imageInfo.exif.flipHorizontal);
		}
		return decodedBitmap;
	}
運行我們的程序,可以看到log信息 199182b=194kb,也就是說21M的圖片,加載進內存只占用了194kb,效果還是很明顯的吧。
原圖片分辨率 w*h= 11935*8554
199182b=194kb,也就是說21M的圖片,加載進內存只占用了194kb,效果還是很明顯的吧。
原圖片分辨率 w*h= 11935*8554前面兩篇地址:
Android-Universal-Image-Loader (圖片異步加載緩存庫)的使用配置
Android-Universal-Image-Loader (圖片異步加載緩存庫)的源碼解讀
 android ListView 實現3級節點 (可拓展N級)
ListView實現二級節點想必大家都知道可以用ExpandableListView 就可以輕松實現,但是要實現3級甚至多級菜單怎麼實現呢? 再利用ExpandableL
 Android中編寫簡單的手電筒小應用的實例教程
主要實現兩個步驟:1、實現打開和關閉閃光燈;而實現操作閃光燈主要通過Camera類Camera camera = Camera.open(); Parameters mP
 Android利用ViewPager實現滑動廣告板實例源碼
•android-support-v4.jar,這是谷歌官方給我們提供的一個兼容低版本Android設備的軟件包,裡面包囊了只有在Android3.0以上可以
 Android-下拉刷新庫
前言入職接近半個多月,有幾天空閒,所以想著能不能自己實現一個庫來練練手,因為之前一直想要實現下拉刷新的功能,因此就有了這樣一個自制的下拉刷新庫——