編輯:關於Android編程
該項目主要是使用SSH開發Android後端服務器程序和前端App代碼的實現,主要技術包含:
Android AsyncTask 、常見自定義控件、客戶端高層類封裝、Android HTTP通信、用戶管理、購物流程、定位、二維碼等知識點,希望大家跟蹤查看最新的學習筆記。
數據庫使用的是MySQL5.6版本,腳本代碼如下:
SET FOREIGN_KEY_CHECKS=0;

DROP TABLE IF EXISTS `admin`;
CREATE TABLE `admin` (
  `ID` bigint(20) NOT NULL AUTO_INCREMENT,
  `loginName` varchar(100) DEFAULT NULL,
  `passowrd` varchar(64) DEFAULT NULL,
  PRIMARY KEY (`ID`)
) ENGINE=InnoDB AUTO_INCREMENT=3 DEFAULT CHARSET=latin1;


DROP TABLE IF EXISTS `cversion`;
CREATE TABLE `cversion` (
  `ID` bigint(20) NOT NULL AUTO_INCREMENT,
  `versionName` varchar(100) DEFAULT NULL,
  `versionCode` int(11) DEFAULT NULL,
  `updateDate` datetime DEFAULT NULL,
  `downloadUrl` varchar(200) DEFAULT NULL,
  `apkSize` varchar(100) DEFAULT NULL,
  `apkName` varchar(200) DEFAULT NULL,
  `updateLog` varchar(500) DEFAULT NULL,
  PRIMARY KEY (`ID`)
) ENGINE=InnoDB AUTO_INCREMENT=2 DEFAULT CHARSET=utf8;


DROP TABLE IF EXISTS `goods`;
CREATE TABLE `goods` (
  `ID` bigint(20) NOT NULL AUTO_INCREMENT,
  `shopID` bigint(20) DEFAULT NULL,
  `code` varchar(100) DEFAULT NULL,
  `name` varchar(200) DEFAULT NULL,
  `thumbnail` varchar(200) DEFAULT NULL,
  `price` decimal(8,0) DEFAULT NULL,
  `weight` decimal(8,0) DEFAULT NULL,
  `color` varchar(100) DEFAULT NULL,
  `factoryAddr` varchar(200) DEFAULT NULL,
  `producer` varchar(200) DEFAULT NULL,
  `productedDate` datetime DEFAULT NULL,
  `RegisterDate` datetime DEFAULT NULL,
  `IsHost` char(1) DEFAULT NULL COMMENT '1為促銷商品;0為普通商品',
  `describes` text,
  PRIMARY KEY (`ID`)
) ENGINE=InnoDB AUTO_INCREMENT=14 DEFAULT CHARSET=utf8;


DROP TABLE IF EXISTS `goodspic`;
CREATE TABLE `goodspic` (
  `ID` bigint(20) NOT NULL AUTO_INCREMENT,
  `shopID` bigint(20) DEFAULT NULL,
  `picurl` varchar(200) DEFAULT NULL,
  `linkurl` varchar(200) DEFAULT NULL,
  `orders` int(11) DEFAULT NULL,
  `status` char(1) DEFAULT NULL COMMENT '1為顯示,0為隱藏',
  PRIMARY KEY (`ID`)
) ENGINE=InnoDB DEFAULT CHARSET=latin1;


DROP TABLE IF EXISTS `scanrecord`;
CREATE TABLE `scanrecord` (
  `ID` bigint(20) NOT NULL AUTO_INCREMENT,
  `userID` bigint(20) DEFAULT NULL,
  `code` varchar(100) DEFAULT NULL,
  `scanTime` datetime DEFAULT NULL,
  PRIMARY KEY (`ID`)
) ENGINE=InnoDB DEFAULT CHARSET=latin1;


DROP TABLE IF EXISTS `shop`;
CREATE TABLE `shop` (
  `ID` bigint(20) NOT NULL AUTO_INCREMENT,
  `name` varchar(200) DEFAULT NULL,
  `logo` varchar(200) DEFAULT NULL,
  `phoneNum` char(20) DEFAULT NULL,
  `addr` varchar(200) DEFAULT NULL,
  `lngitude` double(9,6) DEFAULT NULL,
  `latitude` double(9,6) DEFAULT NULL,
  `type` char(1) DEFAULT NULL,
  `describes` text,
  PRIMARY KEY (`ID`)
) ENGINE=InnoDB AUTO_INCREMENT=5 DEFAULT CHARSET=utf8;


DROP TABLE IF EXISTS `users`;
CREATE TABLE `users` (
  `ID` bigint(20) NOT NULL AUTO_INCREMENT,
  `UserName` varchar(200) DEFAULT NULL,
  `password` varchar(32) DEFAULT NULL,
  `felling` varchar(200) DEFAULT NULL,
  `head` varchar(200) DEFAULT NULL,
  `regtime` datetime DEFAULT NULL,
  PRIMARY KEY (`ID`)
) ENGINE=InnoDB AUTO_INCREMENT=4 DEFAULT CHARSET=utf8;


DROP VIEW IF EXISTS `v_goods`;
CREATE ALGORITHM=UNDEFINED DEFINER=`videoadmin`@`` SQL SECURITY DEFINER VIEW `v_goods` AS select `goods`.`ID` AS `ID`,`goods`.`shopID` AS `shopID`,`goods`.`code` AS `code`,`goods`.`name` AS `goods_name`,`goods`.`thumbnail` AS `thumbnail`,`goods`.`price` AS `price`,`goods`.`weight` AS `weight`,`goods`.`color` AS `color`,`goods`.`factoryAddr` AS `factoryAddr`,`goods`.`producer` AS `producer`,`goods`.`productedDate` AS `productedDate`,`goods`.`RegisterDate` AS `RegisterDate`,`goods`.`IsHost` AS `IsHost`,`goods`.`describes` AS `goods_desc`,`shop`.`name` AS `shop_name`,`shop`.`logo` AS `logo`,`shop`.`phoneNum` AS `phoneNum`,`shop`.`addr` AS `addr`,`shop`.`lngitude` AS `lngitude`,`shop`.`latitude` AS `latitude`,`shop`.`type` AS `type`,`shop`.`describes` AS `shop_desc` from (`goods` join `shop`) where (`goods`.`shopID` = `shop`.`ID`);
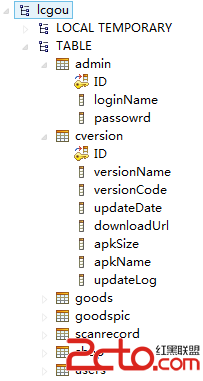
創建數據庫如下:

我們使用“純手工”的方式搭建自己的SSH環境
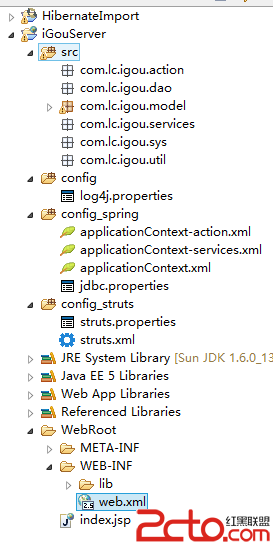
(1)創建一個Web Project(可以根據下邊的圖片建立工程)

注意:當我們創建config_struts、config_spring、config文件的時候一定要在文件上點擊右鍵build path–use as sources folder
這樣的話,在編譯的時候才會把這三個配置文件加入到class目錄中,否則會找不到。加入之後的話就像我上圖中的一樣和src是同級目錄的,上邊有一個package的圖標的樣式!
(2)配置文件的簡單介紹:
log4j.properties
#
log4j.rootLogger=INFO,stdout
log4j.appender.stdout=org.apache.log4j.ConsoleAppender
log4j.appender.stdout.layout=org.apache.log4j.PatternLayout
log4j.appender.stdout.layout.ConversionPattern=%d %-5p [%t] %-17c{2} (%13F:%L) %3x - %m%n
applicationContext.xml
            classpath:jdbc.properties


            ${datasource.driverClassName}


            ${datasource.url}


            ${datasource.username}


            ${datasource.password}


                ${hibernate.dialect}
                ${hibernate.show_sql}
                ${hibernate.format_sql}

                ${hibernate.cache.provider_class}
                ${hibernate.cache.use_query_cache}
                ${hibernate.cache.use_second_level_cache}
jdbc.properties
datasource.type=mysql
datasource.driverClassName=com.mysql.jdbc.Driver
datasource.url=jdbc:mysql://localhost:3306/lcgou?autoReconnect=true&useUnicode=true&characterEncoding=UTF-8
datasource.username=root
datasource.password=1111
datasource.maxActive=100
datasource.maxIdle=2
datasource.maxWait=120000
datasource.whenExhaustedAction=1
datasource.validationQuery=select 1 from dual
datasource.testOnBorrow=true
datasource.testOnReturn=false
##########################  c3p0  ############################
c3p0.acquireIncrement=3
c3p0.acquireRetryAttempts=30
c3p0.acquireRetryDelay=100
c3p0.initialPoolSize=3
c3p0.idleConnectionTestPeriod=900
c3p0.minPoolSize=2
c3p0.maxPoolSize=10
c3p0.maxStatements=0
c3p0.numHelperThreads=10
c3p0.maxIdleTime=30
#####################   Hibernate  ##################################
hibernate.dialect=org.hibernate.dialect.MySQLDialect
hibernate.jdbc.batch_size=25
hibernate.jdbc.fetch_size=50
hibernate.show_sql=true
hibernate.connection.release_mode=after_transaction
hibernate.format_sql=true
hibernate.cache.provider_class=org.hibernate.cache.EhCacheProvider
hibernate.cache.use_query_cache=true
hibernate.cache.use_second_level_cache=true
struts.properties
#struts.custom.i18n.resources=messageResource


struts.i18n.encoding=UTF-8
struts.objectFactory.spring.useClassCache = true
struts.multipart.parser=jakarta
struts.multipart.saveDir=
struts.multipart.maxSize=2097152
struts.serve.static=true
struts.serve.static.browserCache=true
struts.enable.DynamicMethodInvocation = true
struts.enable.SlashesInActionNames = false
struts.tag.altSyntax=true
struts.devMode = false
struts.i18n.reload=false
struts.ui.theme=xhtml
struts.ui.templateDir=template
struts.ui.templateSuffix=ftl
struts.url.includeParams = get
struts.dispatcher.parametersWorkaround = false
struts.freemarker.templatesCache=false
struts.freemarker.wrapper.altMap=true
struts.xslt.nocache=false
struts.configuration.files=struts-default.xml,struts-plugin.xml,struts.xml
struts.xml
web.xml
        webAppRootKey
        iGouServer.root


        contextConfigLocation
        classpath:applicationContext*.xml


        log4jConfigLocation
        classpath:log4j.properties


        org.springframework.web.util.Log4jConfigListener


        org.springframework.web.util.IntrospectorCleanupListener


        org.springframework.web.context.ContextLoaderListener


        struts2
        org.apache.struts2.dispatcher.ng.filter.StrutsPrepareAndExecuteFilter


        struts2
        *.action


        struts2
        *.jsp


        encodingFilter
        org.springframework.web.filter.CharacterEncodingFilter

            encoding
            UTF-8


            forceEncoding
            true


        encodingFilter
        /*


        index.jsp
上邊的配置文件,了解SSH的應該都比較清楚,不過多解釋,都有注釋
(3)關於使用Hibernate,因為我們沒有在項目中進行直接的逆向,而是使用jar直接導入的,那麼我們就可以童工另一個項目HibernateImport 通過hibernate的逆向工程生成model,然後再復制到自己的項目文件下
 Android自定義控件之仿優酷菜單
去年的優酷HD版有過這樣一種菜單,如下圖:應用打開之後,先是三個弧形的三級菜單,點擊實體鍵menu之後,這三個菜單依次旋轉退出,再點擊實體鍵menu之後,一級菜單會旋轉進
 Android之Activity生命周期的淺析(二)
??上一篇文章,我們主要分析了Activity的正常情況下生命周期及其方法,本篇主要涉及內容為Activity的異常情況下的生命周期。Activity異常生命周期??異常
 Android模擬器中安裝apk的方法
本文講述了Android模擬器中安裝apk的方法。分享給大家供大家參考,具體如下:第一步:在Eclipse中啟動模擬器。第二步:打開doc命名窗口,轉到你android
 安卓(Android)實現3DTouch效果
本篇博客要做的效果圖:來個低質量動圖:這個動圖效果不是很好,實際上模糊效果應該是像上面第一張圖那樣的,後面會放出代碼,有興趣的可以試著運行一下看看效果。 先說一