編輯:關於Android編程
今天和大家分享一下Android中Matrix的簡單用法,Matrix其實就是一個3*3的矩陣,利用這個矩陣對圖像操作。在Android中,為我們提供一些封裝好的方法可以進行一些簡單的圖像操作,總共分為rotate(旋轉),scale(縮放),translate(平移)和skew(傾斜)四種,每一種變換都提供了set, post和pre三種操作方式,除了translate,其他三種操作都可以指定中心點。其中post的方式是對原矩陣進行後乘,pre方式是對原矩陣進行前乘,另外,每一次通過set的方式調用就會進行一次reset重置,之前的操作就會被銷毀,在組合變化中需要注意。
Matrix中與旋轉操作相關的方法一共有6個,
public boolean preRotate (float degrees)
public boolean preRotate (float degrees, float px, float py)
public boolean postRotate (float degrees)
public boolean postRotate (float degrees, float px, float py)
public void setRotate (float degrees)
public void setRotate (float degrees, float px, float py)
其中參數degrees指明了旋轉的角度,如果大於零則為順時針,小於零為逆時針;參數px,py用於指定旋轉的中心,默認為(0,0)即左上角。
Matrix中與縮放操作相關的方法一共有6個,
public boolean postScale (float sx, float sy)
public boolean postScale (float sx, float sy, float px, float py)
public boolean preScale (float sx, float sy)
public boolean preScale (float sx, float sy, float px, float py)
public void setScale (float sx, float sy)
public void setScale (float sx, float sy, float px, float py)
其中參數sx,sy分別表示x軸和y軸的拉伸變化,如果大於1,為放大,小於1為縮小,為負值則表示對稱的變化(在之後的組合變化中我們會用到它來實現鏡子和倒影的效果);參數px,py用於指定縮放的中心(就是當縮放變化後該點的位置坐標不會變),默認為(0,0)即左上角。
Matrix中關於平移的方法有3個
public boolean postTranslate (float dx, float dy)
public boolean preTranslate (float dx, float dy)
public void setTranslate (float dx, float dy)
其中參數dx,dy表示平移的距離,dx大於零表示向右,小於零表示向左;dy大於零表示向下,小於零表示向上。
Matrix中關於傾斜操作的方法有6個
public boolean postSkew (float kx, float ky)
public boolean postSkew (float kx, float ky, float px, float py)
public boolean preSkew (float kx, float ky)
public boolean preSkew (float kx, float ky, float px, float py)
public void setSkew (float kx, float ky)
public void setSkew (float kx, float ky, float px, float py)
點(x,y)經過skew(kx,ky,px,py)變換之後,坐標為(kx*(y-py)+px,ky*(x-px)+py),如果,px和py沒有,則默認為都為0。
1.鏡像變化:對於scale變化,如果以一個負數縮放,那麼會將該 圖像繪制到坐標系統的負值空間。由於(0,0)點位於左上角,使用x軸上的負數會導致向左繪制圖像。因此我們需要使用postTranslate方法,將圖像向右移動即可實現鏡像變化。
matrix.setScale(-1, 1);
matrix.postTranslate(mBitmap.getWidth(),0);
2.倒影變化:同鏡像變化,我們可以在y軸上做相同的事情,就會得到倒影的效果。
matrix.postScale(1, -1);
matrix.postTranslate(0, mBitmap.getHeight());
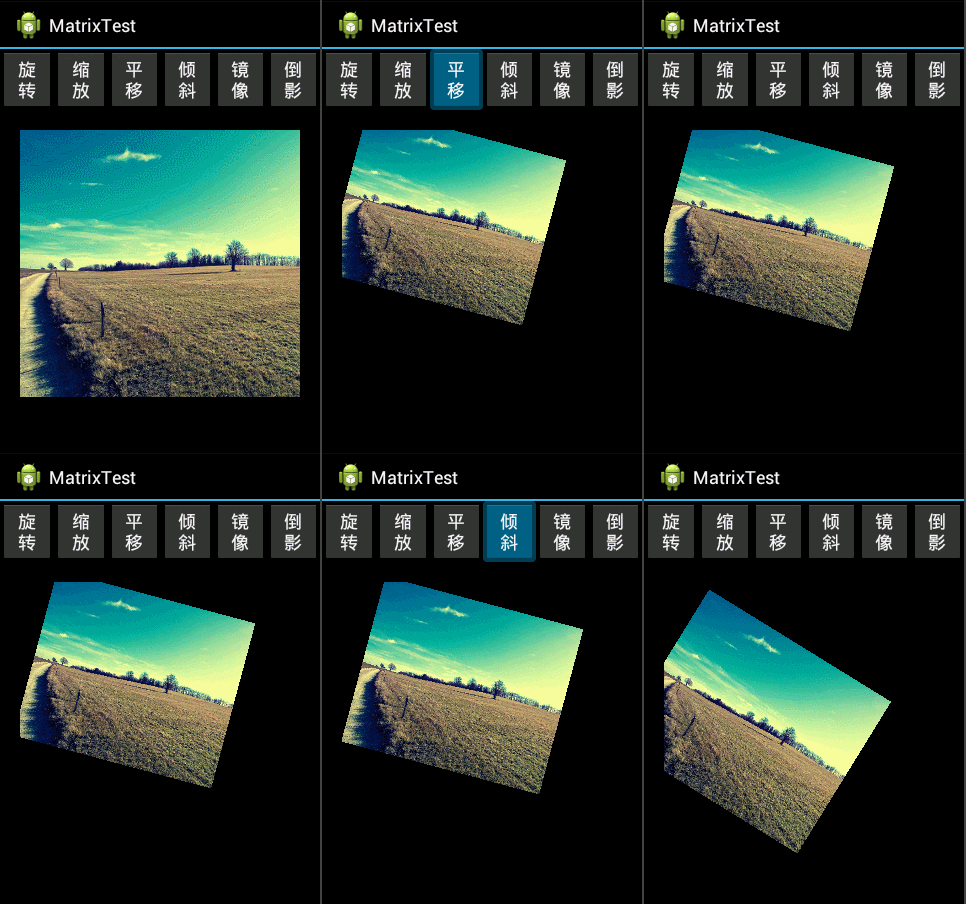
根據以上的Matrix的操作,自己做了一個小的實驗,效果如下:

MainActivity類:
package com.example.matrixtest;

import android.app.Activity;
import android.graphics.Bitmap;
import android.graphics.BitmapFactory;
import android.os.Bundle;
import android.view.Menu;
import android.view.View;
import android.view.View.OnClickListener;
import android.widget.Button;

public class MainActivity extends Activity {

    private TestView testView;

    @Override
    protected void onCreate(Bundle savedInstanceState) {
        super.onCreate(savedInstanceState);
        setContentView(R.layout.activity_main);
        testView = (TestView) findViewById(R.id.testview);
        Bitmap bitmap = BitmapFactory.decodeResource(getResources(),
                R.drawable.ttt);
        testView.setmBitmap(bitmap);

        ((Button) findViewById(R.id.button_rotate))
                .setOnClickListener(new OnClickListener() {

                    @Override
                    public void onClick(View v) {
                        // TODO Auto-generated method stub
                        testView.rotate(15);
                    }
                });
        ((Button) findViewById(R.id.button_scale))
                .setOnClickListener(new OnClickListener() {

                    @Override
                    public void onClick(View v) {
                        // TODO Auto-generated method stub
                        testView.scale(0.8f, 0.8f);
                    }
                });
        ((Button) findViewById(R.id.button_translate))
                .setOnClickListener(new OnClickListener() {

                    @Override
                    public void onClick(View v) {
                        // TODO Auto-generated method stub
                        testView.translate(1, 1);
                    }
                });
        ((Button) findViewById(R.id.button_skew))
        .setOnClickListener(new OnClickListener() {

            @Override
            public void onClick(View v) {
                // TODO Auto-generated method stub
                testView.skew(-0.3f, 0.3f);
            }
        });
        ((Button) findViewById(R.id.button_mirror))
                .setOnClickListener(new OnClickListener() {

                    @Override
                    public void onClick(View v) {
                        // TODO Auto-generated method stub
                        testView.mirror();
                    }
                });
        ((Button) findViewById(R.id.button_shadow))
                .setOnClickListener(new OnClickListener() {

                    @Override
                    public void onClick(View v) {
                        // TODO Auto-generated method stub
                        testView.shadow();
                    }
                });
    }

    @Override
    public boolean onCreateOptionsMenu(Menu menu) {
        // Inflate the menu; this adds items to the action bar if it is present.
        getMenuInflater().inflate(R.menu.main, menu);
        return true;
    }

}
TestView類,我重新寫了一個View來繪制圖片:
package com.example.matrixtest;

import android.content.Context;
import android.graphics.Bitmap;
import android.graphics.Canvas;
import android.graphics.Matrix;
import android.util.AttributeSet;
import android.view.View;

public class TestView extends View {

    private Bitmap mBitmap;
    private Matrix matrix;

    public TestView(Context context) {
        super(context);
        // TODO Auto-generated constructor stub
        matrix = new Matrix();
    }

    public TestView(Context context, AttributeSet attrs, int defStyleAttr) {
        super(context, attrs, defStyleAttr);
        // TODO Auto-generated constructor stub
        matrix = new Matrix();
    }

    public TestView(Context context, AttributeSet attrs) {
        super(context, attrs);
        // TODO Auto-generated constructor stub
        matrix = new Matrix();
    }

    public Bitmap getmBitmap() {
        return mBitmap;
    }

    public void setmBitmap(Bitmap mBitmap) {
        this.mBitmap = mBitmap;
        invalidate();
    }

    @Override
    protected void onDraw(Canvas canvas) {
        // TODO Auto-generated method stub
        super.onDraw(canvas);
        if (mBitmap != null) {
            canvas.drawBitmap(mBitmap, matrix, null);
        }
    }

    public void rotate(float degree) {
        if (mBitmap != null) {
            matrix.preRotate(degree, mBitmap.getWidth() / 2,
                    mBitmap.getHeight() / 2);
            invalidate();
        }

    }

    public void translate(float dx, float dy) {
        if (mBitmap != null) {
            matrix.postTranslate(dx, dy);
            invalidate();
        }
    }

    public void scale(float sx, float sy) {
        if (mBitmap != null) {
            matrix.postScale(sx, sy);
            invalidate();
        }
    }

    public void mirror() {
        if (mBitmap != null) {
            matrix.postScale(-1, 1);
            matrix.postTranslate(mBitmap.getWidth(), 0);
            invalidate();
        }
    }

    public void shadow() {
        if (mBitmap != null) {
            matrix.postScale(1, -1);
            matrix.postTranslate(0, mBitmap.getHeight());
            invalidate();
        }
    }

    public void skew(float kx, float ky){
        if (mBitmap != null) {
            matrix.postSkew(kx, ky);
            invalidate();
        }
    }
}
 retrofit2+Executors+DiskLruCache 2秒加載100張圖片從此告別OOM的困擾
人生的旅途,前途很遠,也很暗。然而不要怕,不怕的人的面前才有路。——魯迅自從上一篇博客發布後,已經有很長時間沒有更新博客了,一直忙著支付通的事情,
 Android開發之搜索框自動提示細節MatrixCursor學習
1,在ActionBar裡面加入搜索框 在ActionBar裡面加入搜索框是現在APP應用的常用做法。要想把搜索做好,可不是那麼容易。涉及到自動提示和真正的搜索。下圖是我
 Android實現自定義日歷
自定義日歷控件,支持舊歷、節氣、日期標注、點擊操作 (參考網絡上的日歷控件改寫)注:將下面的四張資源圖片拷貝到所建包的下一個image目錄中,如Calendar.java
 Android用戶界面設計:基本按鈕
Android用戶界面設計:基本按鈕 本文向你展示了在你的Android應用程序中創建一個簡單的Button或ImageButton控件的步驟。首先,你會