編輯:關於Android編程
我看到越來越多的應用使用這樣的效果,如QQ空間5.0的主界面,確實很好看!大概就搜了一下相關的實現方式,發現早就有了相關的方案:
仿QQ空間滾動ActionBar透明度變化Demo
還有我在github上看到就有這樣的實現方式,這也是本博文的主要核心內容:
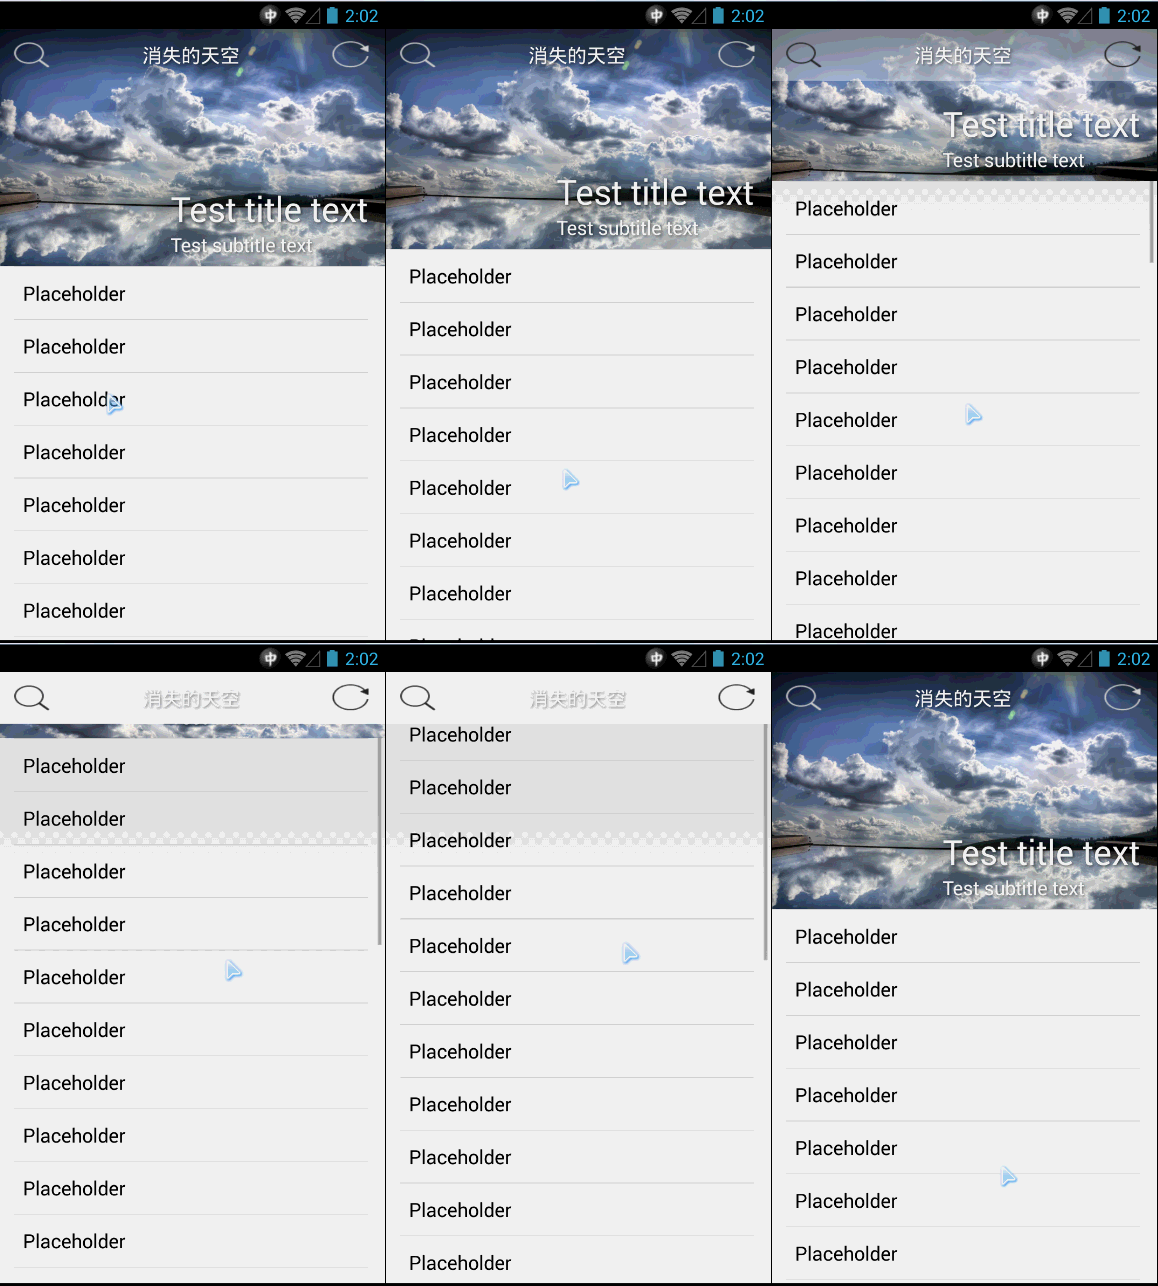
效果如下:

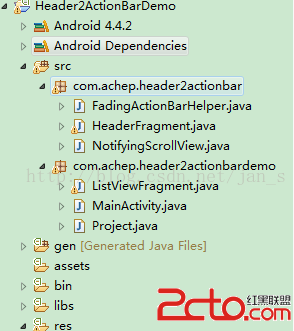
這是Demo結構:

1.FadingActionBarHelper.java 這個類是處理Actionbar的核心類,處理對scroll事件對actionbar背景色alpha的處理。
public class FadingActionBarHelper {

    private static final String TAG = FadingActionBarHelper;

    private int mAlpha = 255;
    private Drawable mDrawable;
    private boolean isAlphaLocked;

    private final ActionBar mActionBar;

    public FadingActionBarHelper(final ActionBar actionBar) {
        mActionBar = actionBar;
    }

    public FadingActionBarHelper(final ActionBar actionBar, final Drawable drawable) {
        mActionBar = actionBar;
        setActionBarBackgroundDrawable(drawable);
    }

    public void setActionBarBackgroundDrawable(Drawable drawable) {
        setActionBarBackgroundDrawable(drawable, true);
    }

    @TargetApi(Build.VERSION_CODES.KITKAT)
	public void setActionBarBackgroundDrawable(Drawable drawable, boolean mutate) {
        mDrawable = mutate ? drawable.mutate() : drawable;
        mActionBar.setBackgroundDrawable(mDrawable);
        if (mAlpha == 255) {
            if (Build.VERSION.SDK_INT >= Build.VERSION_CODES.KITKAT)
                mAlpha = mDrawable.getAlpha();
        } else {
            setActionBarAlpha(mAlpha);
        }
    }

    /**
     * An {@link android.app.ActionBar} background drawable.
     *
     * @see #setActionBarBackgroundDrawable(android.graphics.drawable.Drawable)
     * @see #setActionBarAlpha(int)
     */
    public Drawable getActionBarBackgroundDrawable() {
        return mDrawable;
    }

    /**
     * Please use this method for global changes only!
     * This is helpful when you need to provide something like
     * Navigation drawer: lock ActionBar and set
     * {@link android.graphics.drawable.Drawable#setAlpha(int)}
     * to {@link #getActionBarBackgroundDrawable()} directly.
     *
     * @param alpha a value from 0 to 255
     * @see #getActionBarBackgroundDrawable()
     * @see #getActionBarAlpha()
     */
    public void setActionBarAlpha(int alpha) {
        if (mDrawable == null) {
            Log.w(TAG, Set action bar background before setting the alpha level!);
            return;
        }
        if (!isAlphaLocked) {
			mDrawable.setAlpha(alpha);
			View view = mActionBar.getCustomView();
			if(view!=null){
				//這裡是對自定義actionbar背景的處理,我這邊就草草了事了
				if(alpha>=55){
					view.findViewById(R.id.search_button).setBackgroundResource(R.drawable.search);
					view.findViewById(R.id.refresh_button).setBackgroundResource(R.drawable.refresh);
				}else{
					view.findViewById(R.id.search_button).setBackgroundResource(R.drawable.skin_nav_icon_l_search_rev);
					view.findViewById(R.id.refresh_button).setBackgroundResource(R.drawable.skin_nav_icon_r_refresh_rev);
				}
				Log.i(TAG, search_button.alpha=>+alpha);
			}
		}
        mAlpha = alpha;
    }

    public int getActionBarAlpha() {
        return mAlpha;
    }

    /**
     * When ActionBar's alpha is locked {@link #setActionBarAlpha(int)}
     * won't change drawable's alpha (but will change {@link #getActionBarAlpha()} level)
     *
     * @param lock
     */
    public void setActionBarAlphaLocked(boolean lock) {

        // Update alpha level on unlock
        if (isAlphaLocked != (isAlphaLocked = lock) && !isAlphaLocked) {
            setActionBarAlpha(mAlpha);
        }
    }

    public boolean isActionBarAlphaLocked() {
        return isAlphaLocked;
    }
}
public class NotifyingScrollView extends ScrollView {
    // Edge-effects don't mix well with the translucent action bar in Android 2.X
    private boolean mDisableEdgeEffects = true;

    /**
     * @author Cyril Mottier
     */
    public interface OnScrollChangedListener {
        void onScrollChanged(ScrollView who, int l, int t, int oldl, int oldt);
    }

    private OnScrollChangedListener mOnScrollChangedListener;

    public NotifyingScrollView(Context context) {
        super(context);
    }

    public NotifyingScrollView(Context context, AttributeSet attrs) {
        super(context, attrs);
    }

    public NotifyingScrollView(Context context, AttributeSet attrs, int defStyle) {
        super(context, attrs, defStyle);
    }

    @Override
    protected void onScrollChanged(int l, int t, int oldl, int oldt) {
        super.onScrollChanged(l, t, oldl, oldt);
        if (mOnScrollChangedListener != null) {
            mOnScrollChangedListener.onScrollChanged(this, l, t, oldl, oldt);
        }
    }

    public void setOnScrollChangedListener(OnScrollChangedListener listener) {
        mOnScrollChangedListener = listener;
    }

    @Override
    protected float getTopFadingEdgeStrength() {
        // http://stackoverflow.com/a/6894270/244576
        if (mDisableEdgeEffects && Build.VERSION.SDK_INT < Build.VERSION_CODES.HONEYCOMB) {
            return 0.0f;
        }
        return super.getTopFadingEdgeStrength();
    }

    @Override
    protected float getBottomFadingEdgeStrength() {
        // http://stackoverflow.com/a/6894270/244576
        if (mDisableEdgeEffects && Build.VERSION.SDK_INT < Build.VERSION_CODES.HONEYCOMB) {
            return 0.0f;
        }
        return super.getBottomFadingEdgeStrength();
    }
}
3.對於普通的java程序員來說,你可以不知道怎麼個原理,但是你一定要知道怎麼運用它,如何運用到我們的實際項目中並且改造它,這是demo的主界面,用起來就幾行代碼,是不是很叼?
public class MainActivity extends Activity {

    private FadingActionBarHelper mFadingActionBarHelper;
    private ActionBar mActionBar;

    @Override
    protected void onCreate(Bundle savedInstanceState) {
        super.onCreate(savedInstanceState);
        setContentView(R.layout.activity_main);
        mActionBar = getActionBar();
        //使用自定義的布局的ActionBar
        mActionBar.setDisplayOptions(ActionBar.DISPLAY_SHOW_CUSTOM);
        mActionBar.setCustomView(R.layout.my_actionbar);
        //定義白色為Actionbar的背景色
        mFadingActionBarHelper = new FadingActionBarHelper(getActionBar(),
                getResources().getDrawable(R.drawable.actionbar_bg));

        if (savedInstanceState == null) {
            getFragmentManager().beginTransaction()
                    .add(R.id.container, new ListViewFragment())
                    .commit();
        }
    }


    @Override
    public boolean onCreateOptionsMenu(Menu menu) {

        // Inflate the menu; this adds items to the action bar if it is present.
    	//菜單頁面礙於效果,即被隱藏
//        getMenuInflater().inflate(R.menu.main, menu);
        return true;
    }

    @Override
    public boolean onOptionsItemSelected(MenuItem item) {
        // Handle action bar item clicks here. The action bar will
        // automatically handle clicks on the Home/Up button, so long
        // as you specify a parent activity in AndroidManifest.xml.
        return super.onOptionsItemSelected(item);
    }

    //這段代碼可不要忘了
    public FadingActionBarHelper getFadingActionBarHelper() {
        return mFadingActionBarHelper;
    }
}
 Android高級控件——GridView ScrollView ViewPager (上)
GridView網格視圖,網格視圖組件,九宮圖顯示數據表格(一種控件)ScrollView滾動視圖是一個單一容器,只能包含一個組件。ViewPager左右滑動SlideM
 android 沉浸式狀態欄(像ios那樣的狀態欄與應用統一顏色樣式)
這個特性是andorid4.4支持的,最少要api19才可以使用。下面介紹一下使用的方法,非常得簡單: public class MainActivity ex
 Android自定義帶水滴的進度條樣式(帶漸變色效果)
一、直接看效果二、直接上代碼1.自定義控件部分package com.susan.project.myapplication;import android.app.Act
 [Android] 更改關聯的源碼路徑
右擊選中工程 → Java Build Path → Libraries → Android 4.1.2 → 點開android.jar → 選中Source attac