編輯:關於Android編程
前言
重新學習這一項技術,主要的原因,是因為以前沒有好好的學,那時總覺得作品能動,能完成工作就好了,而這種得過且過的想法,大大地影響了我的技術程度,也因此,在這個這個博客裡,有許多的復習心得。有幸得到一位前輩的指導,指出,若只是學習,而無實際應用,這樣進步會較少,因此,最好要多看源碼,並且自己多嘗試多實踐,這樣學習一萬小時,應該能有小進步,因此開始了 Bound Service相關學習/復習工作。
Bound Service
「Bound Service是 Client-Server Interface 中的服務端,一個 Activity 可以透過 Bound Service 綁定一個服務,收發訊息,甚至進行進程間通訊。」Service類是一個 Abstract Class,而 Bound Service實現了 Service類,並實現了 onBind()方法,Activity 才能和 Service進行溝通。 所以,我們先從簡單的例子--讓一個 Activity 綁定一個 Service,讓 Service 能夠為 Activity 提供服務,同時,我已將練習的相關代碼提交至 GitHub上(https://github.com/shanwu/InterProcessCommPractice),有不同的分枝分別代表不同的例子,這樣可以使用 Github上的分枝比較功能( )比較不同方法間的差異。

master 分枝:進程內通訊,代表的是官網 Extending the Binder class的例子。
ipc_messanger_example:跨進程通訊,代表的是官網 Using a Messenger的例子(抱歉 branch 名英文拼錯 Orz)
ipc_messenger_example_bidirection:同上,但是其為 Service, Activity 雙向互傳的例子。
ipc_aidl_example:跨進程通訊,簡單的 aidl 使用例子。
Extending Binder Service
客戶端的 Activity 可以透過呼叫 bindService()方法和服務端的 Service建立連結,連結建立的時候,會先調用 Bound Service的 onBind() 方法,再來調用 onServiceConnected(),而如果是需要移除連結的話,便調用 unbindService()方法,此時Bound Service會直接調用 onDestory(),然後服務結束。代碼如下:
在Bound Service寫一個繼承 Binder的類-LocalBinder,主要是在進程內通訊時,在 onBind()的時候,能夠用方法來返回 Bound Service的對象:
    public class LocalBinder extends Binder {
        public Service getService() {
            return WorkerService.this;
        }
    }
宣告一個 LocalBinder的私有全局變量
public class WorkerService extends Service {
    private final IBinder mBinder = new LocalBinder();
同時覆寫 onBind()方法
    @Override
    public IBinder onBind(Intent intent) {
        Log.d(guang,onBind);
        return mBinder;
    }
而在Activity端,我們需要使用 bindService()來進行綁定 Bound Service的工作
    @Override
    public void onClick(View v) {
        final int id = v.getId();
        switch (id) {
            case R.id.btn_start:
                Intent intent = new Intent(MainActivity.this, WorkerService.class);
                bindService(intent, mServiceConn, Context.BIND_AUTO_CREATE);
                break;
同時我們需要將接口 ServiceConnection的方法覆寫,在連結開始的時候,iBinder便是onBind所返回的 IBinder類變量,所以我們將它強轉為LocalBinder,然後調用LocalBinder裡的方法以取得 Bound Service 的對象,將它在於全局變量中,之後便可以調用他的方法。這邊要注意的是 onServiceDisconnected一般情況下不會調用,只有在 Service發生異常導致連結結束才會調用。
        mServiceConn = new ServiceConnection() {
            @Override
            public void onServiceConnected(ComponentName componentName, IBinder iBinder) {
                WorkerService.LocalBinder lBinder = (WorkerService.LocalBinder) iBinder;
                mService = (WorkerService) lBinder.getService();
                Log.d(guang,onServiceConnected);
                mIsBind = true;
            }

            @Override
            public void onServiceDisconnected(ComponentName componentName) {
                Log.d(guang,onServiceDisconnected);
                mIsBind = false;
            }
        };
調用它的方法,使 Bound Service 做事,它可以是播放音樂,或是執行其它不需要 UI 界面的工作。
            case R.id.btn_sing:
                if (mIsBind) {
                    mService.makeSingingService();
                }
                break;
這樣基本上就是本篇的重點了~全部代碼均可自 GitHub取得~
 Android實現換膚功能(二)
前兩天寫的上章關於換膚的功能獲得了很好的反響,今天為大家介紹另一種方式。今天實現的策略也是網友建議的,然後我自己去寫了個demo,大家自己評估下相比第一種方式的優勢和劣
 Android實現炫酷的CheckBox效果
首先貼出實現的效果圖:gif的效果可能有點過快,在真機上運行的效果會更好一些。我們主要的思路就是利用屬性動畫來動態地畫出選中狀態以及對勾的繪制過程。看到上面的效果圖,相信
 Android編程實現向桌面添加快捷方式的方法
本文實例講述了Android編程實現向桌面添加快捷方式的方法。分享給大家供大家參考,具體如下:有時候為了使用方便,需要在桌面上添加快捷方式,下面是兩種添加快捷方式的方法:
 Dalvik學習筆記——Zygote啟動
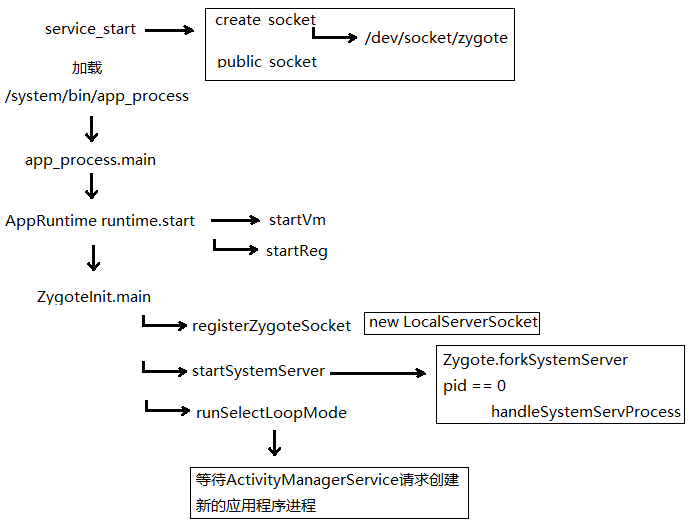
這張圖簡單說明了Zygote的啟動過程下面重點解析這些函數,從app_process.main開始 int main(int argc, char* const