編輯:關於Android編程
因為有前面分析startService的代碼實現過程,則對於bindService的代碼分析就不用那麼詳細介紹,在介紹流程的同時更關注一些細節上的部分。
首先,bindService也是通過 ContextWrapper.bindService,再到ContextImpl的bindService,然後是bindServiceCommon,需要注意的是,傳入的ServiceConnection被轉換成IServiceConnection類型,
private boolean bindServiceCommon(Intent service, ServiceConnection conn, int flags,
UserHandle user) {
IServiceConnection sd;
…
sd = mPackageInfo.getServiceDispatcher(conn, getOuterContext(),
mMainThread.getHandler(), flags);
…
int res = ActivityManagerNative.getDefault().bindService(
mMainThread.getApplicationThread(), getActivityToken(),
service, service.resolveTypeIfNeeded(getContentResolver()),
sd, flags, user.getIdentifier());
}
接下去是進入AMS的bindService,再調用ActiveServices.java 的bindServiceLocked,它會把IServiceConnection實例存放到ConnectionRecord裡面,並執行bringUpServiceLocked,
int bindServiceLocked(IApplicationThread caller, IBinder token,
Intent service, String resolvedType,
IServiceConnection connection, int flags, int userId) {
…
ConnectionRecord c = new ConnectionRecord(b, activity,
connection, flags, clientLabel, clientIntent);
IBinder binder = connection.asBinder();
if ((flags&Context.BIND_AUTO_CREATE) != 0) {
s.lastActivity = SystemClock.uptimeMillis();
if (bringUpServiceLocked(s, service.getFlags(), callerFg, false) != null){
return 0;
}
}
…
if (s.app != null && b.intent.received) {
// Service is already running, so we can immediately
// publish the connection.
try {
c.conn.connected(s.name, b.intent.binder);
} catch (Exception e) {
Slog.w(TAG, "Failure sending service " + s.shortName
+ " to connection " + c.conn.asBinder()
+ " (in " + c.binding.client.processName + ")", e);
}
// If this is the first app connected back to this binding,
// and the service had previously asked to be told when
// rebound, then do so.
if (b.intent.apps.size() == 1 && b.intent.doRebind) {
requestServiceBindingLocked(s, b.intent, callerFg, true);
}
} else if (!b.intent.requested) {
requestServiceBindingLocked(s, b.intent, callerFg, false);
}
}
根據之前的分析ServiceLocked會調用realStartServiceLocked,而realStartServiceLocked則先調用scheduleCreateService,完成service的創建和Oncreate()的執行,然後執行requestServiceBindingsLocked,這個是bind服務相關處理,最後是sendServiceArgsLocked,這個是Start服務的處理。
private final void realStartServiceLocked(ServiceRecord r,
ProcessRecord app, boolean execInFg) throws RemoteException {
…
app.thread.scheduleCreateService(r, r.serviceInfo, mAm.compatibilityInfoForPackageLocked(r.serviceInfo.applicationInfo), app.repProcState);
…
requestServiceBindingsLocked(r, execInFg);
sendServiceArgsLocked(r, execInFg, true);
…
}
requestServiceBindingsLocked再調用ActivityThread的方法scheduleBindService,在ActivityThread.java 中,它發出一個BIND_SERVICE事件,被handleBindService處理,
private void handleBindService(BindServiceData data) {
…
if (!data.rebind) {
IBinder binder = s.onBind(data.intent);
ActivityManagerNative.getDefault().publishService(
data.token, data.intent, binder);
} else {
s.onRebind(data.intent);
ActivityManagerNative.getDefault().serviceDoneExecuting(
data.token, 0, 0, 0);
}
…
這裡先調用服務的onBind方法,因為服務是重載的,所以會執行具體服務類的方法,並返回服務裡的binder實例,這個binder隨後會被使用到,
其中AMS的publishService方法被調用,在 ActivityManagerService.java中又會調用 ActiveServices.java 的publishServiceLocked,
void publishServiceLocked(ServiceRecord r, Intent intent, IBinder service) {
…
for (int conni=r.connections.size()-1; conni>=0; conni--) {
ArrayList
for (int i=0; i ConnectionRecord c = clist.get(i); … try { c.conn.connected(r.name, service); } … serviceDoneExecutingLocked(r, mDestroyingServices.contains(r), false); 這裡主要調用到c.conn.connected,c就是ConnectionRecord,其成員conn是一個IServiceConnection類型實例,這在前面有提到,connected則是其實現類的方法。 對於IServiceConnection,它是一個接口,位置在(frameworks\base): core/java/android/app/IServiceConnection.aidl,aidl定義如下,它只有一個接口方法connected, oneway interface IServiceConnection { void connected(in ComponentName name, IBinder service); } 其服務端的實現在LoadedApk.java,如下,InnerConnection類是在ServiceDispatcher的內部類,並在ServiceDispatcher的構造函數裡面實例化的,其方法connected也是調用的ServiceDispatcher的方法connected, private static class InnerConnection extendsIServiceConnection.Stub { final WeakReference InnerConnection(LoadedApk.ServiceDispatcher sd) { mDispatcher = new WeakReference } public void connected(ComponentName name, IBinder service) throws RemoteException { LoadedApk.ServiceDispatcher sd = mDispatcher.get(); if (sd != null) { sd.connected(name, service); } } } ServiceDispatcher(ServiceConnection conn, Context context, Handler activityThread, int flags) { mIServiceConnection = new InnerConnection(this); mConnection = conn; mContext = context; mActivityThread = activityThread; mLocation = new ServiceConnectionLeaked(null); mLocation.fillInStackTrace(); mFlags = flags; } 這裡就再回到我們前面的ContextImpl裡面bindServiceCommon方法裡面,這裡進行ServiceConnection轉化為IServiceConnection時,調用了mPackageInfo.getServiceDispatcher,mPackageInfo就是一個LoadedApk實例, /*package*/ LoadedApk mPackageInfo; private boolean bindServiceCommon(Intent service, ServiceConnection conn, int flags, UserHandle user) { IServiceConnection sd; sd = mPackageInfo.getServiceDispatcher(conn, getOuterContext(), mMainThread.getHandler(), flags); } 所以,getServiceDispatcher會創建一個ServiceDispatcher實例,並將ServiceDispatcher實例和ServiceConnection實例形成KV對,並在ServiceDispatcher的構造函數裡將ServiceConnection實例c賦值給ServiceConnection的成員變量mConnection, public final IServiceConnection getServiceDispatcher(ServiceConnection c, Context context, Handler handler, int flags) { synchronized (mServices) { LoadedApk.ServiceDispatcher sd = null; ArrayMap if (map != null) { sd = map.get(c); } if (sd == null) { sd = new ServiceDispatcher(c, context, handler, flags); if (map == null) { map = new ArrayMap mServices.put(context, map); } map.put(c, sd); … } 這樣,在執行ServiceDispatcher的connected方法時,就會調用到ServiceConnection的 onServiceConnected,完成綁定ServiceConnection的觸發。 public void doConnected(ComponentName name, IBinder service) { … if (old != null) { mConnection.onServiceDisconnected(name); } // If there is a new service, it is now connected. if (service != null) { mConnection.onServiceConnected(name, service); } } 至此,就執行完了bindService的主要過程。 我們下面用一張圖來總結這個流程,
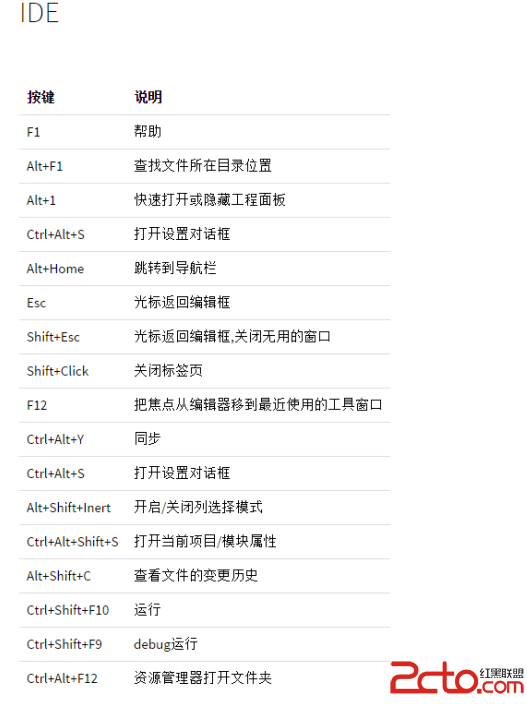
 Android Studio 快捷鍵(最全)
快捷鍵截圖:
 Andriod DiskLruCache的使用案例
DiskLruCache是谷歌推薦的用來實現硬盤緩存的類,本案例將對DiskLruCache的基本用法做一個總結,包括:創建緩存、查找使用緩存、移除緩存等等。實現效果圖創
 Android使用ListView批量刪除item的方法
本文實例講述了Android使用ListView批量刪除item的方法。分享給大家供大家參考,具體如下:利用CheckBox選中一個或多個item,最後批量刪除它們。程序
 Android實現snmp協議(一)
2015年一月初。接到華為一位老師的電話,讓我幫忙做一款他們在北京展會上要用到的App,該App能夠展示華為的網絡設備運行狀態並可以設置一些簡單的參數,包括AP、LSW、