編輯:關於Android編程
最近在android上用opencv搞人臉識別的
現在簡單展示下代碼。環境搭建我前面有寫,不會的自己看可以。
這個事用java api直接調用的更簡單了就,搭建都不需要直接下載opencv解壓就好。
現在貼上程序
首先布局
android:layout_width="match_parent"
android:layout_height="match_parent"
android:orientation="vertical" >
android:layout_width="fill_parent"
android:layout_height="400dp" />
android:layout_height="wrap_content"
android:orientation="horizontal" >
android:layout_width="100dp"
android:layout_height="wrap_content" />
android:id="@+id/button"
android:layout_width="wrap_content"
android:layout_height="wrap_content"
android:text="detection" />
接著主函數:
public class MainActivity extends Activity implements OnClickListener {
final private int PICTURE_CHOOSE = 1;
private ImageView imageView;
private Bitmap bitmap;
private Button button, tu;
private TextView textView;
private CascadeClassifier cascadeClassifier;
private BaseLoaderCallback mLoaderCallback = new BaseLoaderCallback(this) {
@Override
public void onManagerConnected(int status) {
switch (status) {
case LoaderCallbackInterface.SUCCESS: {
}
break;
default: {
super.onManagerConnected(status);
}
break;
}
}
};
@Override
protected void onCreate(Bundle savedInstanceState) {
super.onCreate(savedInstanceState);
setContentView(R.layout.activity_main);
findView();
button.setOnClickListener(this);
button.setVisibility(View.INVISIBLE);
tu.setOnClickListener(this);
imageView.setImageBitmap(bitmap);
}
private void findView() {
imageView = (ImageView) findViewById(R.id.image);
button = (Button) findViewById(R.id.button);
textView = (TextView) findViewById(R.id.text);
tu = (Button) findViewById(R.id.tu);
}
@Override
public void onClick(View v) {
switch (v.getId()) {
case R.id.button:
try {
InputStream is = this.getResources().openRawResource(R.raw.lbpcascade_frontalface);
File cascadeDir = this.getDir("cascade", Context.MODE_PRIVATE);
File cascadeFile = new File(cascadeDir, "lbpcascade_frontalface.xml");
FileOutputStream os = new FileOutputStream(cascadeFile);
byte[] buffer = new byte[4096];
int bytesRead;
while ((bytesRead = is.read(buffer)) != -1) {
os.write(buffer, 0, bytesRead);
}
is.close();
os.close();
cascadeClassifier = new CascadeClassifier(cascadeFile.getAbsolutePath());
if (cascadeClassifier.empty()) {
cascadeClassifier = null;
} else
cascadeFile.delete();
cascadeDir.delete();
} catch (IOException e) {
e.printStackTrace();
}
Mat testmat = new Mat();
System.out.println("cccccccccxxxxxxxxxxxxccccccc"+bitmap);
Utils.bitmapToMat(bitmap, testmat);
System.out.println("xxxxxxxxxxxxxxxxxxxxxx"+testmat);
MatOfRect facedetect = new MatOfRect();
cascadeClassifier.detectMultiScale(testmat, facedetect);
System.out.println("zzzzzzzzzzzzzzzzzz"+facedetect.toArray().length);
int facenum = 0;
for (Rect rect : facedetect.toArray()) {
Core.rectangle(testmat, new Point(rect.x, rect.y), new Point(
rect.x + rect.width, rect.y + rect.height), new Scalar(
255, 0, 0));
++facenum;
}
Utils.matToBitmap(testmat, bitmap);
imageView.setImageBitmap(bitmap);
textView.setText("Facecount:" + facenum);
break;
case R.id.tu:
System.out.println("'sssssssssssssssssssssssssssssssssssss");
Intent photoPickerIntent = new Intent(Intent.ACTION_PICK);
photoPickerIntent.setType("image/*");
startActivityForResult(photoPickerIntent, PICTURE_CHOOSE);
break;
default:
break;
}
}
@Override
protected void onActivityResult(int requestCode, int resultCode,
Intent intent) {
// TODO Auto-generated method stub
super.onActivityResult(requestCode, resultCode, intent);
System.out.println("cccccccccccccccccccccccccccccccccccccccc");
if (requestCode == PICTURE_CHOOSE) {
if (intent != null) {
Cursor cursor = getContentResolver().query(intent.getData(),
null, null, null, null);
cursor.moveToFirst();
int idx = cursor.getColumnIndex(ImageColumns.DATA);
String filesrc = cursor.getString(idx);
Options options = new Options();
options.inJustDecodeBounds = true;
bitmap = BitmapFactory.decodeFile(filesrc, options);
options.inSampleSize = Math.max(1, (int) Math.ceil(Math.max(
(double) options.outWidth / 1024f,
(double) options.outHeight / 1024f)));
options.inJustDecodeBounds = false;
bitmap=BitmapFactory.decodeFile(filesrc, options);
textView.setText("click detection");
System.out.println("ccccccccccccccccc"+bitmap);
imageView.setImageBitmap(bitmap);
button.setVisibility(View.VISIBLE);
} else {
Log.d("ccccccccccc", "idButSelPic Photopicker canceled");
}
}
}
@Override
protected void onResume() {
// TODO Auto-generated method stub
super.onResume();
OpenCVLoader.initAsync(OpenCVLoader.OPENCV_VERSION_2_4_9, this,
mLoaderCallback);
}
}
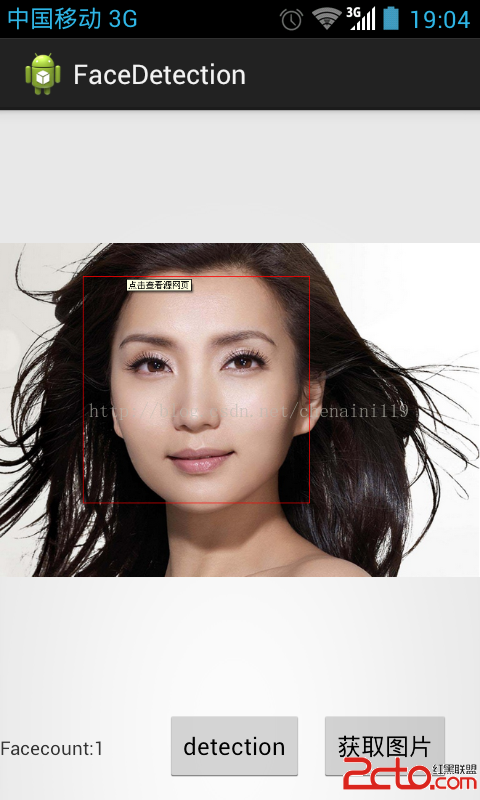
程序可用。大致過程是去相冊裡面的圖片進行人臉識別:附上效果圖

接下來應該處理實時視頻裡面的人臉識別了。
 Android 仿微信朋友圈點贊和評論彈出框功能
貢獻/下載源碼:https://github.com/mmlovesyy/PopupWindowDemo本文簡單模仿微信朋友圈的點贊和評論彈出框,布局等細節請忽略,著重實
 Android greenDAO數據庫配置教程
一、環境配置1、在Android Studio中,在.src/main目錄下新建一個java-gen文件夾,和java文件夾同級。用於存放greenDAO生成的DaoMa
 Android開發之程序員必須要懂得Android的重要設計理念2
上篇文章介紹了Android開發的設計理念的一部分,並沒有得到博友們的多大認可,只看到了一位博友在下面留言期待下一篇文章的發表,為了這小小的唯一支持,我決定繼續把後面的8
 神奇的 Swift 錯誤處理
Swift 中的錯誤處理從 O-C 沿襲而來,但 Swift 1.0 之後逐漸發生了巨大改變。重要的改變發生在 Swift 2,它率先使用了“處理非異常的狀態