編輯:關於Android編程
Action Bar主要功能包含:
1. 顯示選項菜單
2. 提供標簽頁的切換方式的導航功能,可以切換多個fragment.
3. 提供下拉的導航條目.
4. 提供交互式活動視圖代替選項條目
5. 使用程序的圖標作為返回Home主屏或向上的導航操作。
首先說下,使用OverFlow的時候需要在onCreate()函數中調用如下方法:
private void forceShowOverflowMenu() {
    try {
        ViewConfiguration config = ViewConfiguration.get(this);
        Field menuKeyField = ViewConfiguration.class
                .getDeclaredField("sHasPermanentMenuKey");
        if (menuKeyField != null) {
            menuKeyField.setAccessible(true);
            menuKeyField.setBoolean(config, false);
        }
    } catch (Exception e) {
        e.printStackTrace();
    }
}
注:此處未使用這種實現方式,本應用中使用的PopupMen
public class ShopOrderActivity extends ActionBarActivity implements
OnTouchListener, OnMenuItemClickListener{
private Toast mToast;
private Context context;
/** AlertDialog中輸入反饋框 */
private EditText et_FeedBack;
private PopupMenu popupMenu;
@Override
protected void onCreate(Bundle savedInstanceState) {
super.onCreate(savedInstanceState);
setContentView(R.layout.shop_order);
//設置Home圖標區域
// requestWindowFeature(Window.FEATURE_LEFT_ICON);
// setFeatureDrawableResource(Window.FEATURE_LEFT_ICON, resId);
this.context = this;
mToast = Toast.makeText(this, "", Toast.LENGTH_LONG);
initActionBar();
}
@Override
public boolean onCreateOptionsMenu(Menu menu) {
// Inflate the menu; this adds items to the action bar if it is present.
getMenuInflater().inflate(R.menu.actionbar_menu, menu);
return true;
}
@Override
public boolean onOptionsItemSelected(MenuItem item) {
// Handle action bar item clicks here. The action bar will
// automatically handle clicks on the Home/Up button, so long
// as you specify a parent activity in AndroidManifest.xml.
int id = item.getItemId();
if (id == R.id.actionbar_overflow) {
if (popupMenu == null) {
popupMenu = new PopupMenu(this,
findViewById(R.id.actionbar_overflow));
popupMenu.inflate(R.menu.actionbar_pop);
popupMenu.setOnMenuItemClickListener(this);
}
popupMenu.show();
return true;
} else if (public class ShopOrderActivity extends ActionBarActivity implements
OnTouchListener, OnMenuItemClickListener{
private Toast mToast;
private Context context;
/** AlertDialog中輸入反饋框 */
private EditText et_FeedBack;
private PopupMenu popupMenu;
@Override
protected void onCreate(Bundle savedInstanceState) {
super.onCreate(savedInstanceState);
setContentView(R.layout.shop_order);
//設置Home圖標區域
// requestWindowFeature(Window.FEATURE_LEFT_ICON);
// setFeatureDrawableResource(Window.FEATURE_LEFT_ICON, resId);
this.context = this;
mToast = Toast.makeText(this, "", Toast.LENGTH_LONG);
initActionBar();
}
@Override
public boolean onCreateOptionsMenu(Menu menu) {
// Inflate the menu; this adds items to the action bar if it is present.
getMenuInflater().inflate(R.menu.actionbar_menu, menu);
return true;
}
@Override
public boolean onOptionsItemSelected(MenuItem item) {
// Handle action bar item clicks here. The action bar will
// automatically handle clicks on the Home/Up button, so long
// as you specify a parent activity in AndroidManifest.xml.
int id = item.getItemId();
if (id == R.id.actionbar_overflow) {
if (popupMenu == null) {
popupMenu = new PopupMenu(this,
findViewById(R.id.actionbar_overflow));
popupMenu.inflate(R.menu.actionbar_pop);
popupMenu.setOnMenuItemClickListener(this);
}
popupMenu.show();
return true;
} else if (id == android.R.id.home) {
finish();
} else if (id == R.id.new_order_bar) {
showTip("顯示紅點");
}
return super.onOptionsItemSelected(item);
}
@Override
public boolean onMenuItemClick(MenuItem arg0) {
Intent intent;
switch (arg0.getItemId()) {
case R.id.actionbar_settings:
intent = new Intent(this, SettingsActivity.class);
startActivity(intent);
break;
case R.id.historyOrder:
intent = new Intent(this, HistoryOrderActivity.class);
startActivity(intent);
break;
case R.id.logout:
AlertDialog.Builder builder = new AlertDialog.Builder(
ShopOrderActivity.this);
builder.setTitle("確定要退出嗎?");
builder.setPositiveButton("確定",
new DialogInterface.OnClickListener() {
@Override
public void onClick(DialogInterface dialog, int which) {
showTip("退出登錄!");
}
});
builder.setNegativeButton("取消",
new DialogInterface.OnClickListener() {
@Override
public void onClick(DialogInterface dialog, int which) {
dialog.dismiss();
}
});
builder.create().show();
break;
}
return false;
}
/**
* 初始化ActionBar
*/
private void initActionBar() {
ActionBar actionBar = getSupportActionBar();
actionBar.setTitle("搶單");
actionBar.setDisplayHomeAsUpEnabled(true);
actionBar.setHomeButtonEnabled(true);
// actionBar.setIcon(R.drawable.back_menu);
// Drawable background = (Drawable) getResources()
// .getDrawable(R.drawable.top_bg);
// getActionBar().setBackgroundDrawable(background);
setTitleColor(this.getResources().getColor(R.color.green));// 沒反應
}
/**
* 顯示Toast
*
* @param str
*/
public void showTip(final String str) {
runOnUiThread(new Runnable() {
@Override
public void run() {
mToast.setText(str);
mToast.show();
}
});
}
}
id == android.R.id.home
當操作左上角icon圖標的時候實現的功能是返回,配置清單需要設置:
android:name="com.shop.order.ShopOrderActivity"
android:launchMode="singleTop"
android:theme="@style/Theme.AppCompat.Light.DarkActionBar" >
actionbar_menu的代碼:
注意:app:showAsAction="ifRoom|withText"如果寫成android:showAsAction="ifRoom|withText"則不會在actionbar顯示,當操作手機右下角的menu鍵時才會顯示
actionbar_pop的代碼:
 android Handler的使用(一)
Handler的使用(一) Handler基本概念: Handler主要用於異步消息的處理:當發出一個消息之後,首先進入一個消息隊
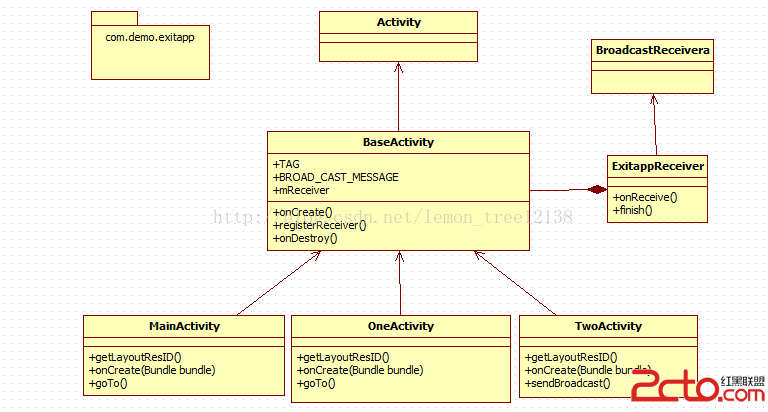
 Android退出程序(下)——利用廣播機制
概述: 基於上一篇博客《Android退出程序(上)——單例模式》的學習,我們知道了如何利用單例和循環遍歷的方式來退出我們的應用程序。這篇博客則要從另一個角度來解決問題—
 Android報警功能,報警鈴音,手機開始震動
公司項目需求,需要給軟件加入報警功能, 點擊手繪的報警圖標,開始震動,並且發出報警鈴音, 使用了layerlist,drawable,Vibrator,soundpool
 Android開發5:應用程序窗口小部件App Widgets的實現(附demo)
前言本次主要是實現一個Android應用,實現靜態廣播、動態廣播兩種改變 widget內容的方法,即在上篇博文中實驗的基礎上進行修改,所以此次實驗的重點是AppWidge