編輯:關於Android編程
在Android系統中,一個Activity對應一個應用程序窗口,任何一個Activity的啟動都是由AMS服務和應用程序進程相互配合來完成的。AMS服務統一調度系統中所有進程的Activity啟動,而每個Activity的啟動過程則由其所屬進程來完成。AMS服務通過realStartActivityLocked函數來通知應用程序進程啟動某個Activity:
frameworks\base\services\java\com\android\server\am\ ActivityStack.java
final boolean realStartActivityLocked(ActivityRecord r,
		ProcessRecord app, boolean andResume, boolean checkConfig)
		throws RemoteException {
	...
	//系統參數發送變化,通知Activity
	if (checkConfig) {
		①Configuration config = mService.mWindowManager.updateOrientationFromAppTokens(mService.mConfiguration,
				r.mayFreezeScreenLocked(app) ? r.appToken : null);
		mService.updateConfigurationLocked(config, r, false, false);
	}
	//將進程描述符設置到啟動的Activity描述符中
	r.app = app;
	app.waitingToKill = null;
	//將啟動的Activity添加到進程啟動的Activity列表中
	int idx = app.activities.indexOf(r);
	if (idx < 0) {
		app.activities.add(r);
	}
	mService.updateLruProcessLocked(app, true, true);
	try {
		...
		//通知應用程序進程加載Activity
		②app.thread.scheduleLaunchActivity(new Intent(r.intent), r.appToken,
				System.identityHashCode(r), r.info,
				new Configuration(mService.mConfiguration),
				r.compat, r.icicle, results, newIntents, !andResume,
				mService.isNextTransitionForward(), profileFile, profileFd,
				profileAutoStop);
		...
	} catch (RemoteException e) {
		...
	}
	if (mMainStack) {
		mService.startSetupActivityLocked();
	}
	return true;
}
AMS通過realStartActivityLocked函數來調度應用程序進程啟動一個Activity,參數r為即將啟動的Activity在AMS服務中的描述符,參數app為Activity運行所在的應用程序進程在AMS服務中的描述符。函數通過IApplicationThread代理對象ApplicationThreadProxy通知應用程序進程啟動r對應的Activity,應用程序進程完成Activity的加載等准備工作後,AMS最後啟動該Activity。啟動Activity的創建等工作是在應用程序進程中完成的,AMS是通過IApplicationThread接口和應用程序進程通信的。r.appToken 在AMS服務端的類型為Token,是IApplicationToken的Binder本地對象。
frameworks\base\core\java\android\app\ ActivityThread.java
public final void scheduleLaunchActivity(Intent intent, IBinder token, int ident, ActivityInfo info, Configuration curConfig, CompatibilityInfo compatInfo, Bundle state, ListpendingResults, List pendingNewIntents, boolean notResumed, boolean isForward, String profileName, ParcelFileDescriptor profileFd, boolean autoStopProfiler) { //將AMS服務傳過來的參數封裝為ActivityClientRecord對象 ActivityClientRecord r = new ActivityClientRecord(); r.token = token; r.ident = ident; r.intent = intent; r.activityInfo = info; r.compatInfo = compatInfo; r.state = state; r.pendingResults = pendingResults; r.pendingIntents = pendingNewIntents; r.startsNotResumed = notResumed; r.isForward = isForward; r.profileFile = profileName; r.profileFd = profileFd; r.autoStopProfiler = autoStopProfiler; updatePendingConfiguration(curConfig); //使用異步消息方式實現Activity的啟動 queueOrSendMessage(H.LAUNCH_ACTIVITY, r); }
參數token從AMS服務端經過Binder傳輸到應用程序進程後,變為IApplicationToken的Binder代理對象,類型為IApplicationToken.Proxy,這是因為AMS和應用程序運行在不同的進程中。
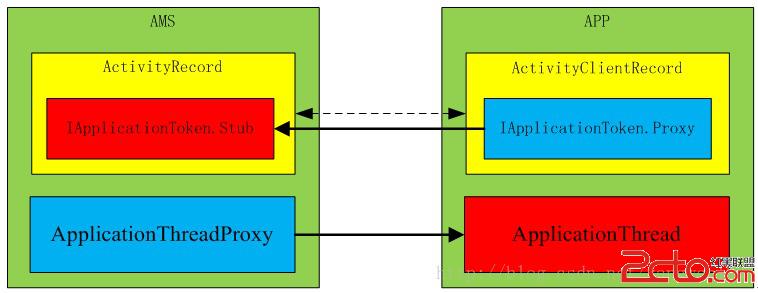
通過queueOrSendMessage函數將Binder跨進程調用轉換為應用程序進程中的異步消息處理
frameworks\base\core\java\android\app\ ActivityThread.java
private class H extends Handler {
 public void handleMessage(Message msg) {
	switch (msg.what) {
			case LAUNCH_ACTIVITY: {
				Trace.traceBegin(Trace.TRACE_TAG_ACTIVITY_MANAGER, "activityStart");
				ActivityClientRecord r = (ActivityClientRecord)msg.obj;
				r.packageInfo = getPackageInfoNoCheck(r.activityInfo.applicationInfo, r.compatInfo);
				handleLaunchActivity(r, null);
				Trace.traceEnd(Trace.TRACE_TAG_ACTIVITY_MANAGER);
			} break;
		}
	}
}
LAUNCH_ACTIVITY消息在應用程序主線程消息循環中得到處理,應用程序通過handleLaunchActivity函數來啟動Activity。到此AMS服務就完成了Activity的調度任務,將Activity的啟動過程完全交給了應用程序進程來完成。
frameworks\base\core\java\android\app\ ActivityThread.java
private void handleLaunchActivity(ActivityClientRecord r, Intent customIntent) {
	//主線程空閒時會定時執行垃圾回收,主線程當前要完成啟動Activity的任務,因此這裡先暫停GC
	unscheduleGcIdler();
	if (r.profileFd != null) {
		mProfiler.setProfiler(r.profileFile, r.profileFd);
		mProfiler.startProfiling();
		mProfiler.autoStopProfiler = r.autoStopProfiler;
	}
	// Make sure we are running with the most recent config.
	①handleConfigurationChanged(null, null);
	//創建Activity
	②Activity a = performLaunchActivity(r, customIntent);
	if (a != null) {
		r.createdConfig = new Configuration(mConfiguration);
		Bundle oldState = r.state;
		//啟動Activity
		③handleResumeActivity(r.token, false, r.isForward);
		...
	}else{
		...
	}
}
應用程序進程通過performLaunchActivity函數將即將要啟動的Activity加載到當前進程空間來,同時為啟動Activity做准備。
frameworks\base\core\java\android\app\ ActivityThread.java
private Activity performLaunchActivity(ActivityClientRecord r, Intent customIntent) {
	ActivityInfo aInfo = r.activityInfo;
	if (r.packageInfo == null) {
		//通過Activity所在的應用程序信息及該Activity對應的CompatibilityInfo信息從PMS服務中查詢當前Activity的包信息
		r.packageInfo = getPackageInfo(aInfo.applicationInfo, r.compatInfo,Context.CONTEXT_INCLUDE_CODE);
	}
	//獲取當前Activity的組件信息
	ComponentName component = r.intent.getComponent();
	if (component == null) {
		component = r.intent.resolveActivity(mInitialApplication.getPackageManager());
		r.intent.setComponent(component);
	}
	if (r.activityInfo.targetActivity != null) {
		//packageName為啟動Activity的包名,targetActivity為Activity的類名
		component = new ComponentName(r.activityInfo.packageName,
				r.activityInfo.targetActivity);
	}
	//通過類反射方式加載即將啟動的Activity
	Activity activity = null;
	try {
		java.lang.ClassLoader cl = r.packageInfo.getClassLoader();
		①activity = mInstrumentation.newActivity(cl, component.getClassName(), r.intent);
		StrictMode.incrementExpectedActivityCount(activity.getClass());
		r.intent.setExtrasClassLoader(cl);
		if (r.state != null) {
			r.state.setClassLoader(cl);
		}
	} catch (Exception e) {
		...
	}
	try {
		//通過單例模式為應用程序進程創建Application對象
		②Application app = r.packageInfo.makeApplication(false, mInstrumentation);
		if (activity != null) {
			//為當前Activity創建上下文對象ContextImpl
			ContextImpl appContext = new ContextImpl();
			//上下文初始化
			③appContext.init(r.packageInfo, r.token, this);
			appContext.setOuterContext(activity);
			CharSequence title = r.activityInfo.loadLabel(appContext.getPackageManager());
			...
			Configuration config = new Configuration(mCompatConfiguration);
			//將當前啟動的Activity和上下文ContextImpl、Application綁定
			④activity.attach(appContext, this, getInstrumentation(), r.token,
					r.ident, app, r.intent, r.activityInfo, title, r.parent,
					r.embeddedID, r.lastNonConfigurationInstances, config);
			...
			//調用Activity的OnCreate函數
			⑤mInstrumentation.callActivityOnCreate(activity, r.state);
			...
			//將Activity保存到ActivityClientRecord中,ActivityClientRecord為Activity在應用程序進程中的描述符
			r.activity = activity;
			...
		}
		r.paused = true;
		//ActivityThread的成員變量mActivities保存了當前應用程序進程中的所有Activity的描述符
		mActivities.put(r.token, r);
	} catch (SuperNotCalledException e) {
		...
	}
	return activity;
}
在該函數中,首先通過PMS服務查找到即將啟動的Activity的包名信息,然後通過類反射方式創建一個該Activity實例,同時為應用程序啟動的每一個Activity創建一個LoadedApk實例對象,應用程序進程中創建的所有LoadedApk對象保存在ActivityThread的成員變量mPackages中。接著通過LoadedApk對象的makeApplication函數,使用單例模式創建Application對象,因此在android應用程序進程中有且只有一個Application實例。然後為當前啟動的Activity創建一個ContextImpl上下文對象,並初始化該上下文,到此我們可以知道,啟動一個Activity需要以下對象:
1) XXActivity對象,需要啟動的Activity;
2) LoadedApk對象,每個啟動的Activity都擁有屬於自身的LoadedApk對象;
3) ContextImpl對象,每個啟動的Activity都擁有屬於自身的ContextImpl對象;
4) Application對象,應用程序進程中有且只有一個實例,和Activity是一對多的關系;
public Activity newActivity(ClassLoader cl, String className,
		Intent intent)
		throws InstantiationException, IllegalAccessException,
		ClassNotFoundException {
	return (Activity)cl.loadClass(className).newInstance();
}
這裡通過類反射的方式來加載要啟動的Activity實例對象。
首先介紹一下LoadedApk對象的構造過程:
frameworks\base\core\java\android\app\ ActivityThread.java
public final LoadedApk getPackageInfo(String packageName, CompatibilityInfo compatInfo,
		int flags) {
	synchronized (mPackages) {
		//通過Activity的包名從對應的成員變量中查找LoadedApk對象
		WeakReference ref;
		if ((flags&Context.CONTEXT_INCLUDE_CODE) != 0) {
			ref = mPackages.get(packageName);
		} else {
			ref = mResourcePackages.get(packageName);
		}
		LoadedApk packageInfo = ref != null ? ref.get() : null;
		if (packageInfo != null && (packageInfo.mResources == null
				|| packageInfo.mResources.getAssets().isUpToDate())) {
			...
			return packageInfo;
		}
	}
	//如果沒有,則為當前Activity創建對應的LoadedApk對象
	ApplicationInfo ai = null;
	try {
		//通過包名在PMS服務中查找應用程序信息
		ai = getPackageManager().getApplicationInfo(packageName,
				PackageManager.GET_SHARED_LIBRARY_FILES, UserId.myUserId());
	} catch (RemoteException e) {
		// Ignore
	}
	//使用另一個重載函數創建LoadedApk對象
	if (ai != null) {
		return getPackageInfo(ai, compatInfo, flags);
	}
	return null;
}
public final LoadedApk getPackageInfo(ApplicationInfo ai, CompatibilityInfo compatInfo,
		int flags) {
	boolean includeCode = (flags&Context.CONTEXT_INCLUDE_CODE) != 0;
	boolean securityViolation = includeCode && ai.uid != 0
			&& ai.uid != Process.SYSTEM_UID && (mBoundApplication != null
					? !UserId.isSameApp(ai.uid, mBoundApplication.appInfo.uid)
					: true);
	if ((flags&(Context.CONTEXT_INCLUDE_CODE|Context.CONTEXT_IGNORE_SECURITY))
			== Context.CONTEXT_INCLUDE_CODE) {
		...
	}
	return getPackageInfo(ai, compatInfo, null, securityViolation, includeCode);
}
private LoadedApk getPackageInfo(ApplicationInfo aInfo, CompatibilityInfo compatInfo,
		ClassLoader baseLoader, boolean securityViolation, boolean includeCode) {
	//再次從對應的成員變量中查找LoadedApk實例
	synchronized (mPackages) {
		WeakReference ref;
		if (includeCode) {
			ref = mPackages.get(aInfo.packageName);
		} else {
			ref = mResourcePackages.get(aInfo.packageName);
		}
		LoadedApk packageInfo = ref != null ? ref.get() : null;
		if (packageInfo == null || (packageInfo.mResources != null
				&& !packageInfo.mResources.getAssets().isUpToDate())) {
			...
			//構造一個LoadedApk對象
			packageInfo =new LoadedApk(this, aInfo, compatInfo, this, baseLoader,
						securityViolation, includeCode &&
						(aInfo.flags&ApplicationInfo.FLAG_HAS_CODE) != 0);
			//保存LoadedApk實例到ActivityThread的相應成員變量中
			if (includeCode) {
				mPackages.put(aInfo.packageName,
						new WeakReference(packageInfo));
			} else {
				mResourcePackages.put(aInfo.packageName,
						new WeakReference(packageInfo));
			}
		}
		return packageInfo;
	}
}
frameworks\base\core\java\android\app\LoadedApk.java
public LoadedApk(ActivityThread activityThread, ApplicationInfo aInfo,
		CompatibilityInfo compatInfo,
		ActivityThread mainThread, ClassLoader baseLoader,
		boolean securityViolation, boolean includeCode) {
	mActivityThread = activityThread;
	mApplicationInfo = aInfo;
	mPackageName = aInfo.packageName;
	mAppDir = aInfo.sourceDir;
	final int myUid = Process.myUid();
	mResDir = aInfo.uid == myUid ? aInfo.sourceDir
			: aInfo.publicSourceDir;
	if (!UserId.isSameUser(aInfo.uid, myUid) && !Process.isIsolated()) {
		aInfo.dataDir = PackageManager.getDataDirForUser(UserId.getUserId(myUid),
				mPackageName);
	}
	mSharedLibraries = aInfo.sharedLibraryFiles;
	mDataDir = aInfo.dataDir;
	mDataDirFile = mDataDir != null ? new File(mDataDir) : null;
	mLibDir = aInfo.nativeLibraryDir;
	mBaseClassLoader = baseLoader;
	mSecurityViolation = securityViolation;
	mIncludeCode = includeCode;
	mCompatibilityInfo.set(compatInfo);
	if (mAppDir == null) {
		//為應用程序進程創建一個ContextImpl上下文
		if (ActivityThread.mSystemContext == null) {
			ActivityThread.mSystemContext =
				ContextImpl.createSystemContext(mainThread);
			ActivityThread.mSystemContext.getResources().updateConfiguration(
					 mainThread.getConfiguration(),
					 mainThread.getDisplayMetricsLocked(compatInfo, false),
					 compatInfo);
		}
		mClassLoader = ActivityThread.mSystemContext.getClassLoader();
		mResources = ActivityThread.mSystemContext.getResources();
	}
}
從以上LoadedApk的構造函數可以看出,LoadedApk類記錄了Activity運行所在的ActivityThread、Activity所在的應用程序信息、Activity的包名、Activity的資源路徑、Activity的庫路徑、Activity的數據存儲路徑、類加載器和應用程序所使用的資源等信息。
當Activity為應用程序進程啟動的第一個Activity,因此需要構造一個Application對象
frameworks\base\core\java\android\app\LoadedApk.java
public Application makeApplication(boolean forceDefaultAppClass,
		Instrumentation instrumentation) {
	//在應用程序進程空間以單例模式創建Application對象
	if (mApplication != null) {
		return mApplication;
	}
	Application app = null;
	//得到應用程序的Application類名
	String appClass = mApplicationInfo.className;
	//如果應用程序沒用重寫Application,則使用Android默認的Application類
	if (forceDefaultAppClass || (appClass == null)) {
		appClass = "android.app.Application";
	}
	try {
		java.lang.ClassLoader cl = getClassLoader();
		//為Application實例創建一個上下文對象ContextImpl
		①ContextImpl appContext = new ContextImpl();
		//初始化上下文
		②appContext.init(this, null, mActivityThread);
		//創建Application實例對象
		③app = mActivityThread.mInstrumentation.newApplication(
				cl, appClass, appContext);
		appContext.setOuterContext(app);
	} catch (Exception e) {
		...
	}
	mActivityThread.mAllApplications.add(app);
	mApplication = app;
	if (instrumentation != null) {
		try {
			//調用Application的OnCreate函數
			④instrumentation.callApplicationOnCreate(app);
		} catch (Exception e) {
			...
		}
	}
	return app;
}
在應用程序開發過程中,當我們重寫了Application類後,應用程序加載運行的是我們定義的Application類,否則就加載運行默認的Application類。從Application對象的構造過程就可以解釋為什麼應用程序啟動後首先執行的是Application的OnCreate函數。在實例化Application對象時,同樣創建並初始化了一個ContextImpl上下文對象。
前面我們介紹了,每一個Activity擁有一個上下文對象ContextImpl,每一個Application對象也擁有一個ContextImpl上下文對象,那麼ContextImpl對象又是如何構造的呢?
frameworks\base\core\java\android\app\ ContextImpl.java
ContextImpl() {
	mOuterContext = this;
}
ContextImpl的構造過程什麼也沒干,通過調用ContextImpl的init函數進行初始化
final void init(LoadedApk packageInfo,IBinder activityToken, ActivityThread mainThread) {
	init(packageInfo, activityToken, mainThread, null, null);
}
final void init(LoadedApk packageInfo,IBinder activityToken, ActivityThread mainThread,
			Resources container, String basePackageName) {
	mPackageInfo = packageInfo;
	mBasePackageName = basePackageName != null ? basePackageName : packageInfo.mPackageName;
	mResources = mPackageInfo.getResources(mainThread);
	if (mResources != null && container != null
			&& container.getCompatibilityInfo().applicationScale !=
					mResources.getCompatibilityInfo().applicationScale) {
		mResources = mainThread.getTopLevelResources(
				mPackageInfo.getResDir(), container.getCompatibilityInfo());
	}
	mMainThread = mainThread;
	mContentResolver = new ApplicationContentResolver(this, mainThread);
	setActivityToken(activityToken);
}
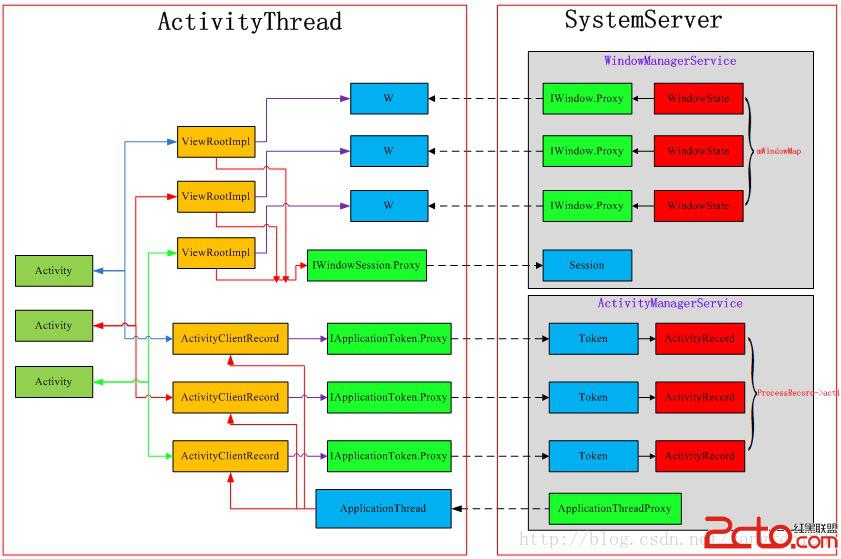
從ContextImpl的初始化函數中可以知道,ContextImpl記錄了應用程序的包名信息、應用程序的資源信息、應用程序的主線程、ContentResolver及Activity對應的IApplicationToken.Proxy,當然對應Application對象所擁有的ContextImpl上下文就沒有對應的Token了。通過前面的分析我們可以知道各個對象之間的關系:
Activity所需要的對象都創建好了,就需要將Activity和Application對象、ContextImpl對象綁定在一起。
frameworks\base\core\java\android\app\ Activity.java
final void attach(Context context, ActivityThread aThread, Instrumentation instr, IBinder token,
		Application application, Intent intent, ActivityInfo info, CharSequence title,
		Activity parent, String id, NonConfigurationInstances lastNonConfigurationInstances,
		Configuration config) {
	attach(context, aThread, instr, token, 0, application, intent, info, title, parent, id,
		lastNonConfigurationInstances, config);
}
context:Activity的上下文對象,就是前面創建的ContextImpl對象;
aThread:Activity運行所在的主線程描述符ActivityThread;
instr:用於監控Activity運行狀態的Instrumentation對象;
token:用於和AMS服務通信的IApplicationToken.Proxy代理對象;
application:Activity運行所在進程的Application對象;
parent:啟動當前Activity的Activity;
final void attach(Context context, ActivityThread aThread,
		Instrumentation instr, IBinder token, int ident,
		Application application, Intent intent, ActivityInfo info,
		CharSequence title, Activity parent, String id,
		NonConfigurationInstances lastNonConfigurationInstances,
		Configuration config) {
	//將上下文對象ContextImpl保存到Activity的成員變量中
	attachBaseContext(context);
	//每個Activity都擁有一個FragmentManager,這裡就是將當前Activity設置到FragmentManager中管理
	mFragments.attachActivity(this);
	//創建窗口對象
	①mWindow = PolicyManager.makeNewWindow(this);
	mWindow.setCallback(this);
	mWindow.getLayoutInflater().setPrivateFactory(this);
	if (info.softInputMode != WindowManager.LayoutParams.SOFT_INPUT_STATE_UNSPECIFIED) {
		mWindow.setSoftInputMode(info.softInputMode);
	}
	if (info.uiOptions != 0) {
		mWindow.setUiOptions(info.uiOptions);
	}
	//記錄應用程序的UI線程
	mUiThread = Thread.currentThread();
	//記錄應用程序的ActivityThread對象
	mMainThread = aThread;
	mInstrumentation = instr;
	mToken = token;
	mIdent = ident;
	mApplication = application;
	mIntent = intent;
	mComponent = intent.getComponent();
	mActivityInfo = info;
	mTitle = title;
	mParent = parent;
	mEmbeddedID = id;
	mLastNonConfigurationInstances = lastNonConfigurationInstances;
	//為Activity所在的窗口創建窗口管理器
	②mWindow.setWindowManager(null, mToken, mComponent.flattenToString(),
			(info.flags & ActivityInfo.FLAG_HARDWARE_ACCELERATED) != 0);
	if (mParent != null) {
		mWindow.setContainer(mParent.getWindow());
	}
	mWindowManager = mWindow.getWindowManager();
	mCurrentConfig = config;
}
在該attach函數中主要做了以下幾件事:
1) 將Activity設置到FragmentManager中;
2) 根據參數初始化Activity的成員變量;
3) 為Activity創建窗口Window對象;
4) 為Window創建窗口管理器;
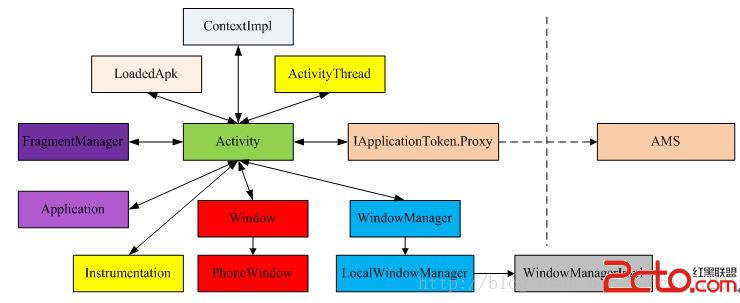
到此為止應用程序進程為啟動的Activity對象創建了以下不同的實例對象,它們之間的關系如下:
frameworks\base\core\java\com\android\internal\policy\ PolicyManager.java
public static Window makeNewWindow(Context context) {
	return sPolicy.makeNewWindow(context);
}
通過Policy類的makeNewWindow函數來創建一個應用程序窗口
private static final String POLICY_IMPL_CLASS_NAME =
        "com.android.internal.policy.impl.Policy";
private static final IPolicy sPolicy;
static {
	try {
		Class policyClass = Class.forName(POLICY_IMPL_CLASS_NAME);
		sPolicy = (IPolicy)policyClass.newInstance();
	} catch (ClassNotFoundException ex) {
		...
	}
}
frameworks\base\policy\src\com\android\internal\policy\impl\ Policy.java
public Window makeNewWindow(Context context) {
	return new PhoneWindow(context);
}
應用程序窗口的創建過程其實就是構造一個PhoneWindow對象。PhoneWindow類是通過靜態方式加載到應用程序進程空間的。
private static final String[] preload_classes = {
	"com.android.internal.policy.impl.PhoneLayoutInflater",
	"com.android.internal.policy.impl.PhoneWindow",
	"com.android.internal.policy.impl.PhoneWindow$1",
	"com.android.internal.policy.impl.PhoneWindow$ContextMenuCallback",
	"com.android.internal.policy.impl.PhoneWindow$DecorView",
	"com.android.internal.policy.impl.PhoneWindow$PanelFeatureState",
	"com.android.internal.policy.impl.PhoneWindow$PanelFeatureState$SavedState",
};
static {
	for (String s : preload_classes) {
		try {
			Class.forName(s);
		} catch (ClassNotFoundException ex) {
			Log.e(TAG, "Could not preload class for phone policy: " + s);
		}
	}
}
PhoneWindow的構造過程
public PhoneWindow(Context context) {
	super(context);
	mAlternativePanelStyle=getContext().getResources().getBoolean(com.android.internal.R.bool.config_alternativePanelStyle);
	mLayoutInflater = LayoutInflater.from(context);
}
構造過程比較簡單,只是得到布局加載服務對象。
通過前面的分析我們可以知道,在Activity啟動過程中,會為Activity創建一個窗口對象PhoneWindow,應用程序有了窗口那就需要有一個窗口管理器來管理這些窗口,因此在Activity啟動過程中還會創建一個WindowManager對象。
frameworks\base\core\java\android\view\ Window.java
public void setWindowManager(WindowManager wm, IBinder appToken, String appName,
		boolean hardwareAccelerated) {
	mAppToken = appToken;// IApplicationToken.Proxy代理對象
	mAppName = appName;
	//得到WindowManagerImpl實例,
	if (wm == null) {
		wm = WindowManagerImpl.getDefault();
	}
	//為每個啟動的Activity創建一個輕量級的窗口管理器LocalWindowManager
	mWindowManager = new LocalWindowManager(wm, hardwareAccelerated);
}
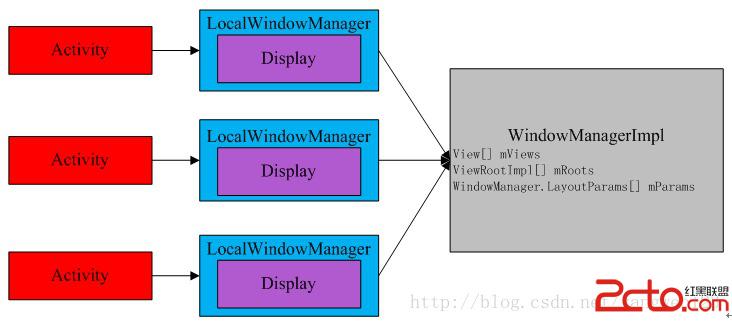
WindowManagerImpl為重量級的窗口管理器,應用程序進程中有且只有一個WindowManagerImpl實例,它管理了應用程序進程中創建的所有PhoneWindow窗口。Activity並沒有直接引用WindowManagerImpl實例,Android系統為每一個啟動的Activity創建了一個輕量級的窗口管理器LocalWindowManager,每個Activity通過LocalWindowManager來訪問WindowManagerImpl,它們三者之間的關系如下圖所示:

WindowManagerImpl以單例模式創建,應用程序進程中有且只有一個WindowManagerImpl實例
frameworks\base\core\java\android\view\ WindowManagerImpl.java
private final static WindowManagerImpl sWindowManager = new WindowManagerImpl();
public static WindowManagerImpl getDefault() {
	return sWindowManager;
}
應用程序進程會為每一個Activity創建一個LocalWindowManager實例對象
frameworks\base\core\java\android\view\ Window.java
LocalWindowManager(WindowManager wm, boolean hardwareAccelerated) {
	super(wm, getCompatInfo(mContext));
	mHardwareAccelerated = hardwareAccelerated ||
			SystemProperties.getBoolean(PROPERTY_HARDWARE_UI, false);
}
frameworks\base\core\java\android\view\ WindowManagerImpl.java
CompatModeWrapper(WindowManager wm, CompatibilityInfoHolder ci) {
	mWindowManager = wm instanceof CompatModeWrapper
			? ((CompatModeWrapper)wm).mWindowManager : (WindowManagerImpl)wm;
	if (ci == null) {
		mDefaultDisplay = mWindowManager.getDefaultDisplay();
	} else {
		mDefaultDisplay = Display.createCompatibleDisplay(
				mWindowManager.getDefaultDisplay().getDisplayId(), ci);
	}
	mCompatibilityInfo = ci;
}
public Display getDefaultDisplay() {
	return new Display(Display.DEFAULT_DISPLAY, null);
}
frameworks\base\core\java\android\view\Display.java
Display(int display, CompatibilityInfoHolder compatInfo) {
	synchronized (sStaticInit) {
		if (!sInitialized) {
			nativeClassInit();
			sInitialized = true;
		}
	}
	mCompatibilityInfo = compatInfo != null ? compatInfo : new CompatibilityInfoHolder();
	mDisplay = display;
	init(display);
}
構造Display對象時需要初始化該對象。
frameworks\base\core\jni\android_view_Display.cpp
static void android_view_Display_init(
        JNIEnv* env, jobject clazz, jint dpy)
{
    DisplayInfo info;
    if (headless) {
        // initialize dummy display with reasonable values
        info.pixelFormatInfo.format = 1; // RGB_8888
        info.fps = 60;
        info.density = 160;
        info.xdpi = 160;
        info.ydpi = 160;
    } else {
        status_t err = SurfaceComposerClient::getDisplayInfo(DisplayID(dpy), &info);
        if (err < 0) {
            jniThrowException(env, "java/lang/IllegalArgumentException", NULL);
            return;
        }
    }
    env->SetIntField(clazz, offsets.pixelFormat,info.pixelFormatInfo.format);
    env->SetFloatField(clazz, offsets.fps,      info.fps);
    env->SetFloatField(clazz, offsets.density,  info.density);
    env->SetFloatField(clazz, offsets.xdpi,     info.xdpi);
    env->SetFloatField(clazz, offsets.ydpi,     info.ydpi);
}
Display的初始化過程很簡單,就是通過SurfaceComposerClient請求SurfaceFlinger得到顯示屏的基本信息。
frameworks\native\libs\gui\ SurfaceComposerClient.cpp
status_t SurfaceComposerClient::getDisplayInfo(
        DisplayID dpy, DisplayInfo* info)
{
    if (uint32_t(dpy)>=NUM_DISPLAY_MAX)
        return BAD_VALUE;
    volatile surface_flinger_cblk_t const * cblk = get_cblk();
    volatile display_cblk_t const * dcblk = cblk->displays + dpy;
    info->w              = dcblk->w;
    info->h              = dcblk->h;
    info->orientation      = dcblk->orientation;
    info->xdpi           = dcblk->xdpi;
    info->ydpi           = dcblk->ydpi;
    info->fps            = dcblk->fps;
    info->density        = dcblk->density;
    return getPixelFormatInfo(dcblk->format, &(info->pixelFormatInfo));
}
我們知道在SurfaceFlinger啟動過程中,創建了一塊匿名共享內存來保存顯示屏的基本信息,這裡就是通過訪問這塊匿名共享內存來讀取顯示屏信息。到此一個Activity所需要的窗口對象就創建完成了,在應用程序窗口的創建過程中一共創建了以下幾個對象:

在Activity的attach函數中完成應用程序窗口的創建後,通過Instrumentation回調Activity的OnCreate函數來為當前Activity加載布局文件,進一步創建視圖對象。
frameworks\base\core\java\android\app\Instrumentation.java
public void callActivityOnCreate(Activity activity, Bundle icicle) {
	...
	activity.performCreate(icicle);
	...
}
frameworks\base\core\java\android\app\Activity.java
final void performCreate(Bundle icicle) {
	onCreate(icicle);
	mVisibleFromClient = !mWindow.getWindowStyle().getBoolean(
			com.android.internal.R.styleable.Window_windowNoDisplay, false);
	mFragments.dispatchActivityCreated();
}
我們知道在應用程序開發中,需要重寫Activity的OnCreate函數:
Packages\apps\xxx\src\com\xxx\ xxxActivity.java
public void onCreate(Bundle savedInstanceState) {
	super.onCreate(savedInstanceState);
	setContentView(R.layout.main_activity);
	...
}
在OnCreate函數中通過setContentView來設置Activity的布局文件,就是生成該Activity的所有視圖對象。
frameworks\base\core\java\android\app\Activity.java
public void setContentView(View view, ViewGroup.LayoutParams params) {
	getWindow().setContentView(view, params);
	//初始化動作條
	initActionBar();
}
getWindow()函數得到前面創建的窗口對象PhoneWindow,通過PhoneWindow來設置Activity的視圖。
frameworks\base\policy\src\com\android\internal\policy\impl\PhoneWindow.java
public void setContentView(int layoutResID) {
	//如果窗口頂級視圖對象為空,則創建窗口視圖對象
	if (mContentParent == null) {
		installDecor();
	} else {//否則只是移除該視圖對象中的其他視圖
		mContentParent.removeAllViews();
	}
	//加載布局文件,並將布局文件中的所有視圖對象添加到mContentParent容器中
	mLayoutInflater.inflate(layoutResID, mContentParent);
	final Callback cb = getCallback();
	if (cb != null && !isDestroyed()) {
		cb.onContentChanged();
	}
}
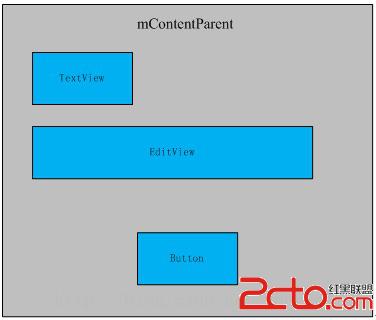
PhoneWindow的成員變量mContentParent的類型為ViewGroup,是窗口內容存放的地方
frameworks\base\policy\src\com\android\internal\policy\impl\PhoneWindow.java
private void installDecor() {
	if (mDecor == null) {
		①mDecor = generateDecor();
		mDecor.setDescendantFocusability(ViewGroup.FOCUS_AFTER_DESCENDANTS);
		mDecor.setIsRootNamespace(true);
		if (!mInvalidatePanelMenuPosted && mInvalidatePanelMenuFeatures != 0) {
			mDecor.postOnAnimation(mInvalidatePanelMenuRunnable);
		}
	}
	if (mContentParent == null) {
		②mContentParent = generateLayout(mDecor);
		mDecor.makeOptionalFitsSystemWindows();
		//應用程序窗口標題欄
		mTitleView = (TextView)findViewById(com.android.internal.R.id.title);
		if (mTitleView != null) {
			...
		} else {
			//應用程序窗口動作條
			mActionBar = (ActionBarView) findViewById(com.android.internal.R.id.action_bar);
			if (mActionBar != null) {
				...
			}
		}
	}
}
通過函數generateDecor()來創建一個DecorView對象
protected DecorView generateDecor() {
	return new DecorView(getContext(), -1);
}
接著通過generateLayout(mDecor)來創建視圖對象容器mContentParent
protected ViewGroup generateLayout(DecorView decor) {
	//通過讀取屬性配置文件設置窗口風格
	if (a.getBoolean(com.android.internal.R.styleable.Window_windowActionBarOverlay, false)) {
		requestFeature(FEATURE_ACTION_BAR_OVERLAY);
	}
	...
	//通過讀取屬性配置文件設置窗口標志
	if (a.getBoolean(com.android.internal.R.styleable.Window_windowFullscreen, false)) {
	setFlags(FLAG_FULLSCREEN,FLAG_FULLSCREEN&(~getForcedWindowFlags()));
	}
	...
	WindowManager.LayoutParams params = getAttributes();
	...
	mDecor.startChanging();
	//根據窗口主題風格選擇不同的布局文件layoutResource
	...
	//加載布局文件
	①View in = mLayoutInflater.inflate(layoutResource, null);
	//添加到DecorView中
	②decor.addView(in, new ViewGroup.LayoutParams(MATCH_PARENT, MATCH_PARENT));
	//從窗口視圖中找出窗口內容視圖對象
	③ViewGroup contentParent = (ViewGroup)findViewById(ID_ANDROID_CONTENT);
	...
	mDecor.finishChanging();
	return contentParent;
}
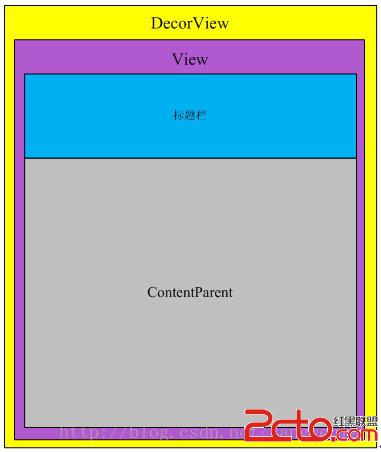
到此Activity的所有視圖對象都已經創建完畢,DecorView是Activity的頂級視圖,由窗口PhoneWindow對象持有,在DecorView視圖對象中添加了一個ViewGroup容器組件contentParent,所有用戶定義視圖組件將被添加到該容器中。
performLaunchActivity函數完成了兩件事:
1) Activity窗口對象的創建,通過attach函數來完成;
2) Activity視圖對象的創建,通過setContentView函數來完成;
這些准備工作完成後,就可以顯示該Activity了,應用程序進程通過調用handleResumeActivity函數來啟動Activity的顯示過程。
frameworks\base\core\java\android\app\ ActivityThread.java
final void handleResumeActivity(IBinder token, boolean clearHide, boolean isForward) {
	unscheduleGcIdler();
	ActivityClientRecord r;
	try {
		①r = performResumeActivity(token, clearHide);
	} catch (Exception e) {
		...
	}
	if (r != null) {
		final Activity a = r.activity;
		...
		if (r.window == null && !a.mFinished && willBeVisible) {
			//獲得為當前Activity創建的窗口PhoneWindow對象
			r.window = r.activity.getWindow();
			//獲取為窗口創建的視圖DecorView對象
			View decor = r.window.getDecorView();
			decor.setVisibility(View.INVISIBLE);
			//在attach函數中就為當前Activity創建了WindowManager對象
			ViewManager wm = a.getWindowManager();
			//得到該視圖對象的布局參數
			②WindowManager.LayoutParams l = r.window.getAttributes();
			//將視圖對象保存到Activity的成員變量mDecor中
			a.mDecor = decor;
			l.type = WindowManager.LayoutParams.TYPE_BASE_APPLICATION;
			if (r.intent.hasCategory(Intent.CATEGORY_HOME)) {
				l.idleScreenAvailable = true;
			} else {
				l.idleScreenAvailable = false;
			}
			l.softInputMode |= forwardBit;
			if (a.mVisibleFromClient) {
				a.mWindowAdded = true;
				//將創建的視圖對象DecorView添加到Activity的窗口管理器中
				③wm.addView(decor, l);
			}
		} else if (!willBeVisible) {
			...
		}
		...
		if (!r.onlyLocalRequest) {
			r.nextIdle = mNewActivities;
			mNewActivities = r;
			Looper.myQueue().addIdleHandler(new Idler());
		}
		...
	} else {
		...
	}
}
我們知道,在前面的performLaunchActivity函數中完成Activity的創建後,會將當前當前創建的Activity在應用程序進程端的描述符ActivityClientRecord以鍵值對的形式保存到ActivityThread的成員變量mActivities中:mActivities.put(r.token, r),r.token就是Activity的身份證,即是IApplicationToken.Proxy代理對象,也用於與AMS通信。上面的函數首先通過performResumeActivity從mActivities變量中取出Activity的應用程序端描述符ActivityClientRecord,然後取出前面為Activity創建的視圖對象DecorView和窗口管理器WindowManager,最後將視圖對象添加到窗口管理器中。

我們知道Activity引用的其實是輕量級的窗口管理器LocalWindowManager
frameworks\base\core\java\android\view\ Window.java
public final void addView(View view, ViewGroup.LayoutParams params) {
	WindowManager.LayoutParams wp = (WindowManager.LayoutParams)params;
	CharSequence curTitle = wp.getTitle();
	//應用程序窗口
	if (wp.type >= WindowManager.LayoutParams.FIRST_SUB_WINDOW &&
		wp.type <= WindowManager.LayoutParams.LAST_SUB_WINDOW) {
		if (wp.token == null) {
			View decor = peekDecorView();
			if (decor != null) {
				// LayoutParams 的token設置為W本地Binder對象
				wp.token = decor.getWindowToken();
			}
		}
		if (curTitle == null || curTitle.length() == 0) {
			//根據窗口類型設置不同的標題
			…
			if (mAppName != null) {
				title += ":" + mAppName;
			}
			wp.setTitle(title);
		}
	} else {//系統窗口
		if (wp.token == null) {
			wp.token = mContainer == null ? mAppToken : mContainer.mAppToken;
		}
		if ((curTitle == null || curTitle.length() == 0)
				&& mAppName != null) {
			wp.setTitle(mAppName);
		}
    }
	if (wp.packageName == null) {
		wp.packageName = mContext.getPackageName();
	}
	if (mHardwareAccelerated) {
		wp.flags |= WindowManager.LayoutParams.FLAG_HARDWARE_ACCELERATED;
	}
	super.addView(view, params);
}
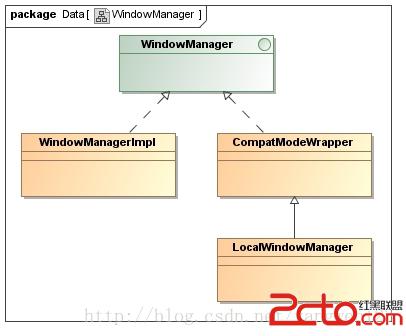
LocalWindowManager的addView函數對不同類型窗口的布局參數進行相應的設置,比如布局參數中的token設置,如果是應用程序窗口,則設置token為W本地Binder對象。如果不是應用程序窗口,同時當前窗口沒有父窗口,則設置token為當前窗口的IApplicationToken.Proxy代理對象,否則設置為父窗口的IApplicationToken.Proxy代理對象。最後視圖組件的添加工作交給其父類來完成。LocalWindowManager繼承於CompatModeWrapper,是WindowManagerImpl的內部類。
frameworks\base\core\java\android\view\WindowManagerImpl.java
public void addView(View view, android.view.ViewGroup.LayoutParams params) {
	mWindowManager.addView(view, params, mCompatibilityInfo);
}
前面我們介紹了,每一個Activity擁有一個輕量級窗口管理器,通過輕量級窗口管理器LocalWindowManager來訪問重量級窗口管理器WindowManagerImpl,因此視圖組件的添加過程又轉交給了WindowManagerImpl來實現。
public void addView(View view, ViewGroup.LayoutParams params, CompatibilityInfoHolder cih) {
	addView(view, params, cih, false);
}
該函數又調用WindowManagerImpl的另一個重載函數來添加視圖組件
private void addView(View view, ViewGroup.LayoutParams params,
CompatibilityInfoHolder cih, boolean nest) {
...
final WindowManager.LayoutParams wparams= (WindowManager.LayoutParams)params;
ViewRootImpl root;
View panelParentView = null;
synchronized (this) {
...
//從mViews中查找當前添加的View
int index = findViewLocked(view, false);
//如果已經存在,直接返回
if (index >= 0) {
...
return;
}
//尚未添加當前View
if (wparams.type >= WindowManager.LayoutParams.FIRST_SUB_WINDOW &&
wparams.type <= WindowManager.LayoutParams.LAST_SUB_WINDOW) {
final int count = mViews != null ? mViews.length : 0;
for (int i=0; i
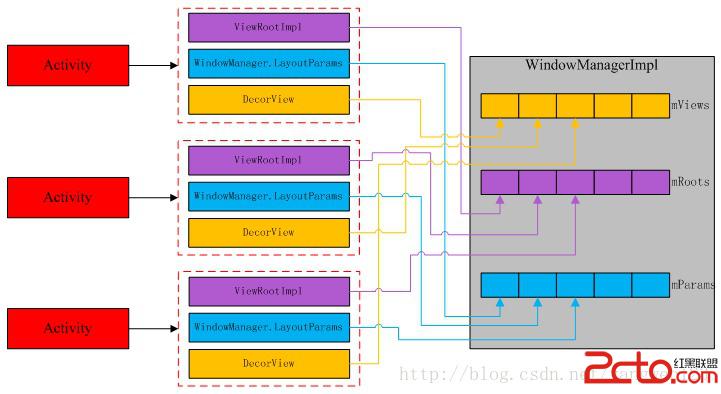
到此我們知道,當應用程序向窗口管理器中添加一個視圖對象時,首先會為該視圖對象創建一個ViewRootImpl對象,並且將視圖對象、ViewRootImpl對象、視圖布局參數分別保存到窗口管理器WindowManagerImpl得mViews、mRoots、mParams數組中,如下圖所示:
最後通過ViewRootImpl對象來完成視圖的顯示過程。
ViewRootImpl構造過程
frameworks\base\core\java\android\view\ViewRootImpl.java
public ViewRootImpl(Context context) {
...
①getWindowSession(context.getMainLooper());
mThread = Thread.currentThread();
mLocation = new WindowLeaked(null);
mLocation.fillInStackTrace();
mWidth = -1;
mHeight = -1;
mDirty = new Rect();
mTempRect = new Rect();
mVisRect = new Rect();
mWinFrame = new Rect();
②mWindow = new W(this);
mTargetSdkVersion = context.getApplicationInfo().targetSdkVersion;
mInputMethodCallback = new InputMethodCallback(this);
mViewVisibility = View.GONE;
mTransparentRegion = new Region();
mPreviousTransparentRegion = new Region();
mFirst = true; // true for the first time the view is added
mAdded = false;
mAccessibilityManager = AccessibilityManager.getInstance(context);
mAccessibilityInteractionConnectionManager =
new AccessibilityInteractionConnectionManager();
mAccessibilityManager.addAccessibilityStateChangeListener(
mAccessibilityInteractionConnectionManager);
③mAttachInfo = new View.AttachInfo(sWindowSession, mWindow, this, mHandler, this);
mViewConfiguration = ViewConfiguration.get(context);
mDensity = context.getResources().getDisplayMetrics().densityDpi;
mFallbackEventHandler = PolicyManager.makeNewFallbackEventHandler(context);
mProfileRendering = Boolean.parseBoolean(
SystemProperties.get(PROPERTY_PROFILE_RENDERING, "false"));
④mChoreographer = Choreographer.getInstance();
PowerManager powerManager = (PowerManager) context.getSystemService(Context.POWER_SERVICE);
mAttachInfo.mScreenOn = powerManager.isScreenOn();
loadSystemProperties();
}
在ViewRootImpl的構造函數中初始化了一些成員變量,ViewRootImpl創建了以下幾個主要對象:
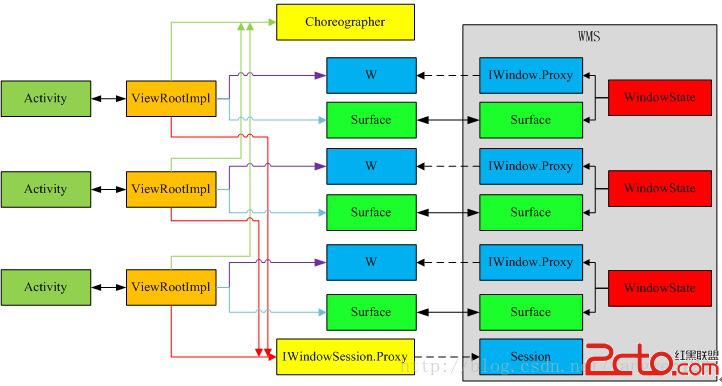
1) 通過getWindowSession(context.getMainLooper())得到IWindowSession的代理對象,該對象用於和WMS通信。
2) 創建了一個W本地Binder對象,用於WMS通知應用程序進程。
3) 采用單例模式創建了一個Choreographer對象,用於統一調度窗口繪圖。
4) 創建ViewRootHandler對象,用於處理當前視圖消息。
5) 構造一個AttachInfo對象;
6) 創建Surface對象,用於繪制當前視圖,當然該Surface對象的真正創建是由WMS來完成的,只不過是WMS傳遞給應用程序進程的。
private final Surface mSurface = new Surface();
final ViewRootHandler mHandler = new ViewRootHandler();
IWindowSession代理獲取過程
frameworks\base\core\java\android\view\ViewRootImpl.java
public static IWindowSession getWindowSession(Looper mainLooper) {
synchronized (mStaticInit) {
if (!mInitialized) {
try {
//獲取輸入法管理器
InputMethodManager imm = InputMethodManager.getInstance(mainLooper);
//獲取窗口管理器
IWindowManager windowManager = Display.getWindowManager();
//得到IWindowSession代理對象
sWindowSession = windowManager.openSession(imm.getClient(), imm.getInputContext());
float animatorScale = windowManager.getAnimationScale(2);
ValueAnimator.setDurationScale(animatorScale);
mInitialized = true;
} catch (RemoteException e) {
}
}
return sWindowSession;
}
}
以上函數通過WMS的openSession函數創建應用程序與WMS之間的連接通道,即獲取IWindowSession代理對象,並將該代理對象保存到ViewRootImpl的靜態成員變量sWindowSession中
static IWindowSession sWindowSession;
因此在應用程序進程中有且只有一個IWindowSession代理對象。
frameworks\base\services\java\com\android\server\wm\WindowManagerService.java
public IWindowSession openSession(IInputMethodClient client,
IInputContext inputContext) {
if (client == null) throw new IllegalArgumentException("null client");
if (inputContext == null) throw new IllegalArgumentException("null inputContext");
Session session = new Session(this, client, inputContext);
return session;
}
在WMS服務端構造了一個Session實例對象。

AttachInfo構造過程
frameworks\base\core\java\android\view\ View.java
AttachInfo(IWindowSession session, IWindow window,
ViewRootImpl viewRootImpl, Handler handler, Callbacks effectPlayer) {
mSession = session;//IWindowSession代理對象,用於與WMS通信
mWindow = window;//W對象
mWindowToken = window.asBinder();//W本地Binder對象
mViewRootImpl = viewRootImpl;//ViewRootImpl實例
mHandler = handler;//ViewRootHandler對象
mRootCallbacks = effectPlayer;//ViewRootImpl實例
}
Choreographer機制
在Android4.1之後增加了Choreographer機制,用於同Vsync機制配合,實現統一調度界面繪圖.
Choreographer構造過程
frameworks\base\core\java\android\view\Choreographer.java
public static Choreographer getInstance() {
return sThreadInstance.get();
}
private static final ThreadLocal sThreadInstance =
new ThreadLocal() {
@Override
protected Choreographer initialValue() {
Looper looper = Looper.myLooper();
if (looper == null) {
throw new IllegalStateException("The current thread must have a looper!");
}
return new Choreographer(looper);
}
};
為調用線程創建一個Choreographer實例,調用線程必須具備消息循環功能,因為ViewRootImpl對象的構造是在應用程序進程的UI主線程中執行的,因此創建的Choreographer對象將使用UI線程消息隊列。
private Choreographer(Looper looper) {
mLooper = looper;
//創建消息處理Handler
mHandler = new FrameHandler(looper);
//如果系統使用了Vsync機制,則注冊一個FrameDisplayEventReceiver接收器
mDisplayEventReceiver = USE_VSYNC ? new FrameDisplayEventReceiver(looper) : null;
mLastFrameTimeNanos = Long.MIN_VALUE;
//屏幕刷新周期
mFrameIntervalNanos = (long)(1000000000 /
new Display(Display.DEFAULT_DISPLAY, null).getRefreshRate());
//創建回調數組
mCallbackQueues = new CallbackQueue[CALLBACK_LAST + 1];
//初始化數組
for (int i = 0; i <= CALLBACK_LAST; i++) {
mCallbackQueues[i] = new CallbackQueue();
}
}
變量USE_VSYNC用於表示系統是否是用了Vsync同步機制,該值是通過讀取系統屬性debug.choreographer.vsync來獲取的。如果系統使用了Vsync同步機制,則創建一個FrameDisplayEventReceiver對象用於請求並接收Vsync事件,最後Choreographer創建了一個大小為3的CallbackQueue隊列數組,用於保存不同類型的Callback。
添加回調過程
frameworks\base\core\java\android\view\Choreographer.java
public void postCallback(int callbackType, Runnable action, Object token) {
postCallbackDelayed(callbackType, action, token, 0);
}
public void postCallbackDelayed(int callbackType,
Runnable action, Object token, long delayMillis) {
if (action == null) {
throw new IllegalArgumentException("action must not be null");
}
if (callbackType < 0 || callbackType > CALLBACK_LAST) {
throw new IllegalArgumentException("callbackType is invalid");
}
postCallbackDelayedInternal(callbackType, action, token, delayMillis);
}
private void postCallbackDelayedInternal(int callbackType,
Object action, Object token, long delayMillis) {
synchronized (mLock) {
final long now = SystemClock.uptimeMillis();
final long dueTime = now + delayMillis;
//將要執行的回調封裝成CallbackRecord對象,保存到mCallbackQueues數組中
mCallbackQueues[callbackType].addCallbackLocked(dueTime, action, token);
//函數執行時間到
if (dueTime <= now) {
scheduleFrameLocked(now);
} else {//通過異步消息方式實現函數延時執行
Message msg = mHandler.obtainMessage(MSG_DO_SCHEDULE_CALLBACK, action);
msg.arg1 = callbackType;
msg.setAsynchronous(true);
mHandler.sendMessageAtTime(msg, dueTime);
}
}
}
private final class FrameHandler extends Handler {
@Override
public void handleMessage(Message msg) {
switch (msg.what) {
case MSG_DO_SCHEDULE_CALLBACK:
doScheduleCallback(msg.arg1);
break;
}
}
}
void doScheduleCallback(int callbackType) {
synchronized (mLock) {
if (!mFrameScheduled) {
final long now = SystemClock.uptimeMillis();
if (mCallbackQueues[callbackType].hasDueCallbacksLocked(now)) {
scheduleFrameLocked(now);
}
}
}
}
private void scheduleFrameLocked(long now) {
if (!mFrameScheduled) {
mFrameScheduled = true;
//檢查是否使用了Vsync機制
if (USE_VSYNC) {
//如果當前線程具備消息循環,則直接請求VSync信號
if (isRunningOnLooperThreadLocked()) {
scheduleVsyncLocked();
} else {//如果當前線程不具備消息循環,則通過主線程請求VSync信號
Message msg = mHandler.obtainMessage(MSG_DO_SCHEDULE_VSYNC);
msg.setAsynchronous(true);
mHandler.sendMessageAtFrontOfQueue(msg);
}
} else { //如果系統沒有使用VSync機制,則使用異步消息延時執行屏幕刷新
final long nextFrameTime = Math.max(
mLastFrameTimeNanos / NANOS_PER_MS + sFrameDelay, now);
Message msg = mHandler.obtainMessage(MSG_DO_FRAME);
msg.setAsynchronous(true);
mHandler.sendMessageAtTime(msg, nextFrameTime);
}
}
}
在該函數中考慮了兩種情況,一種是系統沒有使用Vsync機制,在這種情況下,首先根據屏幕刷新頻率計算下一次刷新時間,通過異步消息方式延時執行doFrame()函數實現屏幕刷新。如果系統使用了Vsync機制,並且當前線程具備消息循環,則直接請求Vsync信號,否則就通過主線程來請求Vsync信號。FrameDisplayEventReceiver對象用於請求並接收Vsync信號,當Vsync信號到來時,系統會自動調用其onVsync()函數,在該回調函數中執行doFrame()實現屏幕刷新。
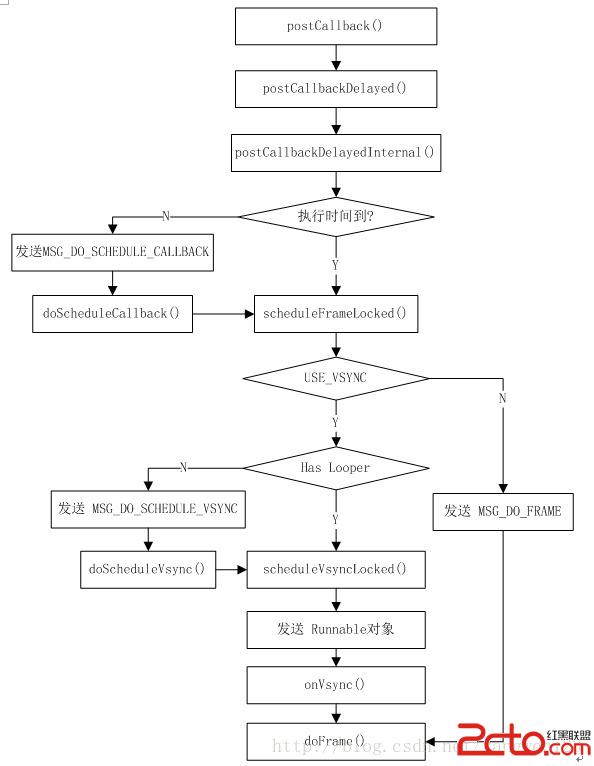
當VSYNC信號到達時,Choreographer doFrame()函數被調用
void doFrame(long frameTimeNanos, int frame) {
final long startNanos;
synchronized (mLock) {
if (!mFrameScheduled) {
return; // no work to do
}
//保存起始時間
startNanos = System.nanoTime();
//由於Vsync事件處理采用的是異步方式,因此這裡計算消息發送與函數調用開始之間所花費的時間
final long jitterNanos = startNanos - frameTimeNanos;
//如果線程處理該消息的時間超過了屏幕刷新周期
if (jitterNanos >= mFrameIntervalNanos) {
//計算函數調用期間所錯過的幀數
final long skippedFrames = jitterNanos / mFrameIntervalNanos;
if (skippedFrames >= SKIPPED_FRAME_WARNING_LIMIT) {
Log.i(TAG, "Skipped " + skippedFrames + " frames! "
+ "The application may be doing too much work on its main thread.");
}
final long lastFrameOffset = jitterNanos % mFrameIntervalNanos;
frameTimeNanos = startNanos - lastFrameOffset;
}
//如果frameTimeNanos小於一個屏幕刷新周期,則重新請求VSync信號
if (frameTimeNanos < mLastFrameTimeNanos) {
scheduleVsyncLocked();
return;
}
mFrameScheduled = false;
mLastFrameTimeNanos = frameTimeNanos;
}
//分別回調CALLBACK_INPUT、CALLBACK_ANIMATION、CALLBACK_TRAVERSAL事件
doCallbacks(Choreographer.CALLBACK_INPUT, frameTimeNanos);
doCallbacks(Choreographer.CALLBACK_ANIMATION, frameTimeNanos);
doCallbacks(Choreographer.CALLBACK_TRAVERSAL, frameTimeNanos);
}

Choreographer類中分別定義了CallbackRecord、CallbackQueue內部類,CallbackQueue是一個按時間先後順序保存CallbackRecord的單向循環鏈表。

在Choreographer中定義了三個CallbackQueue隊列,用數組mCallbackQueues表示,用於分別保存CALLBACK_INPUT、CALLBACK_ANIMATION、CALLBACK_TRAVERSAL這三種類型的Callback,當調用Choreographer類的postCallback()函數時,就是往指定類型的CallbackQueue隊列中通過addCallbackLocked()函數添加一個CallbackRecord項:首先構造一個CallbackRecord對象,然後按時間先後順序插入到CallbackQueue鏈表中。從代碼注釋中,我們可以知道CALLBACK_INPUT是指輸入回調,該回調優先級最高,首先得到執行,而CALLBACK_TRAVERSAL是指處理布局和繪圖的回調,只有在所有異步消息都執行完後才得到執行,CALLBACK_ANIMATION是指動畫回調,比CALLBACK_TRAVERSAL優先執行,從doFrame()函數中的doCallbacks調用就能印證這點。
doCallbacks(Choreographer.CALLBACK_INPUT, frameTimeNanos);
doCallbacks(Choreographer.CALLBACK_ANIMATION, frameTimeNanos);
doCallbacks(Choreographer.CALLBACK_TRAVERSAL, frameTimeNanos);
當Vsync事件到來時,順序執行CALLBACK_INPUT、CALLBACK_ANIMATION和CALLBACK_TRAVERSAL對應CallbackQueue隊列中注冊的回調。
void doCallbacks(int callbackType, long frameTimeNanos) {
CallbackRecord callbacks;
synchronized (mLock) {
final long now = SystemClock.uptimeMillis();
//從指定類型的CallbackQueue隊列中查找執行時間到的CallbackRecord
callbacks = mCallbackQueues[callbackType].extractDueCallbacksLocked(now);
if (callbacks == null) {
return;
}
mCallbacksRunning = true;
}
try {
//由於CallbackQueues是按時間先後順序排序的,因此遍歷執行所有時間到的CallbackRecord
for (CallbackRecord c = callbacks; c != null; c = c.next) {
c.run(frameTimeNanos);
}
} finally {
synchronized (mLock) {
mCallbacksRunning = false;
do {
final CallbackRecord next = callbacks.next;
recycleCallbackLocked(callbacks);
callbacks = next;
} while (callbacks != null);
}
}
}
該函數就是按時間順序先後執行到時的CallbackRecord
private static final class CallbackRecord {
public CallbackRecord next;
public long dueTime;
public Object action; // Runnable or FrameCallback
public Object token;
public void run(long frameTimeNanos) {
if (token == FRAME_CALLBACK_TOKEN) {
((FrameCallback)action).doFrame(frameTimeNanos);
} else {
((Runnable)action).run();
}
}
}
我們知道Choreographer對外提供了兩個接口函數用於注冊指定的Callback,postCallback()用於注冊Runnable對象,而postFrameCallback()函數用於注冊FrameCallback對象,無論注冊的是Runnable對象還是FrameCallback對象,在CallbackRecord對象中統一裝箱為Object類型。在執行其回調函數時,就需要區別這兩種對象類型,如果注冊的是Runnable對象,則調用其run()函數,如果注冊的是FrameCallback對象,則調用它的doFrame()函數。
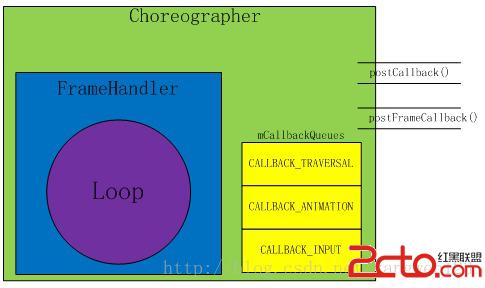
Vsync請求過程
我們知道在Choreographer構造函數中,構造了一個FrameDisplayEventReceiver對象,用於請求並接收Vsync信號,Vsync信號請求過程如下:
private void scheduleVsyncLocked() {
//申請Vsync信號
mDisplayEventReceiver.scheduleVsync();
}
FrameDisplayEventReceiver繼承於DisplayEventReceiver類,Vsync請求在DisplayEventReceiver中實現。
frameworks\base\core\java\android\view\ DisplayEventReceiver.java
public void scheduleVsync() {
if (mReceiverPtr == 0) {
Log.w(TAG, "Attempted to schedule a vertical sync pulse but the display event "
+ "receiver has already been disposed.");
} else {
//通過Jni方式調用native層的NativeDisplayEventReceiver對象來請求VSync
nativeScheduleVsync(mReceiverPtr);
}
}
frameworks\base\core\jni\ android_view_DisplayEventReceiver.cpp
static void nativeScheduleVsync(JNIEnv* env, jclass clazz, jint receiverPtr) {
//得到NativeDisplayEventReceiver對象指針
sp receiver =
reinterpret_cast(receiverPtr);
//通過NativeDisplayEventReceiver請求VSync
status_t status = receiver->scheduleVsync();
if (status) {
String8 message;
message.appendFormat("Failed to schedule next vertical sync pulse. status=%d", status);
jniThrowRuntimeException(env, message.string());
}
}
status_t NativeDisplayEventReceiver::scheduleVsync() {
if (!mWaitingForVsync) {
ALOGV("receiver %p ~ Scheduling vsync.", this);
// Drain all pending events.
nsecs_t vsyncTimestamp;
uint32_t vsyncCount;
readLastVsyncMessage(&vsyncTimestamp, &vsyncCount);
status_t status = mReceiver.requestNextVsync();
if (status) {
ALOGW("Failed to request next vsync, status=%d", status);
return status;
}
mWaitingForVsync = true;
}
return OK;
}
VSync請求過程又轉交給了DisplayEventReceiver
frameworks\native\libs\gui\ DisplayEventReceiver.cpp
status_t DisplayEventReceiver::requestNextVsync() {
if (mEventConnection != NULL) {
mEventConnection->requestNextVsync();
return NO_ERROR;
}
return NO_INIT;
}
這裡又通過IDisplayEventConnection接口來請求Vsync信號,IDisplayEventConnection實現了Binder通信框架,可以跨進程調用,因為Vsync信號請求進程和Vsync產生進程有可能不在同一個進程空間,因此這裡就借助IDisplayEventConnection接口來實現。下面通過圖來梳理Vsync請求的調用流程:
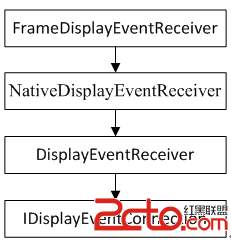
視圖View添加過程
窗口管理器WindowManagerImpl為當前添加的窗口創建好各種對象後,調用ViewRootImpl的setView函數向WMS服務添加一個窗口對象。
public void setView(View view, WindowManager.LayoutParams attrs, View panelParentView) {
synchronized (this) {
if (mView == null) {
//將DecorView保存到ViewRootImpl的成員變量mView中
mView = view;
mFallbackEventHandler.setView(view);
mWindowAttributes.copyFrom(attrs);
attrs = mWindowAttributes;
mClientWindowLayoutFlags = attrs.flags;
setAccessibilityFocus(null, null);
//DecorView實現了RootViewSurfaceTaker接口
if (view instanceof RootViewSurfaceTaker) {
mSurfaceHolderCallback =
((RootViewSurfaceTaker)view).willYouTakeTheSurface();
if (mSurfaceHolderCallback != null) {
mSurfaceHolder = new TakenSurfaceHolder();
mSurfaceHolder.setFormat(PixelFormat.UNKNOWN);
}
}
...
//同時將DecorView保存到mAttachInfo中
mAttachInfo.mRootView = view;
mAttachInfo.mScalingRequired = mTranslator != null;
mAttachInfo.mApplicationScale = mTranslator == null ? 1.0f : mTranslator.applicationScale;
if (panelParentView != null) {
mAttachInfo.mPanelParentWindowToken
= panelParentView.getApplicationWindowToken();
}
...
//在添加窗口前進行UI布局
①requestLayout();
if ((mWindowAttributes.inputFeatures& WindowManager.LayoutParams.INPUT_FEATURE_NO_INPUT_CHANNEL) == 0) {
mInputChannel = new InputChannel();
}
try {
mOrigWindowType = mWindowAttributes.type;
mAttachInfo.mRecomputeGlobalAttributes = true;
collectViewAttributes();
//將窗口添加到WMS服務中,mWindow為W本地Binder對象,通過Binder傳輸到WMS服務端後,變為IWindow代理對象
②res = sWindowSession.add(mWindow, mSeq, mWindowAttributes,
getHostVisibility(), mAttachInfo.mContentInsets,
mInputChannel);
} catch (RemoteException e) {
...
}
...
//建立窗口消息通道
if (view instanceof RootViewSurfaceTaker) {
mInputQueueCallback =
((RootViewSurfaceTaker)view).willYouTakeTheInputQueue();
}
if (mInputChannel != null) {
if (mInputQueueCallback != null) {
mInputQueue = new InputQueue(mInputChannel);
mInputQueueCallback.onInputQueueCreated(mInputQueue);
} else {
mInputEventReceiver = new WindowInputEventReceiver(mInputChannel,Looper.myLooper());
}
}
...
}
}
}
通過前面的分析可以知道,用戶自定義的UI作為一個子View被添加到DecorView中,然後將頂級視圖DecorView添加到應用程序進程的窗口管理器中,窗口管理器首先為當前添加的View創建一個ViewRootImpl對象、一個布局參數對象ViewGroup.LayoutParams,然後將這三個對象分別保存到當前應用程序進程的窗口管理器WindowManagerImpl中,最後通過ViewRootImpl對象將當前視圖對象注冊到WMS服務中。
ViewRootImpl的setView函數向WMS服務添加一個窗口對象過程:
1) requestLayout()在應用程序進程中進行窗口UI布局;
2) WindowSession.add()向WMS服務注冊一個窗口對象;
3) 注冊應用程序進程端的消息接收通道;
窗口UI布局過程
framewZ喎?/kf/ware/vc/" target="_blank" class="keylink">vcmtzXGJhc2VcY29yZVxqYXZhXGFuZHJvaWRcdmlld1xWaWV3Um9vdEltcGwuamF2YTwvcD4KPHByZSBjbGFzcz0="brush:java;">public void requestLayout() {
//檢查當前線程是否是UI線程
checkThread();
//標識當前正在請求UI布局
mLayoutRequested = true;
scheduleTraversals();
}
窗口布局過程必須在UI線程中進行,因此該函數首先檢查調用requestLayout()函數的線程是否為創建ViewRootImpl對象的線程。然後調用scheduleTraversals()函數啟動Choreographer的Callback遍歷過程。
void scheduleTraversals() {
	if (!mTraversalScheduled) {
		mTraversalScheduled = true;
		//暫停UI線程消息隊列對同步消息的處理
		mTraversalBarrier = mHandler.getLooper().postSyncBarrier();
		//向Choreographer注冊一個類型為CALLBACK_TRAVERSAL的回調,用於處理UI繪制
		mChoreographer.postCallback(
				Choreographer.CALLBACK_TRAVERSAL, mTraversalRunnable, null);
		//向Choreographer注冊一個類型為CALLBACK_INPUT的回調,用於處理輸入事件
		scheduleConsumeBatchedInput();
	}
}
關於Choreographer的postCallback()用法在前面進行了詳細的介紹,當Vsync事件到來時,mTraversalRunnable對象的run()函數將被調用。
frameworks\base\core\java\android\view\ViewRootImpl.java
final TraversalRunnable mTraversalRunnable = new TraversalRunnable();
final class TraversalRunnable implements Runnable {
        @Override
        public void run() {
            doTraversal();
        }
}
mTraversalRunnable對象的類型為TraversalRunnable,該類實現了Runnable接口,在其run()函數中調用了doTraversal()函數來完成窗口布局。
void doTraversal() {
	if (mTraversalScheduled) {
		mTraversalScheduled = false;
		mHandler.getLooper().removeSyncBarrier(mTraversalBarrier);
		if (mProfile) {
			Debug.startMethodTracing("ViewAncestor");
		}
		Trace.traceBegin(Trace.TRACE_TAG_VIEW, "performTraversals");
		try {
			performTraversals();
		} finally {
			Trace.traceEnd(Trace.TRACE_TAG_VIEW);
		}
		if (mProfile) {
			Debug.stopMethodTracing();
			mProfile = false;
		}
	}
}
performTraversals函數相當復雜,其主要實現以下幾個重要步驟:
1.執行窗口測量;
2.執行窗口注冊;
3.執行窗口布局;
4.執行窗口繪圖;
private void performTraversals() {
	// cache mView since it is used so much below...
	final View host = mView;
	if (host == null || !mAdded)
		return;
	mWillDrawSoon = true;
	boolean windowSizeMayChange = false;
	boolean newSurface = false;
	boolean surfaceChanged = false;
	WindowManager.LayoutParams lp = mWindowAttributes;
	int desiredWindowWidth;
	int desiredWindowHeight;
	final View.AttachInfo attachInfo = mAttachInfo;
	final int viewVisibility = getHostVisibility();
	boolean viewVisibilityChanged = mViewVisibility != viewVisibility
			|| mNewSurfaceNeeded;
	WindowManager.LayoutParams params = null;
	if (mWindowAttributesChanged) {
		mWindowAttributesChanged = false;
		surfaceChanged = true;
		params = lp;
	}
	...
	/****************執行窗口測量******************/
	boolean layoutRequested = mLayoutRequested && !mStopped;
	if (layoutRequested) {
		...
		// Ask host how big it wants to be
		windowSizeMayChange |= measureHierarchy(host, lp, res,
				desiredWindowWidth, desiredWindowHeight);
	}
	...
	/****************向WMS服務添加窗口******************/
	if (mFirst || windowShouldResize || insetsChanged ||
			viewVisibilityChanged || params != null) {
		...
		try {
			final int surfaceGenerationId = mSurface.getGenerationId();
			relayoutResult = relayoutWindow(params, viewVisibility, insetsPending);
			...
		} catch (RemoteException e) {
		}
		...
		if (!mStopped) {
			boolean focusChangedDueToTouchMode = ensureTouchModeLocally(
					(relayoutResult&WindowManagerImpl.RELAYOUT_RES_IN_TOUCH_MODE) != 0);
			if (focusChangedDueToTouchMode || mWidth != host.getMeasuredWidth()
					|| mHeight != host.getMeasuredHeight() || contentInsetsChanged) {
				...
				 // Ask host how big it wants to be
				performMeasure(childWidthMeasureSpec, childHeightMeasureSpec);
				...
			}
		}
	}
	/****************執行窗口布局******************/
	final boolean didLayout = layoutRequested && !mStopped;
	boolean triggerGlobalLayoutListener = didLayout
			|| attachInfo.mRecomputeGlobalAttributes;
	if (didLayout) {
		performLayout();
		...
	}
	...
	/****************查找窗口焦點******************/
	boolean skipDraw = false;
	if (mFirst) {
		// handle first focus request
		if (DEBUG_INPUT_RESIZE) Log.v(TAG, "First: mView.hasFocus()="
				+ mView.hasFocus());
		if (mView != null) {
			if (!mView.hasFocus()) {
				mView.requestFocus(View.FOCUS_FORWARD);
				mFocusedView = mRealFocusedView = mView.findFocus();
				if (DEBUG_INPUT_RESIZE) Log.v(TAG, "First: requested focused view="
						+ mFocusedView);
			} else {
				mRealFocusedView = mView.findFocus();
				if (DEBUG_INPUT_RESIZE) Log.v(TAG, "First: existing focused view="
						+ mRealFocusedView);
			}
		}
		if ((relayoutResult&WindowManagerImpl.RELAYOUT_RES_ANIMATING) != 0) {
			// The first time we relayout the window, if the system is
			// doing window animations, we want to hold of on any future
			// draws until the animation is done.
			mWindowsAnimating = true;
		}
	} else if (mWindowsAnimating) {
		skipDraw = true;
	}
	/****************執行窗口繪制******************/
	mFirst = false;
	mWillDrawSoon = false;
	mNewSurfaceNeeded = false;
	mViewVisibility = viewVisibility;
	...
	boolean cancelDraw = attachInfo.mTreeObserver.dispatchOnPreDraw() ||
			viewVisibility != View.VISIBLE;
	if (!cancelDraw && !newSurface) {
		if (!skipDraw || mReportNextDraw) {
			if (mPendingTransitions != null && mPendingTransitions.size() > 0) {
				for (int i = 0; i < mPendingTransitions.size(); ++i) {
					mPendingTransitions.get(i).startChangingAnimations();
				}
				mPendingTransitions.clear();
			}
			performDraw();
		}
	} else {
		if (viewVisibility == View.VISIBLE) {
			// Try again
			scheduleTraversals();
		} else if (mPendingTransitions != null && mPendingTransitions.size() > 0) {
			for (int i = 0; i < mPendingTransitions.size(); ++i) {
				mPendingTransitions.get(i).endChangingAnimations();
			}
			mPendingTransitions.clear();
		}
	}
}
frameworks\base\core\java\android\view\ViewRootImpl.java
private void performMeasure(int childWidthMeasureSpec, int childHeightMeasureSpec) {
 Trace.traceBegin(Trace.TRACE_TAG_VIEW, "measure");
 try {
  mView.measure(childWidthMeasureSpec, childHeightMeasureSpec);
 } finally {
  Trace.traceEnd(Trace.TRACE_TAG_VIEW);
 }
}
frameworks\base\core\java\android\view\ViewRootImpl.java
private int relayoutWindow(WindowManager.LayoutParams params, int viewVisibility,
		boolean insetsPending) throws RemoteException {
	...
	int relayoutResult = sWindowSession.relayout(
			mWindow, mSeq, params,
			(int) (mView.getMeasuredWidth() * appScale + 0.5f),
			(int) (mView.getMeasuredHeight() * appScale + 0.5f),
			viewVisibility, insetsPending ? WindowManagerImpl.RELAYOUT_INSETS_PENDING : 0,
			mWinFrame, mPendingContentInsets, mPendingVisibleInsets,
			mPendingConfiguration, mSurface);
	...
	return relayoutResult;
}
這裡通過前面獲取的IWindowSession代理對象請求WMS服務執行窗口布局,mSurface是ViewRootImpl的成員變量
private final Surface mSurface = new Surface();
frameworks\base\core\java\android\view\ Surface.java
public Surface() {
	checkHeadless();
	if (DEBUG_RELEASE) {
		mCreationStack = new Exception();
	}
	mCanvas = new CompatibleCanvas();
}
該Surface構造函數僅僅創建了一個CompatibleCanvas對象,並沒有對該Surface進程native層的初始化,到此我們知道應用程序進程為每個窗口對象都創建了一個Surface對象。並且將該Surface通過跨進程方式傳輸給WMS服務進程,我們知道,在Android系統中,如果一個對象需要在不同進程間傳輸,必須實現Parcelable接口,Surface類正好實現了Parcelable接口。ViewRootImpl通過IWindowSession接口請求WMS的完整過程如下:
frameworks\base\core\java\android\view\IWindowSession.java$ Proxy
public int relayout(android.view.IWindow window, int seq,
		android.view.WindowManager.LayoutParams attrs, int requestedWidth,
		int requestedHeight, int viewVisibility, int flags,
		android.graphics.Rect outFrame,
		android.graphics.Rect outOverscanInsets,
		android.graphics.Rect outContentInsets,
		android.graphics.Rect outVisibleInsets,
		android.content.res.Configuration outConfig,
		android.view.Surface outSurface) throws android.os.RemoteException {
	android.os.Parcel _data = android.os.Parcel.obtain();
	android.os.Parcel _reply = android.os.Parcel.obtain();
	int _result;
	try {
		_data.writeInterfaceToken(DESCRIPTOR);
		_data.writeStrongBinder((((window != null)) ? (window.asBinder()): (null)));
		_data.writeInt(seq);
		if ((attrs != null)) {
			_data.writeInt(1);
			attrs.writeToParcel(_data, 0);
		} else {
			_data.writeInt(0);
		}
		_data.writeInt(requestedWidth);
		_data.writeInt(requestedHeight);
		_data.writeInt(viewVisibility);
		_data.writeInt(flags);
		mRemote.transact(Stub.TRANSACTION_relayout, _data, _reply, 0);
		_reply.readException();
		_result = _reply.readInt();
		if ((0 != _reply.readInt())) {
			outFrame.readFromParcel(_reply);
		}
		if ((0 != _reply.readInt())) {
			outOverscanInsets.readFromParcel(_reply);
		}
		if ((0 != _reply.readInt())) {
			outContentInsets.readFromParcel(_reply);
		}
		if ((0 != _reply.readInt())) {
			outVisibleInsets.readFromParcel(_reply);
		}
		if ((0 != _reply.readInt())) {
			outConfig.readFromParcel(_reply);
		}
		if ((0 != _reply.readInt())) {
			outSurface.readFromParcel(_reply);
		}
	} finally {
		_reply.recycle();
		_data.recycle();
	}
	return _result;
}
從該函數的實現可以看出,應用程序進程中創建的Surface對象並沒有傳遞到WMS服務進程,只是讀取WMS服務進程返回來的Surface。那麼WMS服務進程是如何響應應用程序進程布局請求的呢?
frameworks\base\core\java\android\view\IWindowSession.java$ Stub
public boolean onTransact(int code, android.os.Parcel data,
		android.os.Parcel reply, int flags)throws android.os.RemoteException {
	switch (code) {
	case TRANSACTION_relayout: {
		data.enforceInterface(DESCRIPTOR);
		android.view.IWindow _arg0;
		_arg0 = android.view.IWindow.Stub.asInterface(data.readStrongBinder());
		int _arg1;
		_arg1 = data.readInt();
		android.view.WindowManager.LayoutParams _arg2;
		if ((0 != data.readInt())) {
			_arg2 = android.view.WindowManager.LayoutParams.CREATOR
					.createFromParcel(data);
		} else {
			_arg2 = null;
		}
		int _arg3;
		_arg3 = data.readInt();
		int _arg4;
		_arg4 = data.readInt();
		int _arg5;
		_arg5 = data.readInt();
		int _arg6;
		_arg6 = data.readInt();
		android.graphics.Rect _arg7;
		_arg7 = new android.graphics.Rect();
		android.graphics.Rect _arg8;
		_arg8 = new android.graphics.Rect();
		android.graphics.Rect _arg9;
		_arg9 = new android.graphics.Rect();
		android.graphics.Rect _arg10;
		_arg10 = new android.graphics.Rect();
		android.content.res.Configuration _arg11;
		_arg11 = new android.content.res.Configuration();
		android.view.Surface _arg12;
		_arg12 = new android.view.Surface();
		int _result = this.relayout(_arg0, _arg1, _arg2, _arg3, _arg4,
				_arg5, _arg6, _arg7, _arg8, _arg9, _arg10, _arg11, _arg12);
		reply.writeNoException();
		reply.writeInt(_result);
		if ((_arg7 != null)) {
			reply.writeInt(1);
			_arg7.writeToParcel(reply,
					android.os.Parcelable.PARCELABLE_WRITE_RETURN_VALUE);
		} else {
			reply.writeInt(0);
		}
		if ((_arg8 != null)) {
			reply.writeInt(1);
			_arg8.writeToParcel(reply,
					android.os.Parcelable.PARCELABLE_WRITE_RETURN_VALUE);
		} else {
			reply.writeInt(0);
		}
		if ((_arg9 != null)) {
			reply.writeInt(1);
			_arg9.writeToParcel(reply,
					android.os.Parcelable.PARCELABLE_WRITE_RETURN_VALUE);
		} else {
			reply.writeInt(0);
		}
		if ((_arg10 != null)) {
			reply.writeInt(1);
			_arg10.writeToParcel(reply,
					android.os.Parcelable.PARCELABLE_WRITE_RETURN_VALUE);
		} else {
			reply.writeInt(0);
		}
		if ((_arg11 != null)) {
			reply.writeInt(1);
			_arg11.writeToParcel(reply,
					android.os.Parcelable.PARCELABLE_WRITE_RETURN_VALUE);
		} else {
			reply.writeInt(0);
		}
		if ((_arg12 != null)) {
			reply.writeInt(1);
			_arg12.writeToParcel(reply,
					android.os.Parcelable.PARCELABLE_WRITE_RETURN_VALUE);
		} else {
			reply.writeInt(0);
		}
		return true;
	}
	}
}
該函數可以看出,WMS服務在響應應用程序進程請求添加窗口時,首先在當前進程空間創建一個Surface對象,然後調用Session的relayout()函數進一步完成窗口添加過程,最後將WMS服務中創建的Surface返回給應用程序進程。

到目前為止,在應用程序進程和WMS服務進程分別創建了一個Surface對象,但是他們調用的都是Surface的無參構造函數,在該構造函數中並未真正初始化native層的Surface,那native層的Surface是在那裡創建的呢?
frameworks\base\services\java\com\android\server\wm\ Session.java
public int relayout(IWindow window, int seq, WindowManager.LayoutParams attrs,
		int requestedWidth, int requestedHeight, int viewFlags,
		int flags, Rect outFrame, Rect outContentInsets,
		Rect outVisibleInsets, Configuration outConfig, Surface outSurface) {
	int res = mService.relayoutWindow(this, window, seq, attrs,
			requestedWidth, requestedHeight, viewFlags, flags,
			outFrame, outContentInsets, outVisibleInsets,
			outConfig, outSurface);
	return res;
}
frameworks\base\services\java\com\android\server\wm\ WindowManagerService.java
public int relayoutWindow(Session session, IWindow client, int seq,
		WindowManager.LayoutParams attrs, int requestedWidth,
		int requestedHeight, int viewVisibility, int flags,
		Rect outFrame, Rect outContentInsets,
		Rect outVisibleInsets, Configuration outConfig, Surface outSurface) {
	...
	synchronized(mWindowMap) {
		// TODO(cmautner): synchronize on mAnimator or win.mWinAnimator.
		WindowState win = windowForClientLocked(session, client, false);
		if (win == null) {
			return 0;
		}
		...
		if (viewVisibility == View.VISIBLE &&
				(win.mAppToken == null || !win.mAppToken.clientHidden)) {
			...
			try {
				if (!win.mHasSurface) {
					surfaceChanged = true;
				}
				//創建Surface
				Surface surface = winAnimator.createSurfaceLocked();
				if (surface != null) {
					outSurface.copyFrom(surface);
				} else {
					outSurface.release();
				}
			} catch (Exception e) {
				...
			}
			...
		}
		...
	}
	...
}
frameworks\base\services\java\com\android\server\wm\WindowStateAnimator.java
Surface createSurfaceLocked() {
	if (mSurface == null) {
		...
		try {
			...
			if (DEBUG_SURFACE_TRACE) {
				mSurface = new SurfaceTrace(
						mSession.mSurfaceSession, mSession.mPid,
						attrs.getTitle().toString(),
						0, w, h, format, flags);
			} else {
				mSurface = new Surface(
					mSession.mSurfaceSession, mSession.mPid,
					attrs.getTitle().toString(),
					0, w, h, format, flags);
			}
			mWin.mHasSurface = true;
		} catch (Surface.OutOfResourcesException e) {
			...
		}
		Surface.openTransaction();
		...
	}
	return mSurface;
}
Surface創建過程
frameworks\base\core\java\android\view\Surface.java
public Surface(SurfaceSession s,int pid, String name, int display, int w, int h, int format, int flags)
	throws OutOfResourcesException {
	checkHeadless();
	if (DEBUG_RELEASE) {
		mCreationStack = new Exception();
	}
	mCanvas = new CompatibleCanvas();
	init(s,pid,name,display,w,h,format,flags);
	mName = name;
}
frameworks\base\core\jni\ android_view_Surface.cpp
static void Surface_init(
        JNIEnv* env, jobject clazz,
        jobject session,
        jint, jstring jname, jint dpy, jint w, jint h, jint format, jint flags)
{
    if (session == NULL) {
        doThrowNPE(env);
        return;
    }
    SurfaceComposerClient* client =
            (SurfaceComposerClient*)env->GetIntField(session, sso.client);
    sp surface;
    if (jname == NULL) {
        surface = client->createSurface(dpy, w, h, format, flags);
    } else {
        const jchar* str = env->GetStringCritical(jname, 0);
        const String8 name(str, env->GetStringLength(jname));
        env->ReleaseStringCritical(jname, str);
        surface = client->createSurface(name, dpy, w, h, format, flags);
    }
    if (surface == 0) {
        jniThrowException(env, OutOfResourcesException, NULL);
        return;
    }
    setSurfaceControl(env, clazz, surface);
}
到此才算真正創建了一個可用於繪圖的Surface,從上面的分析我們可以看出,在WMS服務進程端,其實創建了兩個Java層的Surface對象,第一個Surface使用了無參構造函數,僅僅構造一個Surface對象而已,而第二個Surface卻使用了有參構造函數,參數指定了圖象寬高等信息,這個Java層Surface對象還會在native層請求SurfaceFlinger創建一個真正能用於繪制圖象的native層Surface。最後通過淺拷貝的方式將第二個Surface復制到第一個Surface中,最後通過writeToParcel方式寫回到應用程序進程。

到目前為止,應用程序和WMS一共創建了3個Java層Surface對象,如上圖所示,而真正能用於繪圖的Surface只有3號,那麼3號Surface與2號Surface之間是什麼關系呢?outSurface.copyFrom(surface)
frameworks\base\core\jni\ android_view_Surface.cpp
static void Surface_copyFrom(JNIEnv* env, jobject clazz, jobject other)
{
    if (clazz == other)
        return;
    if (other == NULL) {
        doThrowNPE(env);
        return;
    }
	//得到當前Surface所引用的SurfaceControl對象
    const sp& surface = getSurfaceControl(env, clazz);
	//得到源Surface所引用的SurfaceControl對象
    const sp& rhs = getSurfaceControl(env, other);
	//如果它們引用的不是同一個SurfaceControl對象
    if (!SurfaceControl::isSameSurface(surface, rhs)) {
        setSurfaceControl(env, clazz, rhs);
    }
}
2號Surface引用到了3號Surface的SurfaceControl對象後,通過writeToParcel()函數寫會到應用程序進程。
frameworks\base\core\jni\ android_view_Surface.cpp
static void Surface_writeToParcel(
        JNIEnv* env, jobject clazz, jobject argParcel, jint flags)
{
    Parcel* parcel = (Parcel*)env->GetIntField(
            argParcel, no.native_parcel);
    if (parcel == NULL) {
        doThrowNPE(env);
        return;
    }
    const sp& control(getSurfaceControl(env, clazz));
    if (control != NULL) {
        SurfaceControl::writeSurfaceToParcel(control, parcel);
    } else {
        sp surface(Surface_getSurface(env, clazz));
        if (surface != NULL) {
            Surface::writeToParcel(surface, parcel);
        } else {
            SurfaceControl::writeSurfaceToParcel(NULL, parcel);
        }
    }
    if (flags & PARCELABLE_WRITE_RETURN_VALUE) {
        setSurfaceControl(env, clazz, NULL);
        setSurface(env, clazz, NULL);
    }
}
由於2號Surface引用的SurfaceControl對象不為空,因此這裡就將SurfaceControl對象寫會給應用程序進程
frameworks\native\libs\gui\ Surface.cpp
status_t SurfaceControl::writeSurfaceToParcel(
        const sp& control, Parcel* parcel)
{
    sp sur;
    uint32_t identity = 0;
    if (SurfaceControl::isValid(control)) {
        sur = control->mSurface;
        identity = control->mIdentity;
    }
    parcel->writeStrongBinder(sur!=0 ? sur->asBinder() : NULL);
    parcel->writeStrongBinder(NULL);  // NULL ISurfaceTexture in this case.
    parcel->writeInt32(identity);
    return NO_ERROR;
}
寫入Parcel包裹的對象順序如下:

應用程序進程中的1號Surface通過readFromParcel()函數讀取從WMS服務進程寫回的Binder對象。
frameworks\base\core\jni\ android_view_Surface.cpp
static void Surface_readFromParcel(
        JNIEnv* env, jobject clazz, jobject argParcel)
{
    Parcel* parcel = (Parcel*)env->GetIntField( argParcel, no.native_parcel);
    if (parcel == NULL) {
        doThrowNPE(env);
        return;
    }
    sp sur(Surface::readFromParcel(*parcel));
    setSurface(env, clazz, sur);
}
frameworks\native\libs\gui\ Surface.cpp
spSurface::readFromParcel(const Parcel& data) { Mutex::Autolock _l(sCachedSurfacesLock); sp binder(data.readStrongBinder()); sp surface = sCachedSurfaces.valueFor(binder).promote(); if (surface == 0) { surface = new Surface(data, binder); sCachedSurfaces.add(binder, surface); } else { // The Surface was found in the cache, but we still should clear any // remaining data from the parcel. data.readStrongBinder(); // ISurfaceTexture data.readInt32(); // identity } if (surface->mSurface == NULL && surface->getISurfaceTexture() == NULL) { surface = 0; } cleanCachedSurfacesLocked(); return surface; }
應用程序進程中的1號Surface按相反順序讀取WMS服務端返回過來的Binder對象等數據,並構造一個native層的Surface對象。
Surface::Surface(const Parcel& parcel, const sp& ref) : SurfaceTextureClient() { mSurface = interface_cast (ref); sp st_binder(parcel.readStrongBinder()); sp st; if (st_binder != NULL) { st = interface_cast (st_binder); } else if (mSurface != NULL) { st = mSurface->getSurfaceTexture(); } mIdentity = parcel.readInt32(); init(st); }
每個Activity可以有一個或多個Surface,默認情況下一個Activity只有一個Surface,當Activity中使用SurfaceView時,就存在多個Surface。Activity默認surface是在relayoutWindow過程中由WMS服務創建的,然後回傳給應用程序進程,我們知道一個Surface其實就是應用程序端的本地窗口,關於Surface的初始化過程這裡就不在介紹。
frameworks\base\core\java\android\view\ViewRootImpl.java
private void performLayout() {
	mLayoutRequested = false;
	mScrollMayChange = true;
	final View host = mView;
	if (DEBUG_ORIENTATION || DEBUG_LAYOUT) {
		Log.v(TAG, "Laying out " + host + " to (" +
				host.getMeasuredWidth() + ", " + host.getMeasuredHeight() + ")");
	}
	Trace.traceBegin(Trace.TRACE_TAG_VIEW, "layout");
	try {
		host.layout(0, 0, host.getMeasuredWidth(), host.getMeasuredHeight());
	} finally {
		Trace.traceEnd(Trace.TRACE_TAG_VIEW);
	}
}
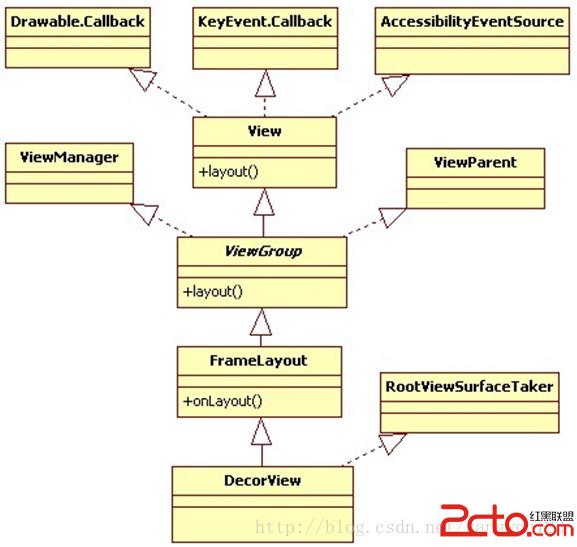
frameworks\base\core\java\android\view\ ViewRootImpl.java
private void performDraw() {
	if (!mAttachInfo.mScreenOn && !mReportNextDraw) {
		return;
	}
	final boolean fullRedrawNeeded = mFullRedrawNeeded;
	mFullRedrawNeeded = false;
	mIsDrawing = true;
	Trace.traceBegin(Trace.TRACE_TAG_VIEW, "draw");
	try {
		draw(fullRedrawNeeded);
	} finally {
		mIsDrawing = false;
		Trace.traceEnd(Trace.TRACE_TAG_VIEW);
	}
	...
}
private void draw(boolean fullRedrawNeeded) {
	Surface surface = mSurface;
	if (surface == null || !surface.isValid()) {
		return;
	}
	...
	if (!dirty.isEmpty() || mIsAnimating) {
		//使用硬件渲染
		if (attachInfo.mHardwareRenderer != null && attachInfo.mHardwareRenderer.isEnabled()) {
			// Draw with hardware renderer.
			mIsAnimating = false;
			mHardwareYOffset = yoff;
			mResizeAlpha = resizeAlpha;
			mCurrentDirty.set(dirty);
			mCurrentDirty.union(mPreviousDirty);
			mPreviousDirty.set(dirty);
			dirty.setEmpty();
			if (attachInfo.mHardwareRenderer.draw(mView, attachInfo, this,
					animating ? null : mCurrentDirty)) {
				mPreviousDirty.set(0, 0, mWidth, mHeight);
			}
		//使用軟件渲染
		} else if (!drawSoftware(surface, attachInfo, yoff, scalingRequired, dirty)) {
			return;
		}
	}
	...
}
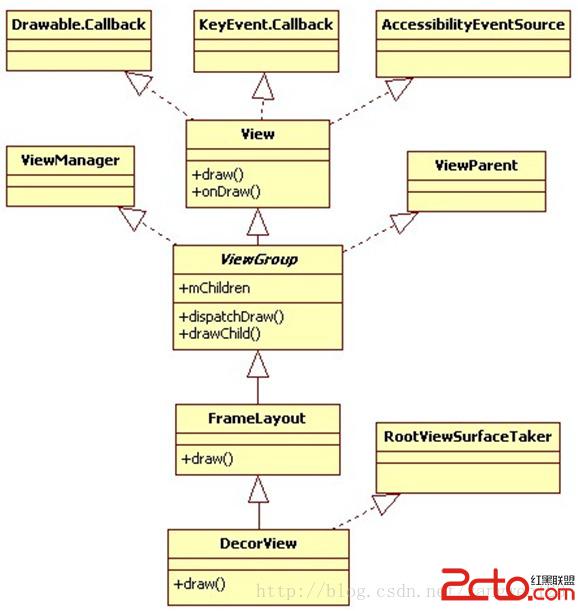
frameworks\base\services\java\com\android\server\wm\Session.java
public int add(IWindow window, int seq, WindowManager.LayoutParams attrs,
		int viewVisibility, Rect outContentInsets, InputChannel outInputChannel) {
	return mService.addWindow(this, window, seq, attrs, viewVisibility, outContentInsets,
			outInputChannel);
}
frameworks\base\services\java\com\android\server\wm\WindowManagerService.java
public int addWindow(Session session, IWindow client, int seq,
		WindowManager.LayoutParams attrs, int viewVisibility,
		Rect outContentInsets, InputChannel outInputChannel) {
	//client為IWindow的代理對象,是Activity在WMS服務中的唯一標示
	int res = mPolicy.checkAddPermission(attrs);
	if (res != WindowManagerImpl.ADD_OKAY) {
		return res;
	}
	boolean reportNewConfig = false;
	WindowState attachedWindow = null;
	WindowState win = null;
	long origId;
	synchronized(mWindowMap) {
		if (mDisplay == null) {
			throw new IllegalStateException("Display has not been initialialized");
		}
		//判斷窗口是否已經存在
		if (mWindowMap.containsKey(client.asBinder())) {
			Slog.w(TAG, "Window " + client + " is already added");
			return WindowManagerImpl.ADD_DUPLICATE_ADD;
		}
		//如果添加的是應用程序窗口
		if (attrs.type >= FIRST_SUB_WINDOW && attrs.type <= LAST_SUB_WINDOW) {
			//根據attrs.token從mWindowMap中取出應用程序窗口在WMS服務中的描述符WindowState
			attachedWindow = windowForClientLocked(null, attrs.token, false);
			if (attachedWindow == null) {
				Slog.w(TAG, "Attempted to add window with token that is not a window: "
					  + attrs.token + ".  Aborting.");
				return WindowManagerImpl.ADD_BAD_SUBWINDOW_TOKEN;
			}
			if (attachedWindow.mAttrs.type >= FIRST_SUB_WINDOW
					&& attachedWindow.mAttrs.type <= LAST_SUB_WINDOW) {
				Slog.w(TAG, "Attempted to add window with token that is a sub-window: "
						+ attrs.token + ".  Aborting.");
				return WindowManagerImpl.ADD_BAD_SUBWINDOW_TOKEN;
			}
		}
		boolean addToken = false;
		//根據attrs.token從mWindowMap中取出應用程序窗口在WMS服務中的描述符WindowState
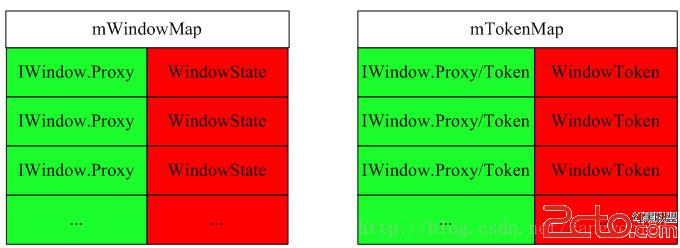
		WindowToken token = mTokenMap.get(attrs.token);
		if (token == null) {
			...
			①token = new WindowToken(this, attrs.token, -1, false);
			addToken = true;
		}
		//應用程序窗口
		else if (attrs.type >= FIRST_APPLICATION_WINDOW
				&& attrs.type <= LAST_APPLICATION_WINDOW) {
			AppWindowToken atoken = token.appWindowToken;
			...
		}
		//輸入法窗口
		else if (attrs.type == TYPE_INPUT_METHOD) {
			...
		}
		//牆紙窗口
		else if (attrs.type == TYPE_WALLPAPER) {
			...
		}
		//Dream窗口
		else if (attrs.type == TYPE_DREAM) {
			...
		}
		//為Activity窗口創建WindowState對象
		②win = new WindowState(this, session, client, token,
				attachedWindow, seq, attrs, viewVisibility);
		...
		if (outInputChannel != null && (attrs.inputFeatures& WindowManager.LayoutParams.INPUT_FEATURE_NO_INPUT_CHANNEL) == 0) {
			String name = win.makeInputChannelName();
			InputChannel[] inputChannels = InputChannel.openInputChannelPair(name);
			win.setInputChannel(inputChannels[0]);
			inputChannels[1].transferTo(outInputChannel);
			mInputManager.registerInputChannel(win.mInputChannel, win.mInputWindowHandle);
		}
		...
		//以鍵值對形式保存到mTokenMap表中
		if (addToken) {
			③mTokenMap.put(attrs.token, token);
		}
		④win.attach();
		//以鍵值對形式保存到mWindowMap表中
		⑤mWindowMap.put(client.asBinder(), win);
		...
	}
	...
	return res;
}
我們知道當應用程序進程添加一個DecorView到窗口管理器時,會為當前添加的窗口創建ViewRootImpl對象,同時構造了一個W本地Binder對象,無論是窗口視圖對象DecorView還是ViewRootImpl對象,都只是存在於應用程序進程中,在添加窗口過程中僅僅將該窗口的W對象傳遞給WMS服務,經過Binder傳輸後,到達WMS服務端進程後變為IWindow.Proxy代理對象,因此該函數的參數client的類型為IWindow.Proxy。參數attrs的類型為WindowManager.LayoutParams,在應用程序進程啟動Activity時,handleResumeActivity()函數通過WindowManager.LayoutParams l = r.window.getAttributes();來得到應用程序窗口布局參數,由於WindowManager.LayoutParams實現了Parcelable接口,因此WindowManager.LayoutParams對象可以跨進程傳輸,WMS服務的addWindow函數中的attrs參數就是應用程序進程發送過來的窗口布局參數。在LocalWindowManager的addView函數中為窗口布局參數設置了相應的token,如果是應用程序窗口,則布局參數的token設為W本地Binder對象。如果不是應用程序窗口,同時當前窗口沒有父窗口,則設置token為當前窗口的IApplicationToken.Proxy代理對象,否則設置為父窗口的IApplicationToken.Proxy代理對象,由於應用程序和WMS分屬於兩個不同的進程空間,因此經過Binder傳輸後,布局參數的令牌attrs.token就轉變為IWindow.Proxy或者Token。以上函數首先根據布局參數的token等信息構造一個WindowToken對象,然後在構造一個WindowState對象,並將添加的窗口信息記錄到mTokenMap和mWindowMap哈希表中。

在WMS服務端創建了所需對象後,接著調用了WindowState的attach()來進一步完成窗口添加。
frameworks\base\services\java\com\android\server\wm\WindowState.java
void attach() {
	if (WindowManagerService.localLOGV) Slog.v(
		TAG, "Attaching " + this + " token=" + mToken
		+ ", list=" + mToken.windows);
	mSession.windowAddedLocked();
}
frameworks\base\services\java\com\android\server\wm\Session.java
void windowAddedLocked() {
	if (mSurfaceSession == null) {
		mSurfaceSession = new SurfaceSession();
		if (WindowManagerService.SHOW_TRANSACTIONS) Slog.i(
				WindowManagerService.TAG, "  NEW SURFACE SESSION " + mSurfaceSession);
		mService.mSessions.add(this);
	}
	mNumWindow++;//記錄對應的某個應用程序添加的窗口數量
}
到此一個新的應用程序窗口就添加完成了。總結一下:
應用程序通過IWindowSession接口請求WMS服務添加一個應用程序窗口,WMS服務首先在自己服務進程為應用程序創建創建一個對應的WindowState描述符,然後保存到成員變量mWindowMap中。如果還沒有為應用程序進程創建連接SurfaceFlinger的會話,就接著創建該會話通道SurfaceSession,我們知道,Activity中的視圖所使用的畫布Surface是在WMS服務進程中創建的,但是該畫布所使用的圖形buffer確實在SurfaceFlinger進程中分配管理的,而圖形的繪制確是在應用程序進程中完成的,所以Activity的顯示過程需要三個進程的配合才能完成。應用程序進程只與WMS服務進程交互,並不直接和SurfaceFlinger進程交互,而是由WMS服務進程同SurfaceFlinger進程配合。前面我們介紹了應用程序進程是通過IWindowSession接口與WMS服務進程通信的,那WMS服務是如何與SurfaceFlinger進程通信的呢,這就是windowAddedLocked函數要完成的工作。
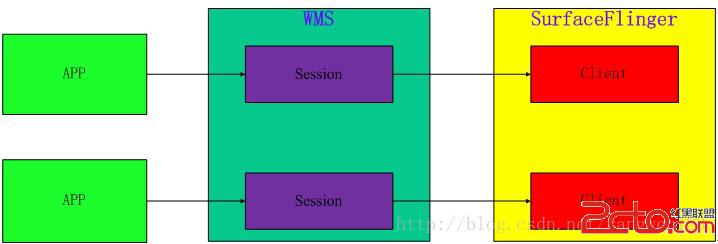
在windowAddedLocked函數中使用單例模式創建一個SurfaceSession對象,在構造該對象時,通過JNI在native層創建一個與SurfaceFlinger進程的連接。
frameworks\base\core\java\android\view\SurfaceSession.java
public SurfaceSession() {
	init();
}
該init()函數是一個native函數,其JNI實現如下:
frameworks\base\core\jni\ android_view_Surface.cpp
static void SurfaceSession_init(JNIEnv* env, jobject clazz)
{
    sp client = new SurfaceComposerClient;
    client->incStrong(clazz);
    env->SetIntField(clazz, sso.client, (int)client.get());
}
該函數構造了一個SurfaceComposerClient對象,在第一次強引用該對象時,會請求SurfaceFlinger創建一個專門處理當前應用程序進程請求的Client會話。
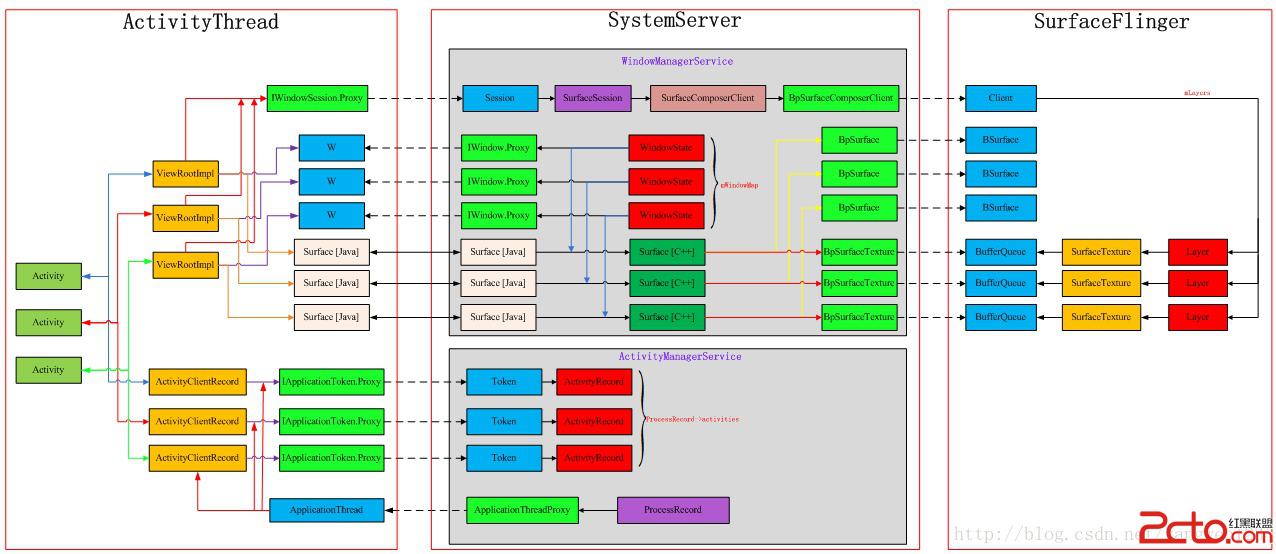
每個應用程序進程都持有一個與WMS服務會話通道IWindowSession,而服務端的Session有且只有一個SurfaceSession對象。系統中創建的所有IWindowSession都被記錄到WMS服務的mSessions成員變量中,這樣WMS就可以知道自己正在處理那些應用程序的請求。到此我們來梳理一下在WMS服務端都創建了那些對象:
1) WindowState對象,是應用程序窗口在WMS服務端的描述符;
2) Session對象,應用程序進程與WMS服務會話通道;
3) SurfaceSession對象,應用程序進程與SurfaceFlinger的會話通道;
 Android progressBar 自定義
在drawable文件夾中建立如下旋轉動畫文件 android:drawable=@drawable/loading1 android:p
 Android學習小Demo(19)利用Loader來實時接收短信
之前寫過一篇文章《Android學習小Demo(13)Android中關於ContentObserver的使用》,在裡面利用ContentOberver去監測短信URI內
 一起學android之自定義控件顯示點贊用戶並通過用戶名稱進入該用戶主頁的功能
效果圖:以上效果類似於顯示點贊用戶的界面,我們可以通過點擊不同的昵稱進入每個人的個人主頁。 關於公共控件,請點擊文章下方的git地址。 第一步:我們為
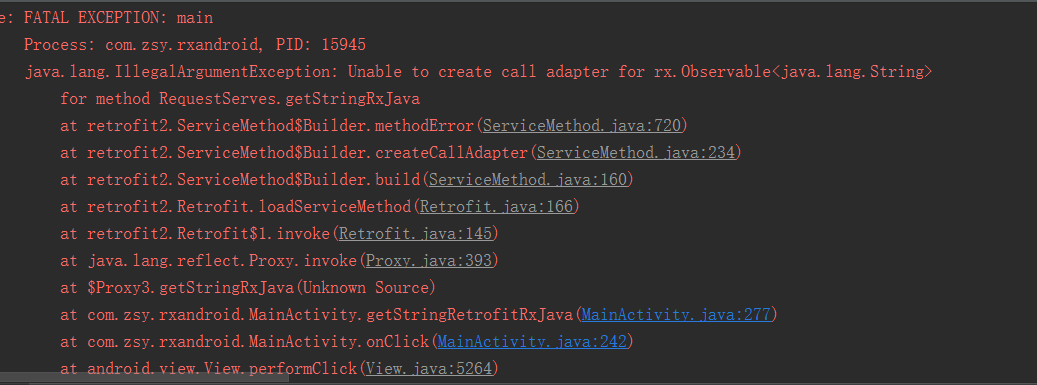 Android----Rxjava與Retrofit初體驗
RxJava(響應式編程) RxJava 在 GitHub 主頁上的自我介紹是 “a library for composing asynchronous a