編輯:關於Android編程
Android is a large and fast-growing segment of the mobile phone market. With potentially 350,000 users activating a new Android phone every day and multiple Android App Stores popping up (Google’s Android Market was recently revamped, and now other markets are coming online, like Amazon’s Android App Store), now is a great time to jump into Android development.
This walk-through will get you started installing the Android Software Development Kit (Android SDK), installing and configuring the Eclipse IDE for Android development, and choosing and installing Android Virtual Devices (AVDs) to emulate the Android environment right on your local computer. After following these steps, you will be ready to create your first Android application!
1. Download the Android Software Development Kit (SDK)
http://developer.android.com/sdk/index.html
The very first step is to download the Android Software Development Kit (SDK) that will let you emulate Android on your local computer. It is not too large (only ~30MB, compared to the monolithic XCode/iPhone SDK, which is almost 4GB!).
From the Android SDK Download Page, make sure to choose the version that is correct for your operating system.
After your Android SDK download is complete, unzip and move the new folder to a permanent location (*not* your downloads directory). I use a folder in my home directory (~/Android/android-sdk-mac_x86/) but you can move it anywhere you would like. There is no wrong location. Wherever you choose will hereby known as $ANDROID for future reference.
2. Download Eclipse IDE for Java Developers
http://www.eclipse.org/downloads/
When I develop for Android, I choose to use Eclipse as my Integrated Development Environment (IDE). Eclipse can be suitably adapted for Android development since you can get plugins to help with creating your Android project, launching your Android emulator, and preparing your Android application for the Android Market. It is not an ideal IDE, but the pros outweigh the cons for Android Development.
From the Eclipse Downloads Page, choose the “Eclipse IDE for Java Developers. Make sure you are getting the correct version for your operating system. Eclipse is fairly large (~100MB) but still a lot smaller than the 4GB XCode for the iPhone!
After your Eclipse IDE download is complete, unzip and move to a permanent folder. I use the applications directory in my home folder (~/Applications/).
For OSX users: we will want to have access to Eclipse.app from within our Applications folder. To do this:
Now you can use Eclipse just like any other application, including adding it to your dock. I do this with all of programs that I download that do not have installers (i.e., they are just .app files). This may not be a necessary step (I am fairly new to OSX), so please let me know if there is a better way!
3. Install the Android Development Tools (ADT) plugin for Eclipse
http://developer.android.com/sdk/eclipse-adt.html#downloading
Next, we will use Eclipse to install the Android Development Tools (ADT) using Eclipse’s built-in plug-in system. From within Eclipse:
4. Connect Android SDK with Eclipse IDE
This next step connects the Android SDK from Step #1 to the Eclipse IDE from Step #2. In Step #3, you should have restarted Eclipse. If you have not done so, do that now. From within Eclipse:
5. (Optional) Additional Android/Eclipse Config
While we are in the Android section of our Eclipse preferences, let’s change a few more things. These steps are entirely optional. For these additional preferences, we need to expand the menu-tree under the “Android” heading:
6. Decide Which Android Platforms You Will Support
http://developer.android.com/resources/dashboard/platform-versions.html
This graph will help you decide which ones are relevant and worth your time. I recommend checking the Android Platform Versions Graph every month or so to see how rapidly it changes! When I first found this graph less than a year ago, Android 1.5 and Android 1.6 together represented ~50% of the graph. Today, they are only ~8%. For me, this dramatic change in Android 1.5/1.6 deployment means that my efforts will be better spent focusing on Android 2.1+. For you, it may be worth it to support 1.5/1.6 for those 8% of users. Only you can make that decision.
When deciding, consider that you will need to test, debug, and provide customer support for every version of Android that you support, and for each individual device that runs those versions! For example, deciding to support 2.1 means that there are a whole host of different hardware devices that you may receive feedback regarding; whereas supporting 2.3.3 (for right now) only means the Nexus One and the Nexus S. Just keep that in mind while deciding.
From a resources standpoint, not only do you need to test and support each version that you plan to release for, but you also need to have those Android SDKs and Android Emulators on your machine (which takes up space; which, on my smaller SSD, is a finite resource). It may not be an issue for your, but it is just yet another thing to keep in mind.
Finally, no matter which versions you choose to support right now, make sure to check the Android Platform Versions Graph every month or so to see how it is changing, and to adjust accordingly. This will let you know when you can stop supporting older versions of Android and, most importantly, will let you know when you need to start supporting newer versions of Android as they grow and gain traction.
7. Install Android SDK Components
http://developer.android.com/sdk/adding-components.html
Android is packaged in such a way that the base Android SDK (downloaded in Step #1) is distinct and separate from each API version of the Android SDK. This means that for each version we want to support (from Step #6), we need to download a separate Android SDK for that version. This can be very annoying when installing (notice how many steps we have done by now), but in the long-run is a very beneficial design for us Android Developers. As new API versions are added and old API versions are phased out, we can install/uninstall the APIs as compnents, rather than a single huge download like XCode is for iPhone (4GB! I just can’t get over that! Who has a 4GB download for a minor version change?!)
We need to download the Software Development Kits (SDKs) for the Android versions that we want to support. To do this, we can use the Eclipse IDE + Android ADT that we installed in Step #3. From within Eclipse:
8. Create Your Android Virtual Devices (AVDs)
http://developer.android.com/guide/practices/screens_support.html#testing
Last but not least, we need to create Android Virtual Devices (AVDs) that will be our Android Emulators for running and testing our Android applications on our local computer. In the same “Android SDK and AVD Manager” from Step #7, choose “Virtual Devices” on the left and create “New…” ones. I like to create AVDs to represent different Android versions that I want to test, as well as different hardware specs and screen densities my users are likely to be using.
The main idea is to test different versions of the Android API, as well as different screen resolutions and densities. I tend to pair older versions of Android (most likely running on older hardware) with lower screen densities, and new versions of Android (most likely running on newer hardware) with better screen resolutions.
Final Thoughts
These 8 Steps should be enough to get you up and running on your local computer, and ready to create and test your first Android application. There are plenty more things to cover regarding testing and packaging of your application, but this is at least a start for now. If you have any questions, issues, or suggestions, please leave a comment below!
 Android-2電話應用,短信應用
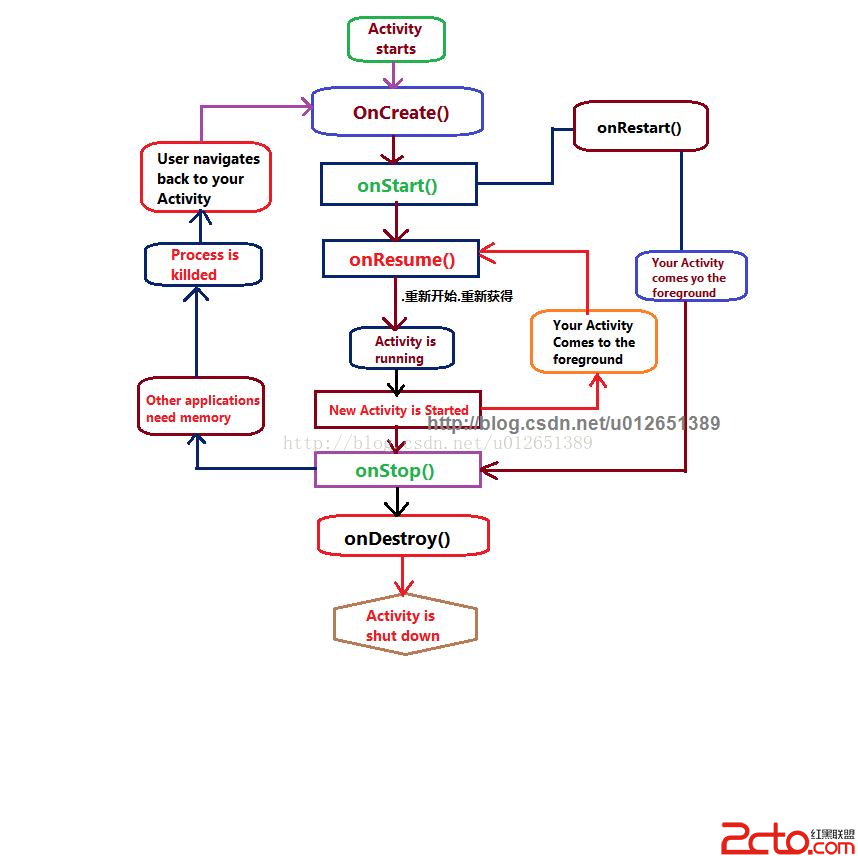
Activity的生命周期 Android的核心組件 1.Viiew :界面 ,組織UI控件 2.Intent :意圖,支持組件之間的通信 3.Activity:
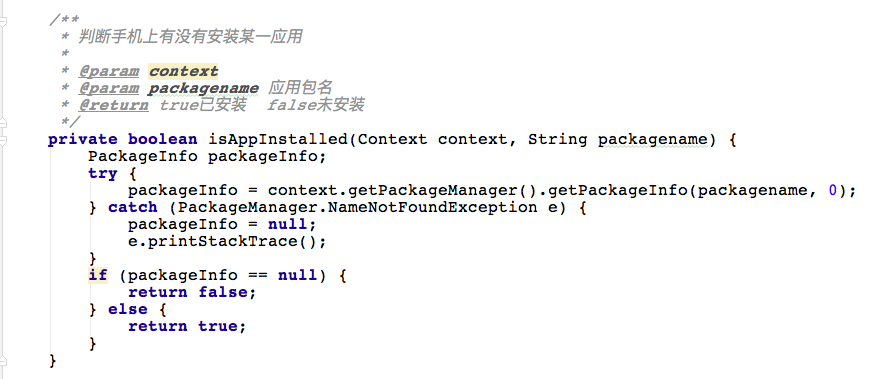
 android判斷手機是否安裝地圖應用實現跳轉到該地圖應用
前言現在很多應用都會用到地圖,但是我們肯定不想自己的app中還要弄個導航神馬的,所以第三方的地圖也為我們開辟了一條捷徑,直接將數據傳輸到地圖應用,讓第三方的地圖幫我們來做
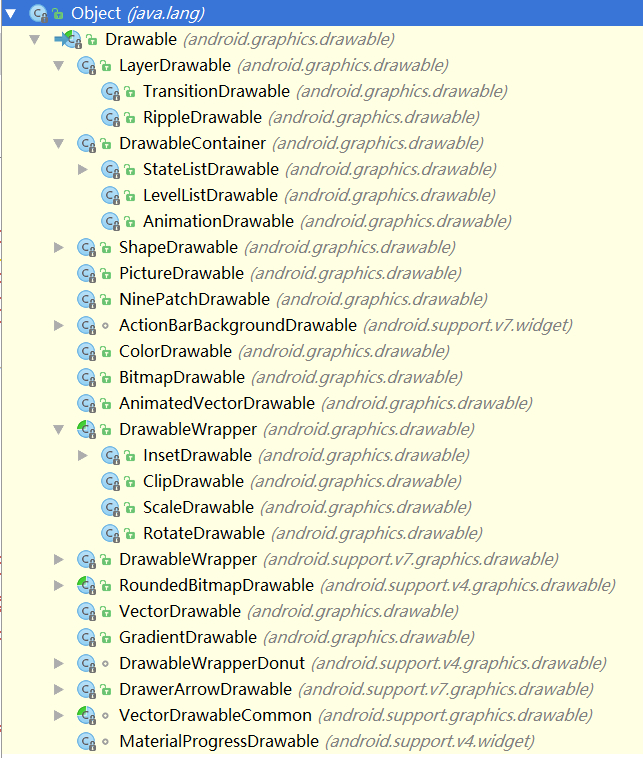
 安卓學習筆記之Drawable
Drawable基礎什麼是Drawable首先Drawable是一個抽象類,表示的是可以在Canvas中繪制的圖像,常被用作一個view的背景,有多種實現類完成不同的功能
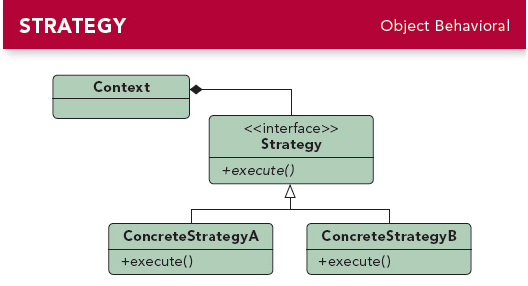
 Android 中的那些策略模式
首先祭上經典的策略模式 UML 圖可以看到,策略模式中主要有以下幾個角色:Strategy 接口,用於定義算法的固定套路 ConcreteStrategyA , &hel