編輯:關於Android編程
最近弄了下android ffmpeg解碼,下面把流程總結一下方便大家參考
1.ffmpeg移植
網上有一些關於ffmpeg移植的文章,試了很多次但是最後生成的libffmpeg.so就只有幾KB所以這裡換一種方式,網上也有文章說到了,其實我覺得這種方式反而要好一點,只需要生成一個庫就行了。
我修改好的ffmpeg下載地址:http://download.csdn.net/detail/hclydao/6865961
下載後,解壓進入ffmpeg-1.2.4-android目錄,裡面有一個mkconfig.sh文件,打開這個文件,你需要修改幾個地方.
mkconfig.sh內容如下:
#!/bin/sh
export PREBUILT=/dao/work/tools/android-ndk-r5b/toolchains/arm-linux-androideabi-4.4.3
export PLATFORM=/dao/work/tools/android-ndk-r5b/platforms/android-9/arch-arm
export TMPDIR=/dao/tmp

./configure \
--target-os=linux \
--arch=arm \
--disable-ffmpeg \
--disable-ffplay \
--disable-ffprobe \
--disable-ffserver \
--disable-avdevice \
--disable-avfilter \
--disable-postproc \
--disable-swresample \
--disable-avresample \
--disable-symver \
--disable-debug \
--disable-stripping \
--disable-yasm \
--disable-asm \
--enable-gpl \
--enable-version3 \
--enable-nonfree \
--disable-doc \
--enable-static \
--disable-shared \
--enable-cross-compile \
--prefix=/dao/_install \
--cc=$PREBUILT/prebuilt/linux-x86/bin/arm-linux-androideabi-gcc \
--cross-prefix=$PREBUILT/prebuilt/linux-x86/bin/arm-linux-androideabi- \
--nm=$PREBUILT/prebuilt/linux-x86/bin/arm-linux-androideabi-nm \
--extra-cflags="-fPIC -DANDROID -I$PLATFORM/usr/include" \
--extra-ldflags="-L$PLATFORM/usr/lib -nostdlib"

sed -i 's/HAVE_LRINT 0/HAVE_LRINT 1/g' config.h
sed -i 's/HAVE_LRINTF 0/HAVE_LRINTF 1/g' config.h
sed -i 's/HAVE_ROUND 0/HAVE_ROUND 1/g' config.h
sed -i 's/HAVE_ROUNDF 0/HAVE_ROUNDF 1/g' config.h
sed -i 's/HAVE_TRUNC 0/HAVE_TRUNC 1/g' config.h
sed -i 's/HAVE_TRUNCF 0/HAVE_TRUNCF 1/g' config.h
sed -i 's/HAVE_CBRT 0/HAVE_CBRT 1/g' config.h
sed -i 's/HAVE_CBRTF 0/HAVE_CBRTF 1/g' config.h
sed -i 's/HAVE_ISINF 0/HAVE_ISINF 1/g' config.h
sed -i 's/HAVE_ISNAN 0/HAVE_ISNAN 1/g' config.h
sed -i 's/HAVE_SINF 0/HAVE_SINF 1/g' config.h
sed -i 's/HAVE_RINT 0/HAVE_RINT 1/g' config.h
sed -i 's/#define av_restrict restrict/#define av_restrict/g' config.h
最開始的環境變量要設置一下:
export PREBUILT=/dao/work/tools/android-ndk-r5b/toolchains/arm-linux-androideabi-4.4.3
export PLATFORM=/dao/work/tools/android-ndk-r5b/platforms/android-9/arch-arm
export TMPDIR=/dao/tmp
這個為你的NDK的路徑,以及臨時目錄
還有一個地方需要修改:
--prefix=/dao/_install \這個為安裝目錄,請改成你自己的。
然後執行./mkconfig.sh
應該會有一個警告,不用管。直接執行make幾分鐘左右應該就會編譯完成了,然後執行make install
在你的安裝目錄下就會生成兩個目錄include和llib到這裡 我們移植就完成了,先把這些文件放在這,後面我們需要用到。
2.jni的編寫
在你的android工程目錄下新建一個jni的目錄(其實我是在另一個工程裡新建的,前面我試了一次執行ndk-build的時候把工程裡的東西給刪除了),把前面我們安裝的include整個目錄拷貝到jni目錄下,把lib目錄裡的所有.a文件拷貝到jni目錄下,新建Android.mk文件,內容如下:
LOCAL_PATH := $(call my-dir)

include $(CLEAR_VARS)
LOCAL_MODULE := avformat
LOCAL_SRC_FILES := libavformat.a
LOCAL_CFLAGS :=-Ilibavformat
LOCAL_EXPORT_C_INCLUDES := libavformat
LOCAL_EXPORT_CFLAGS := -Ilibavformat
LOCAL_EXPORT_LDLIBS := -llog
include $(PREBUILT_STATIC_LIBRARY)

include $(CLEAR_VARS)
LOCAL_MODULE := avcodec
LOCAL_SRC_FILES := libavcodec.a
LOCAL_CFLAGS :=-Ilibavcodec
LOCAL_EXPORT_C_INCLUDES := libavcodec
LOCAL_EXPORT_CFLAGS := -Ilibavcodec
LOCAL_EXPORT_LDLIBS := -llog
include $(PREBUILT_STATIC_LIBRARY)

include $(CLEAR_VARS)
LOCAL_MODULE := avutil
LOCAL_SRC_FILES := libavutil.a
LOCAL_CFLAGS :=-Ilibavutil
LOCAL_EXPORT_C_INCLUDES := libavutil
LOCAL_EXPORT_CFLAGS := -Ilibavutil
LOCAL_EXPORT_LDLIBS := -llog
include $(PREBUILT_STATIC_LIBRARY)

include $(CLEAR_VARS)
LOCAL_MODULE := swscale
LOCAL_SRC_FILES :=libswscale.a
LOCAL_CFLAGS :=-Ilibavutil -Ilibswscale
LOCAL_EXPORT_C_INCLUDES := libswscale
LOCAL_EXPORT_CFLAGS := -Ilibswscale
LOCAL_EXPORT_LDLIBS := -llog -lavutil
include $(PREBUILT_STATIC_LIBRARY)

include $(CLEAR_VARS)
LOCAL_MODULE    := ffmpegutils
LOCAL_SRC_FILES := native.c
LOCAL_C_INCLUDES := $(LOCAL_PATH)/include
LOCAL_LDLIBS    := -L$(LOCAL_PATH) -lm -lz
LOCAL_STATIC_LIBRARIES := avformat avcodec avutil swscale
include $(BUILD_SHARED_LIBRARY)
新建native.c文件,這個是我們最終要調用到的文件,內容如下:
/* * Copyright 2011 - Churn Labs, LLC * * Licensed under the Apache License, Version 2.0 (the "License"); * you may not use this file except in compliance with the License. * You may obtain a copy of the License at * * http://www.apache.org/licenses/LICENSE-2.0 * * Unless required by applicable law or agreed to in writing, software * distributed under the License is distributed on an "AS IS" BASIS, * WITHOUT WARRANTIES OR CONDITIONS OF ANY KIND, either express or implied. * See the License for the specific language governing permissions and * limitations under the License. */ /* * This is mostly based off of the FFMPEG tutorial: * http://dranger.com/ffmpeg/ * With a few updates to support Android output mechanisms and to update * places where the APIs have shifted. */ #include#include #include #include #include #include #include #define LOG_TAG "FFMPEGSample" #define LOGI(...) __android_log_print(ANDROID_LOG_INFO,LOG_TAG,__VA_ARGS__) #define LOGE(...) __android_log_print(ANDROID_LOG_ERROR,LOG_TAG,__VA_ARGS__) AVCodecContext * pCodecCtx = NULL; AVFrame * pFrame=NULL; AVPacket avpkt; struct SwsContext *swsctx = NULL; AVFrame * picture=NULL; JNIEXPORT jint JNICALL Java_com_dao_iclient_FfmpegIF_getffmpegv(JNIEnv * env, jclass obj) { LOGI("getffmpegv"); return avformat_version(); } JNIEXPORT jint JNICALL Java_com_dao_iclient_FfmpegIF_DecodeInit(JNIEnv * env, jclass obj,jint width,jint height) { LOGI("Decode_init"); AVCodec * pCodec=NULL; avcodec_register_all(); //av_register_all(); //avcodec_init(); av_init_packet(&avpkt); pCodec=avcodec_find_decoder(CODEC_ID_H264); if(NULL!=pCodec) { pCodecCtx=avcodec_alloc_context3(pCodec); if(avcodec_open2(pCodecCtx,pCodec,NULL)>=0) { pCodecCtx->height = height; pCodecCtx->width = width; pFrame=avcodec_alloc_frame(); } return 1; } else return 0; } JNIEXPORT jint JNICALL Java_com_dao_iclient_FfmpegIF_Decoding(JNIEnv * env, jclass obj,const jbyteArray pSrcData,const jint DataLen,const jbyteArray pDeData) { //LOGI("Decoding"); int frameFinished; int i,j; int consumed_bytes; jbyte * Buf = (jbyte*)(*env)->GetByteArrayElements(env, pSrcData, 0); jbyte * Pixel= (jbyte*)(*env)->GetByteArrayElements(env, pDeData, 0); avpkt.data = Buf; avpkt.size = DataLen; consumed_bytes=avcodec_decode_video2(pCodecCtx,pFrame,&frameFinished,&avpkt); //av_free_packet(&avpkt); if(frameFinished) { picture=avcodec_alloc_frame(); avpicture_fill((AVPicture *) picture, (uint8_t *)Pixel, PIX_FMT_RGB565,pCodecCtx->width,pCodecCtx->height); swsctx = sws_getContext(pCodecCtx->width,pCodecCtx->height, pCodecCtx->pix_fmt, pCodecCtx->width, pCodecCtx->height,PIX_FMT_RGB565, SWS_BICUBIC, NULL, NULL, NULL); sws_scale(swsctx,(const uint8_t* const*)pFrame->data,pFrame->linesize,0,pCodecCtx->height,picture->data,picture->linesize); } (*env)->ReleaseByteArrayElements(env, pSrcData, Buf, 0); (*env)->ReleaseByteArrayElements(env, pDeData, Pixel, 0); return consumed_bytes; } JNIEXPORT jint JNICALL Java_com_dao_iclient_FfmpegIF_DecodeRelease(JNIEnv * env, jclass obj) { //LOGI("Decode_release"); sws_freeContext(swsctx); av_free_packet(&avpkt); av_free(pFrame); av_free(picture); avcodec_close(pCodecCtx); av_free(pCodecCtx); return 1; }
最後我們只用到了兩個函數一個是init一個是decoding,這裡說明一下函數的命名方式為Java_包名_類名_函數名,com.dao.iclient是我的包名,FfmpegIF是我的類名,DecodeInit是我的函數名.如果你之前已經在系統設置了ndk的環境變量,你就可以直接在工程目錄下執行ndk-build(這裡目錄別弄錯了).最後會在工程目錄下的libs/armeabi/生成這個庫文件.
3.應用ffmpeg庫
增加FfmpegIF類,內容如下
package com.dao.iclient;

public class FfmpegIF {
	public static short TYPE_MODE_DATA = 0;
	public static short TYPE_MODE_COM = 1;
	public static int VIDEO_COM_START = 0x00;
	public static int VIDEO_COM_POSE = 0x01;
	public static int VIDEO_COM_RUN = 0x02;
	public static int VIDEO_COM_ACK = 0x03;
	public static int VIDEO_COM_STOP = 0x04;

	static public native int getffmpegv();
	static public native int DecodeInit(int width,int height);
	static public native int Decoding(byte[] in,int datalen,byte[] out);
	static public native int DecodeRelease();
	static {
		System.loadLibrary("ffmpegutils");
	}

}
在布局文件裡增加一個ImageView對象,我這裡是接收到網絡傳輸過來的數據後進行的解碼,我把代碼都帖上來吧,以下是我的主文件的內容:
package com.dao.iclient;

import java.io.IOException;
import java.io.InputStream;
import java.io.OutputStream;
import java.net.Socket;
import java.nio.ByteBuffer;
import java.util.Timer;
import java.util.TimerTask;

import android.app.Activity;
import android.graphics.Bitmap;
import android.graphics.Bitmap.Config;
import android.os.Bundle;
import android.os.Handler;
import android.os.Message;
import android.os.SystemClock;
import android.view.Menu;
import android.widget.ImageView;

public class IcoolClient extends Activity {
	public Socket socket;
	public ByteBuffer buffer;
	public ByteBuffer Imagbuf;
	//net package
	public static short type = 0;
	public static int packageLen = 0;
	public static int sendDeviceID = 0;
	public static int revceiveDeviceID = 0;
	public static short sendDeviceType = 0;
	public static int dataIndex = 0;
	public static int dataLen = 0;
	public static int frameNum = 0;
	public static int commType = 0;
	//size
	public static int packagesize;

	public OutputStream outputStream=null;
	public InputStream inputStream=null;

	public int width = 0;
	public int height = 0;
	public Bitmap VideoBit;
	public ImageView mImag;

	public byte[] mout;
	protected static final int REFRESH = 0;
	private Handler mHandler;
	@Override
	protected void onCreate(Bundle savedInstanceState) {
		super.onCreate(savedInstanceState);
		setContentView(R.layout.activity_icool_client);
		mImag = (ImageView)findViewById(R.id.mimg);
        packagesize = 7 * 4 + 2 * 2;
        buffer = ByteBuffer.allocate(packagesize);
       // int ffpmegv = FfmpegIF.getffmpegv();
        //System.out.println("ffmpeg version is " + ffpmegv);
        width = 640;
        height = 480;
        mout = new byte[width * height * 2];
        Imagbuf = ByteBuffer.wrap(mout);
        VideoBit = Bitmap.createBitmap(width ,height, Config.RGB_565);
        //mImag.postInvalidate();
        int ret = FfmpegIF.DecodeInit(width, height);
        //System.out.println(" ret is " + ret);
        mHandler = new Handler();
        new StartThread().start();
	}

	final Runnable mUpdateUI = new Runnable() {

		@Override
		public void run() {
			// TODO Auto-generated method stub
		    VideoBit.copyPixelsFromBuffer(Imagbuf);
		    mImag.setImageBitmap(VideoBit);
		}
	};

    class StartThread extends Thread {

		@Override
		public void run() {
			// TODO Auto-generated method stub
			//super.run();
			int datasize;
			try {
		        socket = new Socket("192.168.1.15", 9876);
		        //System.out.println("socket");
		        SendCom(FfmpegIF.VIDEO_COM_STOP);
		        SendCom(FfmpegIF.VIDEO_COM_START);
		        //new ShowBuffer().start();
		        inputStream = socket.getInputStream();
		        byte[] Rbuffer = new byte[packagesize];
		        while(true) {
					inputStream.read(Rbuffer);
					//byte2hex(Rbuffer);
					SystemClock.sleep(3);
					datasize = getDataL(Rbuffer);
					if(datasize > 0) {
						byte[] Data = new byte[datasize];
						int size;
					    size = inputStream.read(Data);
					    FfmpegIF.Decoding(Data, size, mout);
					    //VideoBit.copyPixelsFromBuffer(Imagbuf);
					    //mImag.setImageBitmap(VideoBit);
					    mHandler.post(mUpdateUI);
					    //System.out.println("read datalen is " + size);
					    //SystemClock.sleep(10);
					    SendCom(FfmpegIF.VIDEO_COM_ACK);
					}
		        }
			}catch (IOException e) {
	            e.printStackTrace();
	        }
		}
    }

    public void SendCom(int comtype) {
    	byte[] Bbuffer = new byte[packagesize];
    	try {
    		outputStream = socket.getOutputStream();
    		type = FfmpegIF.TYPE_MODE_COM;
    		packageLen = packagesize;
    		commType = comtype;
    		putbuffer();
    		Bbuffer = buffer.array();
    		outputStream.write(Bbuffer);
    		//System.out.println("send done");
    	} catch (IOException e) {
            e.printStackTrace();
        }
    }

    public void putbuffer(){
    	buffer.clear();
        buffer.put(ShorttoByteArray(type));
        buffer.put(InttoByteArray(packageLen));
        buffer.put(InttoByteArray(sendDeviceID));
        buffer.put(InttoByteArray(revceiveDeviceID));
        buffer.put(ShorttoByteArray(sendDeviceType));
        buffer.put(InttoByteArray(dataIndex));
        buffer.put(InttoByteArray(dataLen));
        buffer.put(InttoByteArray(frameNum));
        buffer.put(InttoByteArray(commType));
        //System.out.println("putbuffer done");
    }

    private static byte[] ShorttoByteArray(short n) {
        byte[] b = new byte[2];
        b[0] = (byte) (n & 0xff);
        b[1] = (byte) (n >> 8 & 0xff);
        return b;
    }

    private static byte[] InttoByteArray(int n) {
        byte[] b = new byte[4];
        b[0] = (byte) (n & 0xff);
        b[1] = (byte) (n >> 8 & 0xff);
        b[2] = (byte) (n >> 16 & 0xff);
        b[3] = (byte) (n >> 24 & 0xff);
        return b;
    }

    public short getType(byte[] tpbuffer){
    	short gtype = (short) ((short)tpbuffer[0] + (short)(tpbuffer[1] << 8));
    	//System.out.println("gtype is " + gtype);
    	return gtype;
    }

    public int getPakL(byte[] pkbuffer){
    	int gPackageLen = ((int)(pkbuffer[2]) & 0xff) | ((int)(pkbuffer[3] & 0xff) << 8) | ((int)(pkbuffer[4] & 0xff) << 16) | ((int)(pkbuffer[5] & 0xff) << 24);
    	//System.out.println("gPackageLen is " + gPackageLen);
    	return gPackageLen;
    }

    public int getDataL(byte[] getbuffer){
    	int gDataLen = (((int)(getbuffer[20] & 0xff)) | ((int)(getbuffer[21] & 0xff) << 8) | ((int)(getbuffer[22] & 0xff) << 16) | ((int)(getbuffer[23] & 0xff) << 24));
    	//System.out.println("gDataLen is " + gDataLen);
    	return gDataLen;
    }

    public int getFrameN(byte[] getbuffer){
    	int getFrameN = (int)(((int)(getbuffer[24])) + ((int)(getbuffer[25]) << 8) + ((int)(getbuffer[26]) << 16) + ((int)(getbuffer[27]) << 24));
    	//System.out.println("getFrameN is " + getFrameN);
    	return getFrameN;
    }

    private void byte2hex(byte [] buffer) {
        String h = "";
        for(int i = 0; i < buffer.length; i++){
            String temp = Integer.toHexString(buffer[i] & 0xFF);
            if(temp.length() == 1){
                temp = "0" + temp;
            }
            h = h + " "+ temp;
        }
       // System.out.println(h);
    }

	@Override
	public boolean onCreateOptionsMenu(Menu menu) {
		// Inflate the menu; this adds items to the action bar if it is present.
		getMenuInflater().inflate(R.menu.icool_client, menu);
		return true;
	}

}
函數說明:
mUpdateUI用於解決主進程無法刷新UI的問題
StartThread網絡通信線程主要工作是在這裡,先接收指令包,然後接收數據包,然後解碼顯示
SendCom指令包發送
putbuffer指令包生成,因為服務器是用C寫的,指令包是一個結構體所以這裡進行了這樣的處理,同時需要注意字節對齊,C語言的long類型是4個字節,Java的long類型為8個字節,這裡需要注意,我在這糾結了幾個小時。
ShorttoByteArray,InttoByteArray網絡通信格式轉換,低字節在前高字節在後
getType,getPakL,getDataL,getFrameN,指令包相關數據獲取
byte2hex將byte數組轉換成十六進制輸出,這裡是為了調試用.
============================================
作者:hclydao
http://blog.csdn.net/hclydao
版權沒有,但是轉載請保留此段聲明
============================================
 android 支持分組和聯系人展示的一個小例子
先看效果圖: @Override public void onCreate(Bundle savedInstanceState) { super.onC
 Android增量更新實現
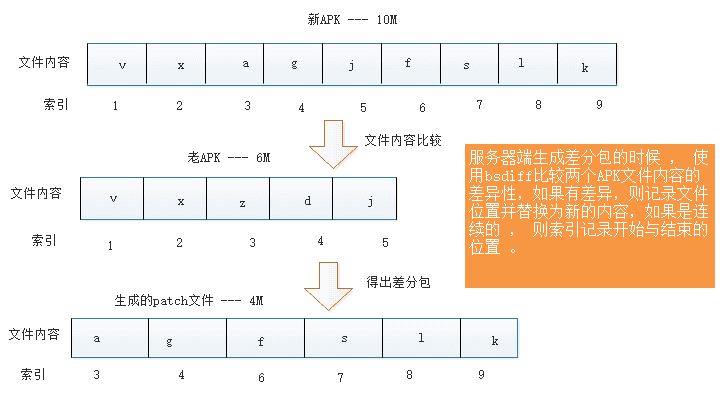
Android增量更新技術在很多公司都在使用,網上也有一些相關的文章,但大家可能未必完全理解實現的方式,本篇博客,我將一步步的帶大家實現增量更新。為什麼需要增量更新?當我
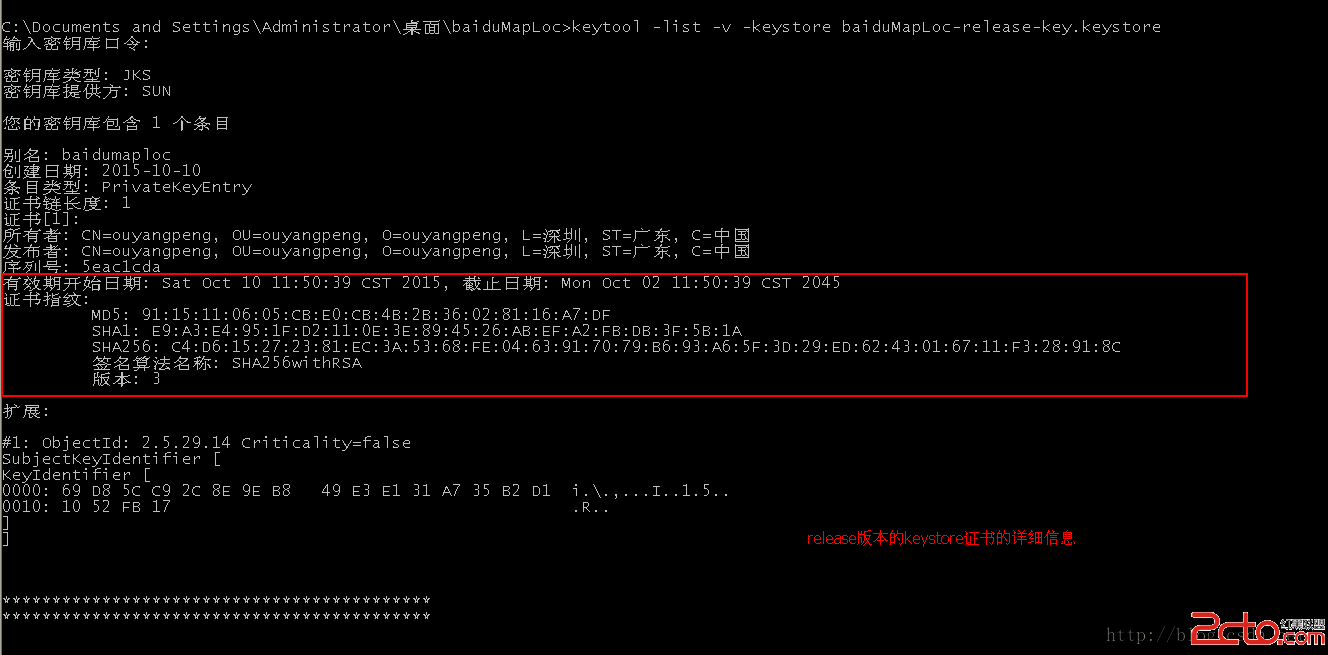
 我的Android進階之旅------)Android中查看應用簽名信息
一、查看自己的證書簽名信息如上一篇文章《我的Android進階之旅------>Android中制作和查看自定義的Debug版本Android簽名證書 》地址:ht
 Android 自定義橫向滾動條
Android 自定義橫向滾動條。當你的橫向字段或者表格很多時候,顯示不下內容,可以使用很想滾動條進行滾動。豎向方面我添加了listview進行添加數據。兩者滾動互不干擾