編輯:關於Android編程
Android筆記——自動顯示、隱藏布局的ListView。學習了Android有一段時間了,學習的東西老是遺忘,於是決定寫博客來鞏固知識點,激勵自己學習。
由於會使用到ObjectAnimator,我們先對ObjectAnimator進行了解:
ObjectAnimator是屬性動畫,是ValueAnimator的子類,他本身就已經包含時間引擎和值的計算,所以它擁有為對象的某個屬性設置動畫的功能。
ObjectAnmator中提供ofInt,ofFloat的方法,其參數為:
(操作對象,屬性名,動畫開始,動畫結束)
屬性名一般為alpha,translateY,translateX,rotateX,rotateY,scaleX,scaleY
下面舉個例子:
ObjectAnimator animator = ObjectAnimator.ofFloat(imageBall,"alpha",0f,1f);//透明度從0-1效果
animator.setDuration(500).start();//持續時間為500ms
接下來我們來實現自動顯示、隱藏布局的ListView。
首先我們要在styles.xml中設置NoActionBar:
為了避免第一個Item被Toolbar遮擋,需要給ListView增加一個HeaderView:
//獲取headerView
View header = new View(this);
//寬為match_parent,高為獲取系統Actionbar
 header.setLayoutParams(new AbsListView.LayoutParams(AbsListView.LayoutParams.MATCH_PARENT,
(R.dimen.abc_action_bar_default_height_material)));//R.dimen.abc_action_bar_default_height_material獲取屬性Actionbar的高度
listView.addHeaderView(header);//增加一個HeaderView避免Item被Toolbar被遮擋
我們還需要定義一個mTouchSlop來獲取系統認為的最低滑動距離,即超過這個距離就是滑動狀態了:
mTouchSlop = ViewConfiguration.get(this).getScaledTouchSlop();//獲取滑動的最小距離
接下來為關鍵代碼用來判斷滑動事件
    private void scorllEvent() {
     listView.setOnTouchListener(new View.OnTouchListener() {
            @Override
            public boolean onTouch(View view, MotionEvent motionEvent) {
                switch (motionEvent.getAction()) {
                    case MotionEvent.ACTION_DOWN: {
                        mFirstY = (int) motionEvent.getY();
                        break;
                    }
                    case MotionEvent.ACTION_MOVE: {
                        mCurrentY = (int) motionEvent.getY();
                        if (mCurrentY - mFirstY > mTouchSlop) {
                            //向下滑動
                            direction = 0;
                        } else
                        //向上滑動
                        {
                            direction = 1;
                        }
                        if (direction == 1) {
                            if (mShow) {
                                ToolbarAnim(0);//顯示
                                mShow = false;
                            }
                        } else {
                            if (!mShow) {
                                ToolbarAnim(1);//隱藏
                                mShow = true;
                            }

                        }
                        break;

                    }


                }
                return false;

            }
        });
    }
最後加上控制動畫
 private void ToolbarAnim(int i) {
        if (animator != null && animator.isRunning())
            animator.cancel();
        if (i == 0) {//顯示
            animator = ObjectAnimator.ofFloat(
                    toolbar,
                    "translationY",
                    toolbar.getTranslationY(),
                    0);
            Log.d("tag", "下滑" + toolbar.getTranslationY());
        } else {//隱藏
            animator = ObjectAnimator.ofFloat(
                    toolbar,
                    "translationY",
                    toolbar.getTranslationY(),
                    -toolbar.getHeight());
            Log.d("tag", "上滑getTranslationY" + toolbar.getTranslationY());
            Log.d("tag", "上滑getHeight()" + toolbar.getHeight());
        }
        animator.start();
    }
}
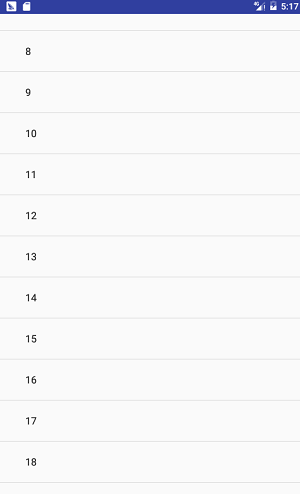
上滑效果圖

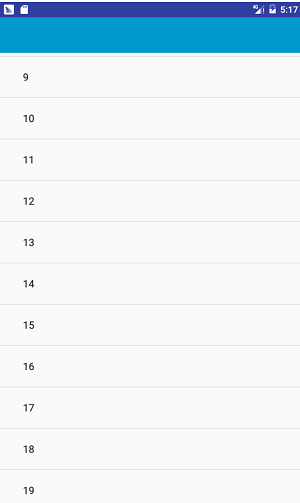
下滑效果圖

如下通過打印查看滑動距離

通過打印內容可以看出上滑距離由0~-56,下滑距離由-56~0
布局文件如下:
完整代碼如下:
public class MainActivity extends AppCompatActivity {
    private ListView listView;
    private List list;
    private Toolbar toolbar;
    private int mTouchSlop;//系統認為的最小滑動距離
    private int mFirstY;//第一次點擊的位置
    private int mCurrentY;//當前點擊的Y軸位置
    private boolean mShow = true;//當前是否顯示
    private int direction;
    private ObjectAnimator animator;

    @Override
    protected void onCreate(Bundle savedInstanceState) {
        super.onCreate(savedInstanceState);
        setContentView(R.layout.activity_main);
        toolbar = (Toolbar) findViewById(R.id.toolbar);

        listView = (ListView) findViewById(R.id.list_view);
        list = new ArrayList();
        for (int i = 0; i < 20; i++) {
            list.add(i + "");
        }
        ArrayAdapter adapter = new ArrayAdapter(this, android.R.layout.simple_expandable_list_item_1, list);
        listView.setAdapter(adapter);

        //獲取headerView
        View header = new View(this);
        //寬為match_parent,高為獲取系統Actionbar
        header.setLayoutParams(new AbsListView.LayoutParams(AbsListView.LayoutParams.MATCH_PARENT,
                (int) getResources().getDimension(R.dimen.abc_action_bar_default_height_material)));//R.dimen.abc_action_bar_default_height_material獲取屬性Actionbar的高度
        listView.addHeaderView(header);//增加一個HeaderView避免Item被Toolbar被遮擋
        mTouchSlop = ViewConfiguration.get(this).getScaledTouchSlop();//獲取滑動的最小距離
        scorllEvent();
    }

    private void scorllEvent() {

        listView.setOnTouchListener(new View.OnTouchListener() {
            @Override
            public boolean onTouch(View view, MotionEvent motionEvent) {
                switch (motionEvent.getAction()) {
                    case MotionEvent.ACTION_DOWN: {
                        mFirstY = (int) motionEvent.getY();
                        break;
                    }
                    case MotionEvent.ACTION_MOVE: {
                        mCurrentY = (int) motionEvent.getY();
                        if (mCurrentY - mFirstY > mTouchSlop) {
                            //向下滑動
                            direction = 0;
                        } else
                        //向上滑動
                        {
                            direction = 1;
                        }
                        if (direction == 1) {
                            if (mShow) {
                                ToolbarAnim(0);//顯示
                                mShow = false;
                            }
                        } else {
                            if (!mShow) {
                                ToolbarAnim(1);//隱藏
                                mShow = true;
                            }

                        }
                        break;

                    }


                }
                return false;

            }
        });
    }


    private void ToolbarAnim(int i) {
        if (animator != null && animator.isRunning())
            animator.cancel();
        if (i == 0) {//向下滑動顯示
            animator = ObjectAnimator.ofFloat(
                    toolbar,
                    "translationY",
                    toolbar.getTranslationY(),
                    0);
        } else {
            animator = ObjectAnimator.ofFloat(//向上滑動隱藏
                    toolbar,
                    "translationY",
                    toolbar.getTranslationY(),
                    -toolbar.getHeight());
        }
        animator.start();
    }


}
以上就是ListView自動顯示、隱藏布局的方法。
 Android中實現Bitmap在自定義View中的放大與拖動
一基本實現思路:基於View類實現自定義View –MyImageView類。在使用View的Activity類中完成OnTouchListener接口,實現
 android MediaRecorder錄制音頻
使用MediaRecorder錄制音頻步驟: 創建MediaRecorder對象MediaRecorder recorder = new MediaRecorder()
 Android Studio如何使用Git提交代碼到GitHub和OsChina並解決沖突
由於本人喜愛Git,那就介紹Git,,如何和在GitHub和Oschina拉取和提交項目,並且你會學會如何解決沖突問題!!博主還是那個圖片控!!准備工作git下載地址:G
 android開機啟動過程
Linux內核啟動之後就到Android Init進程,進而啟動Android相關的服務和應用。啟動的過程如下圖所示: 下面將從Android4.0源碼中,和