編輯:關於Android編程
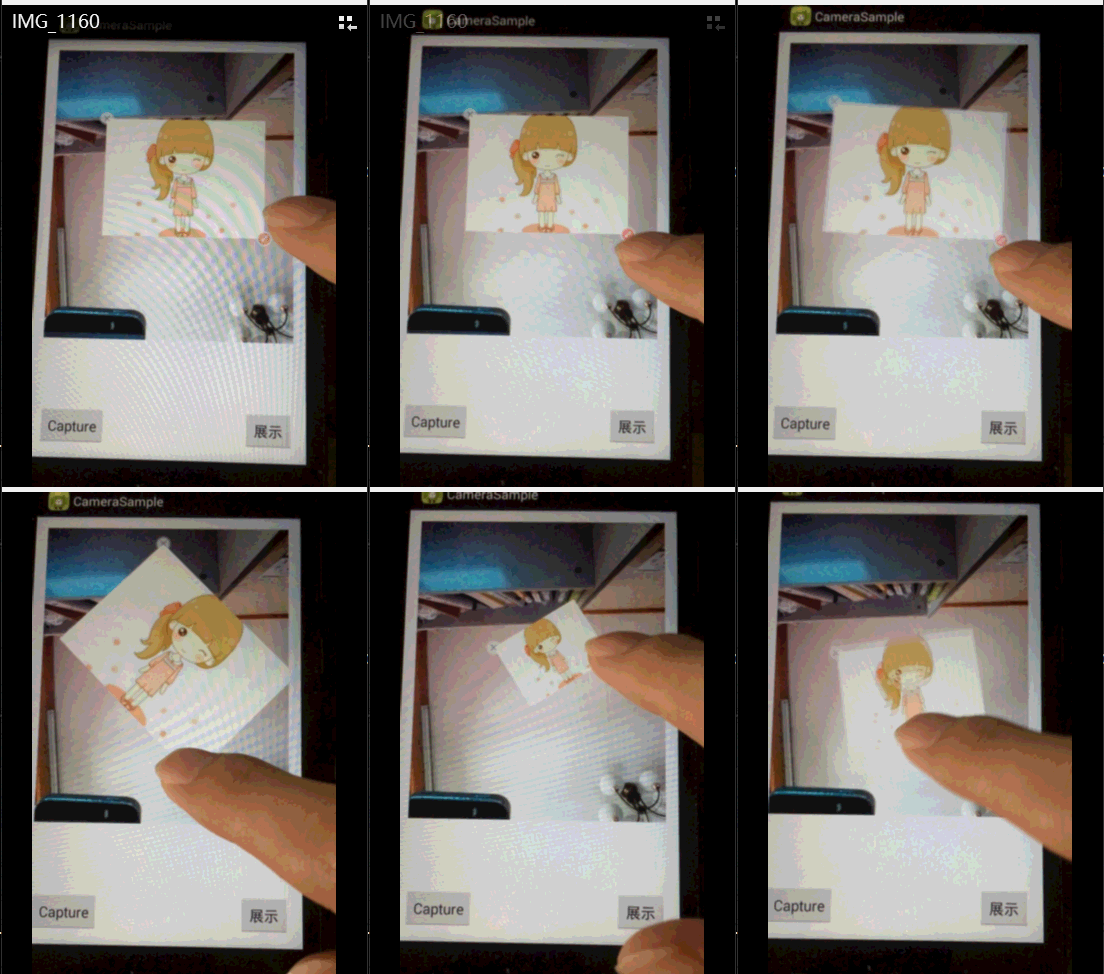
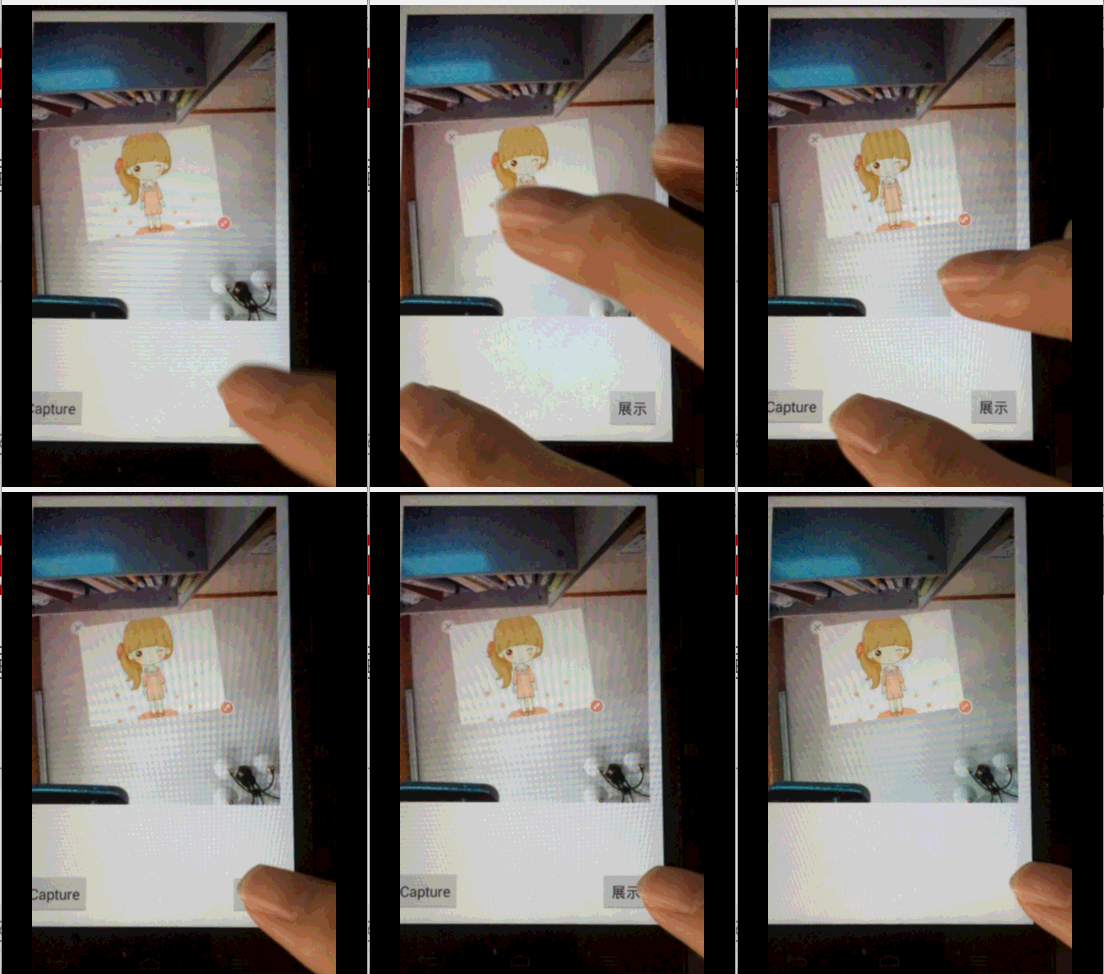
給自己的APP增加相機是一個不錯的功能,在我們打開相機時,如果能動態給我們的臉上貼上標簽,或者是貼上一個卡通的眼睛,最後點擊拍照,一張合成的圖片就產生了,這是不是一個好主意,下面的效果圖是我在一邊拍照一邊擺弄我的卡通貼紙,最後進行拍照,並把圖片保存到圖庫中,最後在下個頁面顯示我們的合成圖。


我們知道自定義相機可以通過Camera+SurfaceView來實現,那如何才能截取到SurfaceView和貼紙合成的圖呢?
起初我是獲取SurfaceView和貼紙的容器(SurfaceView與貼紙是重疊的),通過以下方法來獲取合成圖:
group.setDrawingCacheEnabled(true);
group.buildDrawingCache();
Bitmap bitmap = group.getDrawingCache();
最後發現獲取到的bitmap是一張背景漆黑的只有貼紙的圖,也就是SurfaceView中圖獲取不到。
最終我用了一個巧辦法:
1.在SurfaceView上放置一個隱藏的ImageView.
2.通過android.hardware.Camera.takePicture(ShutterCallback shutter, PictureCallback raw, PictureCallback jpeg)方法中的第三參數PictureCallback中的onPictureTaken方法回調中獲取到拍照完的字節數組,也就是我們照片,將圖片保存在本地,這時獲取圖片的bitmap將它設置在SurfaceView上的ImageView上。
3.將ImageView顯示,再通過getDrawingCache獲取容器視圖並保存。
既然SurfaceView上的試圖無法通過getDrawingCache獲取,那我們就把圖片設置在ImageView上,相當於截取Image View與貼紙重疊的視圖。
自定義相機的layout文件:
StickerView是一個可以移動放大縮小旋轉的自定義控件。
package com.yxiaolv.camerasample;

import java.io.BufferedOutputStream;
import java.io.File;
import java.io.FileNotFoundException;
import java.io.FileOutputStream;
import java.io.IOException;
import java.util.List;

import android.app.Activity;
import android.content.Context;
import android.content.Intent;
import android.graphics.Bitmap;
import android.graphics.Bitmap.CompressFormat;
import android.graphics.BitmapFactory;
import android.hardware.Camera;
import android.hardware.Camera.CameraInfo;
import android.hardware.Camera.PictureCallback;
import android.hardware.Camera.ShutterCallback;
import android.media.MediaScannerConnection;
import android.net.Uri;
import android.os.Bundle;
import android.os.Environment;
import android.provider.MediaStore;
import android.view.Surface;
import android.view.SurfaceHolder;
import android.view.SurfaceView;
import android.view.View;
import android.view.View.OnClickListener;
import android.widget.Button;
import android.widget.ImageView;
import android.widget.RelativeLayout;

import com.yxiaolv.camerasample.StickerView.OnStickerDeleteListener;
import com.yxiaolv.camerasample.util.BitmapUtil;

public class CameraActivity extends Activity {

    private StickerView stickerView;

    private ImageView iv_show;

    private RelativeLayout group;

    private Camera mCamera;
    private SurfaceView surfaceView;
    private SurfaceHolder surfaceHolder;
    private Button btnCapture;
    private Button btnTo;
    private boolean previewing;

    private String imagUrl = "";

    int mCurrentCamIndex = 0;
    SurfaceViewCallback surfaceViewCallback;

    @Override
    protected void onCreate(Bundle savedInstanceState) {
        super.onCreate(savedInstanceState);
        setContentView(R.layout.activity_main);
        initViews();
        initEvent();
    }

    private void initEvent() {
        btnCapture.setOnClickListener(new Button.OnClickListener() {
            public void onClick(View arg0) {
                if (previewing) {
                    mCamera.takePicture(shutterCallback, rawPictureCallback,
                            jpegPictureCallback);

                }

            }
        });
        btnTo.setOnClickListener(new OnClickListener() {

            @Override
            public void onClick(View v) {
                // TODO Auto-generated method stub
                to();
            }
        });
    }

    private void to() {
        Intent intent = new Intent(CameraActivity.this, ShowImageActivity.class);
        intent.putExtra("imagpath", imagUrl);
        startActivity(intent);
    }

    /**
     * 初始化View
     */
    private void initViews() {
        btnCapture = (Button) findViewById(R.id.btn_capture);
        btnTo = (Button) findViewById(R.id.btn_to);
        group = (RelativeLayout) findViewById(R.id.group);
        iv_show = (ImageView) findViewById(R.id.iv_show);
        stickerView = (StickerView) findViewById(R.id.sticker);
        iv_show.setVisibility(View.INVISIBLE);
        group.setDrawingCacheEnabled(true);
        group.buildDrawingCache();
        Bitmap bitmap = BitmapFactory.decodeResource(getResources(),
                R.drawable.katong);
        stickerView.setWaterMark(bitmap);
        stickerView.setOnStickerDeleteListener(new OnStickerDeleteListener() {

            @Override
            public void onDelete() {

            }
        });
        surfaceViewCallback = new SurfaceViewCallback();
        surfaceView = (SurfaceView) findViewById(R.id.surfaceView1);
        surfaceHolder = surfaceView.getHolder();
        surfaceHolder.addCallback(surfaceViewCallback);
        // surfaceHolder.addCallback(this);
        surfaceHolder.setType(SurfaceHolder.SURFACE_TYPE_PUSH_BUFFERS);
    }

    ShutterCallback shutterCallback = new ShutterCallback() {
        @Override
        public void onShutter() {
        }
    };

    PictureCallback rawPictureCallback = new PictureCallback() {
        @Override
        public void onPictureTaken(byte[] arg0, Camera arg1) {

        }
    };

    PictureCallback jpegPictureCallback = new PictureCallback() {
        @Override
        public void onPictureTaken(byte[] arg0, Camera arg1) {
            save(arg0);
        }

        /**
         * 保存圖片
         *
         * @param data
         */
        private void save(byte[] data) {
            String fileName = Environment.getExternalStoragePublicDirectory(
                    Environment.DIRECTORY_DCIM).toString()
                    + File.separator + System.currentTimeMillis() + ".jpg";
            File file = new File(fileName);
            if (!file.getParentFile().exists()) {
                file.getParentFile().mkdir();
            }
            try {
                BufferedOutputStream bos = new BufferedOutputStream(
                        new FileOutputStream(file));
                bos.write(data);
                mCamera.stopPreview();
                previewing = false;
                bos.flush();
                bos.close();
                scanFileToPhotoAlbum(file.getAbsolutePath());
                configPhoto(file);
                saveNewPhoto();
            } catch (Exception e) {
            }
            mCamera.startPreview();
            previewing = true;
        }

        /**
         * 保持合成後的圖片
         */
        private void saveNewPhoto() {
            Bitmap bitmap = group.getDrawingCache();
            iv_show.setImageBitmap(bitmap);
            saveImageToGallery(CameraActivity.this, bitmap);
            iv_show.setVisibility(View.INVISIBLE);
        }

        /**
         * 配置照片
         *
         * @param file
         */
        private void configPhoto(File file) {
            Bitmap imagbitmap = null;
            setCameraDisplayOrientation(CameraActivity.this, mCurrentCamIndex,
                    mCamera);
            if (cameraPosition == 1) {
                imagbitmap = BitmapUtil.convert(BitmapUtil.rotaingImageView(
                        270, BitmapFactory.decodeFile(file.getAbsolutePath())),
                        0);
            } else {
                imagbitmap = BitmapUtil.decodeSampledBitmapFromResource(
                        file.getAbsolutePath(), 200, 300);
                imagbitmap = BitmapUtil.rotaingImageView(90, imagbitmap);
            }
            iv_show.setImageBitmap(imagbitmap);
            iv_show.setVisibility(View.VISIBLE);

        };
    };

    public void scanFileToPhotoAlbum(String path) {

        MediaScannerConnection.scanFile(CameraActivity.this,
                new String[] { path }, null,
                new MediaScannerConnection.OnScanCompletedListener() {

                    public void onScanCompleted(String path, Uri uri) {
                    }
                });
    }

    private final class SurfaceViewCallback implements
            android.view.SurfaceHolder.Callback {
        public void surfaceChanged(SurfaceHolder arg0, int arg1, int arg2,
                int arg3) {
            if (previewing) {
                mCamera.stopPreview();
                previewing = false;
            }

            try {
                mCamera.setPreviewDisplay(arg0);
                mCamera.startPreview();
                previewing = true;
                setCameraDisplayOrientation(CameraActivity.this,
                        mCurrentCamIndex, mCamera);
            } catch (Exception e) {
            }
        }

        public void surfaceCreated(SurfaceHolder holder) {
            mCamera = openFrontFacingCameraGingerbread();

        }

        public void surfaceDestroyed(SurfaceHolder holder) {
            mCamera.stopPreview();
            mCamera.release();
            mCamera = null;
            previewing = false;
        }
    }

    // 0表示後置,1表示前置
    private int cameraPosition = 1;

    private Camera openFrontFacingCameraGingerbread() {
        int cameraCount = 0;
        Camera cam = null;
        CameraInfo cameraInfo = new CameraInfo();
        cameraCount = Camera.getNumberOfCameras();// 得到攝像頭的個數
        if (cameraCount > 1) {
            cameraPosition = 1;
        } else {
            cameraPosition = 0;
        }
        for (int i = 0; i < cameraCount; i++) {
            Camera.getCameraInfo(i, cameraInfo);// 得到每一個攝像頭的信息
            if (cameraPosition == 1) {
                // 現在是後置,變更為前置
                if (cameraInfo.facing == Camera.CameraInfo.CAMERA_FACING_FRONT) {
                    cam = Camera.open(i);
                    break;
                }
            } else {
                // 現在是前置, 變更為後置
                if (cameraInfo.facing == Camera.CameraInfo.CAMERA_FACING_BACK) {
                    cam = Camera.open(i);
                    break;
                }
            }

        }

        return cam;
    }

    // 根據橫豎屏自動調節preview方向
    private static void setCameraDisplayOrientation(Activity activity,
            int cameraId, Camera camera) {
        Camera.CameraInfo info = new Camera.CameraInfo();
        Camera.getCameraInfo(cameraId, info);
        int rotation = activity.getWindowManager().getDefaultDisplay()
                .getRotation();

        int degrees = 0;
        switch (rotation) {
        case Surface.ROTATION_0:
            degrees = 0;
            break;
        case Surface.ROTATION_90:
            degrees = 90;
            break;
        case Surface.ROTATION_180:
            degrees = 180;
            break;
        case Surface.ROTATION_270:
            degrees = 270;
            break;
        }
        int result;
        if (info.facing == Camera.CameraInfo.CAMERA_FACING_FRONT) {
            result = (info.orientation + degrees) % 360;
            result = (360 - result) % 360;
        } else {

            result = (info.orientation - degrees + 360) % 360;
        }
        camera.setDisplayOrientation(result);

    }

    /**
     * 保存合成後的圖片
     *
     * @param context
     * @param bmp
     */
    public void saveImageToGallery(Context context, Bitmap bmp) {
        // 首先保存圖片
        String fileName = Environment.getExternalStoragePublicDirectory(
                Environment.DIRECTORY_DCIM).toString()
                + File.separator + System.currentTimeMillis() + ".jpg";
        File file = new File(fileName);

        try {
            FileOutputStream fos = new FileOutputStream(file);
            bmp.compress(CompressFormat.JPEG, 100, fos);
            fos.flush();
            fos.close();
        } catch (FileNotFoundException e) {
            e.printStackTrace();
        } catch (IOException e) {
            e.printStackTrace();
        }

        // 其次把文件插入到系統圖庫
        try {
            MediaStore.Images.Media.insertImage(context.getContentResolver(),
                    file.getAbsolutePath(), fileName, null);
        } catch (FileNotFoundException e) {
            e.printStackTrace();
        }
        // 最後通知圖庫更新
        context.sendBroadcast(new Intent(Intent.ACTION_MEDIA_SCANNER_SCAN_FILE,
                Uri.parse(file.getAbsolutePath())));
        imagUrl = file.getAbsolutePath();
    }

}
如果手機支持前置攝像頭的話,會優先使用前置攝像頭。
BitmapUtil工具類:
package com.yxiaolv.camerasample.util;

import android.graphics.Bitmap;
import android.graphics.Bitmap.Config;
import android.graphics.BitmapFactory;
import android.graphics.Canvas;
import android.graphics.Matrix;
import android.graphics.Rect;

public class BitmapUtil {
    private BitmapUtil() {
    }

    /**
     * 旋轉
     *
     * @param angle
     * @param bitmap
     * @return
     */
    public static Bitmap rotaingImageView(int angle, Bitmap bitmap) {
        // 旋轉圖片 動作
        Matrix matrix = new Matrix();
        matrix.postRotate(angle);
        // 創建新的圖片
        Bitmap resizedBitmap = Bitmap.createBitmap(bitmap, 0, 0,
                bitmap.getWidth(), bitmap.getHeight(), matrix, true);
        return resizedBitmap;
    }

    /**
     * 翻轉
     *
     * @param a
     * @return
     */
    public static Bitmap convert(Bitmap a,int index) {
        int w = a.getWidth();
        int h = a.getHeight();

        Bitmap newb = Bitmap.createBitmap(w, h, Config.ARGB_8888);// 創建一個新的和SRC長度寬度一樣的位圖
        Canvas cv = new Canvas(newb);
        Matrix m = new Matrix();
        //
        if(index==0){
        m.postScale(-1, 1); // 鏡像水平翻轉
        }else{
             m.postScale(1, -1); // 鏡像垂直翻轉
        }
        // m.postRotate(-90); // 旋轉-90度
        Bitmap new2 = Bitmap.createBitmap(a, 0, 0, w, h, m, true);
        cv.drawBitmap(new2, new Rect(0, 0, new2.getWidth(), new2.getHeight()),
                new Rect(0, 0, w, h), null);
        return newb;
    }

    public static Bitmap decodeSampledBitmapFromResource(
            String path, int reqWidth, int reqHeight) {

        // First decode with inJustDecodeBounds=true to check dimensions
        final BitmapFactory.Options options = new BitmapFactory.Options();
        options.inJustDecodeBounds = true;
        BitmapFactory.decodeFile(path, options);

        // Calculate inSampleSize
        options.inSampleSize = calculateInSampleSize(options, reqWidth,
                reqHeight);

        // Decode bitmap with inSampleSize set
        options.inJustDecodeBounds = false;
        return BitmapFactory.decodeFile(path, options);
    }

    public static int calculateInSampleSize(BitmapFactory.Options options,
            int reqWidth, int reqHeight) {
        // Raw height and width of image
        final int height = options.outHeight;
        final int width = options.outWidth;
        int inSampleSize = 1;

        if (height > reqHeight || width > reqWidth) {

            final int halfHeight = height / 2;
            final int halfWidth = width / 2;

            // Calculate the largest inSampleSize value that is a power of 2 and
            // keeps both
            // height and width larger than the requested height and width.
            while ((halfHeight / inSampleSize) > reqHeight
                    && (halfWidth / inSampleSize) > reqWidth) {
                inSampleSize *= 2;
            }
        }

        return inSampleSize;
    }
}
代碼比較多,關於自定義的貼紙控件請下載完整項目查看。
以下是完整的github項目地址
github項目源碼地址:點擊【項目源碼】
 Android apk反編譯工具介紹
首先apk不能被代碼混淆(或未經編譯優化),如果混淆了,反編譯出來的代號還是看不懂, 當然,在你沒反編譯出來之前,你也不知道有沒有混淆。 網上各種反編譯工具,&
 Android 高仿微信轉賬金錢輸入框規則
微信轉賬輸入框規則(可能不全)1、小數點後兩位2、起始輸入小數點,顯示0.3、刪除到第一個位置是小數點的時候,第一個位置為0 ,避免出現小數點在第一個位置的情況修改這個朋
 Android 必知必會 - 動態切換著色模式和全屏模式
如果移動端訪問不佳,歡迎使用 ==> Github 版通過代碼動態切換頁面的著色模式和全屏模式,兼容 Android 4.4 + 。本文假設讀者已經了解著色模式和全
 Android應用程序窗口View的創建過程
View類是android中非常重要的一個類.view是應用程序界面的直觀體現,我們看到的應用程序界面就可以看作是View(視圖)組成的.那麼我們應用程序的界面是怎麼創建