編輯:Android開發教程
在上一篇《Android多線程研究(5)——線程之間共享數據》中對線程之間的數據共享進行了學習和研究,這一篇我們來看看如何解決多個線程之間的數據隔離問題,什麼是數據隔離呢?比如說我們現在開啟了兩個線程,這兩個線程都要同時給同一個全局變量data賦值,各個線程操作它賦值後的變量數據,這裡就需要用到隔離。先看一段代碼:
import java.util.Random;


public class ThreadLocalTest {
    private static int data = 0;
    public static void main(String[] args) {
        for(int i=0; i<2; i++){
            new Thread(new Runnable() {

                @Override
                public void run() {
                    data = new Random().nextInt();
                    System.out.println(Thread.currentThread().getName() +
                            " has put data: " + data);
                    new A().get();
                    new B().get();
                }
            }).start();
        }
    }

    static class A{
        public int get(){
            System.out.println("A from " + Thread.currentThread().getName() +
                    " has get data: " + data);
            return data;
        }
    }

    static class B{
        public int get(){
            System.out.println("B from " + Thread.currentThread().getName() +
                    " has get data: " + data);
            return data;
        }
    }
}
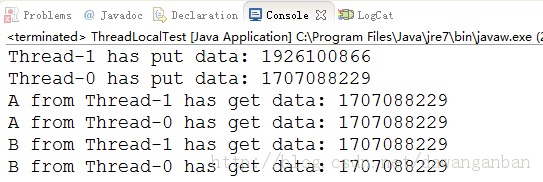
運行結果:
查看本欄目更多精彩內容:http://www.bianceng.cn/OS/extra/
從上面我們可以看到Thread-0和Thread-1都在操作變量data,但是兩個線程之間沒有做到對數據操作的隔離,所以輸出結果中兩個線程共用了一個data變量。
我們將上面代碼修改如下:
import java.util.HashMap;
import java.util.Map;
import java.util.Random;


public class ThreadLocalTest {
    //private static int data = 0;
    private static Map<Thread, Integer> map = new HashMap<Thread, Integer>();
    public static void main(String[] args) {
        for(int i=0; i<2; i++){
            new Thread(new Runnable() {

                @Override
                public void run() {
                    //data = new Random().nextInt();
                    int data = new Random().nextInt();
                    map.put(Thread.currentThread(), data);
                    System.out.println(Thread.currentThread().getName() +
                            " has put data: " + data);
                    new A().get();
                    new B().get();
                }
            }).start();
        }
    }

    static class A{
        public int get(){
            System.out.println("A from " + Thread.currentThread().getName() +
                    " has get data: " + map.get(Thread.currentThread()));
            return map.get(Thread.currentThread());
        }
    }

    static class B{
        public int get(){
            System.out.println("B from " + Thread.currentThread().getName() +
                    " has get data: " + map.get(Thread.currentThread()));
            return  map.get(Thread.currentThread());
        }
    }
}
 Android開發入門(八)使用活動欄 8.1 操縱ActionBar
除了fragments(碎片),在Android3和4中新增加的特性,還有ActionBar(活動欄)。ActionBar位於傳 統標題欄的位置,就在設備屏幕的頂部。Ac
 Android測試教程(9):ApplicationTestCase示例
前面介紹了Android測試的一些理論知識,從本篇開始的幾篇將結合ApiDemoTest示例來介紹Android測試的實例。在此之前可 以參照Android測試教程(3)
 Android中如何使用資源(resource)
Android平台, 可以使用本地資源, 也可以使用系統資源;使用靜態R類訪問資源, R類中包含一個靜態子類, R類中每一個子類都把它的相關資源表示為變量的形式;資源表被
 Android ApiDemos示例解析(29):App->Notification->Status Bar
這個例子的Icons Only 和 Icons and marquee 沒有什麼特別好說明的。而Use Remote views in balloon 介紹了可 以自定
 Android ApiDemos示例解析(32):App->Preferences->Preference dependencies
Preferences之間可以定義依賴關系,在第一個例子中已有說明。對應