編輯:安卓省電與加速
在之前一篇文章中我們講解了三種ProgressBar的做法,詳見—>《Android 自定義View——自定義ProgressBar 》。這一節中我們模仿360加速球制作一個動態ProgressBar。
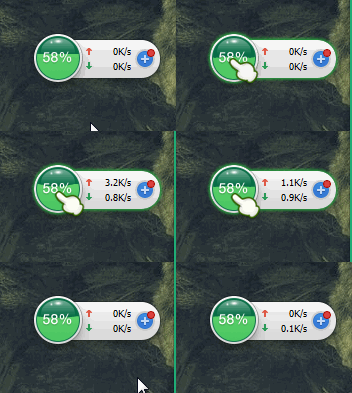
當然制作之前,我們先來看看360加速球是什麼樣子的:
 vcHL1q7HsMG9xqqyqb/NtcTWqsq2oaO087zSv8nS1LLOv7zRp8+wo7o8YnIgLz4NCqGhoaE8c3Ryb25nPqG2QW5kcm9pZCDX1Lao0uVWaWV3Jm1kYXNoOyZtZGFzaDtQYXRotcTKudPDIKG3PC9zdHJvbmc+PGJyIC8+DQqhoaGhPHN0cm9uZz6htkFuZHJvaWQg19S2qNLlVmlldyZtZGFzaDsmbWRhc2g719S2qNLlUHJvZ3Jlc3NCYXIgobc8L3N0cm9uZz48YnIgLz4NCqGhoaE8c3Ryb25nPqG2QW5kcm9pZCBQb3J0ZXJEdWZmLk1vZGXNvNDOu+y6z7SmwO0gobc8L3N0cm9uZz48L3A+DQo8cD6hoaGhsru3z7uwwcujrL3Tz8LAtL34yOvV/cziJmhlbGxpcDsmaGVsbGlwOzwvcD4NCjxoMiBpZD0="原理解析">原理解析
首先我們定義有一個Bitmap,給這個Bitmap對象定義一個Canvas畫布,我們將內容繪制在這個Bitmap上,然後再將Bitmap添加到View的Canvas上。
Bitmap的Canvas上,我們要繪制一個圓形,這個圓形代表最大進度,然後繪制圓形內的“波動的水”。這個波動的水我們要通過處理圖形混合的PorterDuff.Mode來實現。“波動的水”的實現,是通過Path中定義貝塞爾曲線完成的。我們繪制一條貝塞爾曲線,通過moveTo()和lineTo()方法,將貝塞爾曲線閉合,然後通過Handler操縱貝塞爾曲線波動。通過PorterDuff.Mode的PorterDuff.Mode.SRC_IN模式上層只顯示圓圓形重合的部分,從而實現在貝塞爾曲線在圓形內波動。
我們看代碼,再通過代碼解析:
public class MyProgressAnimation extends View {
    private int width;//設置高
    private int height;//設置高

    private Bitmap bitmap;//定義Bitmap
    private Canvas bitmapCanvas;//定義Bitmap的畫布

    private Path mPath;    //定義路徑
    private Paint mPathPaint;//定義路徑的畫筆

    private Paint mPaintCircle;//定義圓形的畫筆

    private Paint mPaintText; //定義繪制文字的畫筆

    //設置進度
    private int maxProgress = 100;
    private int currentProgress = 0;

    public int getMaxProgress() {
        return maxProgress;
    }

    public void setMaxProgress(int maxProgress) {
        this.maxProgress = maxProgress;
    }

    public int getCurrentProgress() {
        return currentProgress;
    }

    public void setCurrentProgress(int currentProgress) {
        this.currentProgress = currentProgress;
        invalidate();//實時更新進度
    }


    private int count = 0;
    private static final int NEED_INVALIDATE = 0X6666;
    //操作UI主線程
    private Handler handler = new Handler() {
        @Override
        public void handleMessage(Message msg) {
            super.handleMessage(msg);
            switch (msg.what) {
                case NEED_INVALIDATE:
                    //更新時間
                    count += 5;
                    if (count > 80) {
                        count = 0;
                    }
                    invalidate();
                    sendEmptyMessageDelayed(NEED_INVALIDATE, 50);
                    break;
            }

        }
    };

    public MyProgressAnimation(Context context, AttributeSet attrs) {
        super(context, attrs);
        //初始化一個路徑
        mPath = new Path();
        //初始化繪制路徑的畫筆
        mPathPaint = new Paint();
        mPathPaint.setAntiAlias(true);
        mPathPaint.setColor(Color.argb(0xff, 0xff, 0x69, 0x5a));
        mPathPaint.setStyle(Paint.Style.FILL);//設置為填充,默認為填充,這裡我們還是定義下
        mPathPaint.setXfermode(new PorterDuffXfermode(PorterDuff.Mode.SRC_IN));

        mPaintCircle = new Paint();
        mPaintCircle.setAntiAlias(true);
        mPaintCircle.setColor(Color.argb(0xff, 0xf8, 0x8e, 0x8b));

        mPaintText = new Paint();
        mPaintText.setAntiAlias(true);
        mPaintText.setColor(Color.argb(0xff, 0xFF, 0xF3, 0xF7));
        mPaintText.setTextAlign(Paint.Align.CENTER);
        mPaintText.setTextSize(50);

        handler.sendEmptyMessageDelayed(NEED_INVALIDATE, 50);
    }

    public MyProgressAnimation(Context context) {
        super(context);
    }

    @Override
    protected void onMeasure(int widthMeasureSpec, int heightMeasureSpec) {
        super.onMeasure(widthMeasureSpec, heightMeasureSpec);
        super.onMeasure(widthMeasureSpec, heightMeasureSpec);
        width = getDefaultSize(getSuggestedMinimumWidth(), widthMeasureSpec);
        height = getDefaultSize(getSuggestedMinimumHeight(), heightMeasureSpec);
        setMeasuredDimension(width, height);//設置寬和高

        bitmap = Bitmap.createBitmap(width, height, Bitmap.Config.ARGB_8888);
        bitmapCanvas = new Canvas(bitmap);
    }


    @Override
    protected void onDraw(Canvas canvas) {
        super.onDraw(canvas);
        //繪制Bitmap上的圓形
        bitmapCanvas.drawCircle(width / 2, height / 2, 150, mPaintCircle);
        //通過Path繪制貝塞爾曲線
        mPath.reset();
        mPath.moveTo(width, (height / 2 + 150) - (currentProgress * 300f / maxProgress));
        mPath.lineTo(width, height / 2 + 200);
        mPath.lineTo(count, height / 2 + 200);
        mPath.lineTo(count, (height / 2 + 150) - (currentProgress * 300f / maxProgress));
        for (int i = 0; i < 10; i++) {
            mPath.rQuadTo(20, 5, 40, 0);
            mPath.rQuadTo(20, -5, 40, 0);
        }
        mPath.close();
        //將貝塞爾曲線繪制到Bitmap的Canvas上
        bitmapCanvas.drawPath(mPath, mPathPaint);
        //將Bitmap繪制到View的Canvas上
        bitmapCanvas.drawText(currentProgress * 100f / maxProgress + %, width / 2, height / 2, mPaintText);
        canvas.drawBitmap(bitmap, 0, 0, null);
    }
}

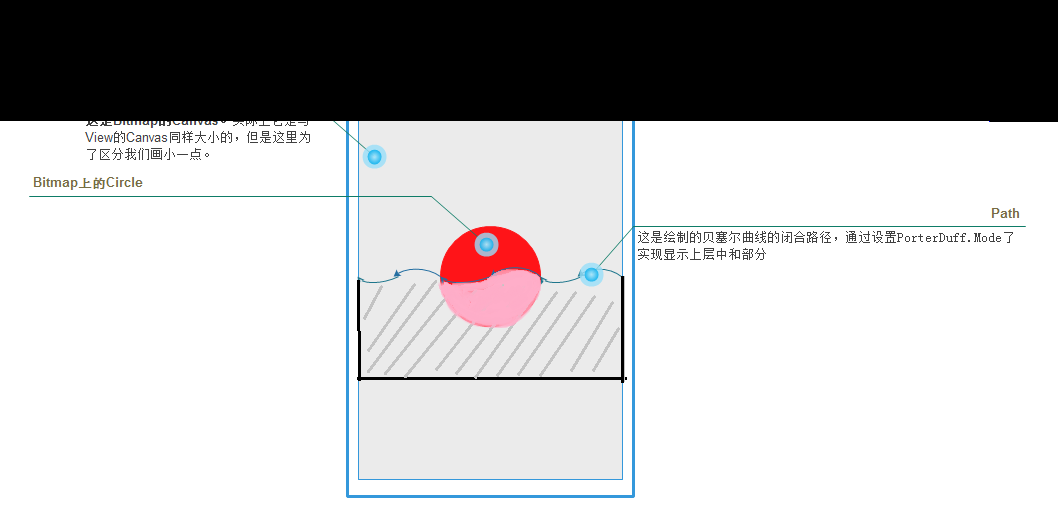
通過這張圖片我們可以更好的理解繪制原理。
繪制紅色區域的圓形:
        //繪制Bitmap上的圓形
        bitmapCanvas.drawCircle(width / 2, height / 2, 150, mPaintCircle);
繪制Path軌跡區域:
注意:這裡我們繪制路徑是最後使用貝塞爾曲線封閉的。然後Path封閉路徑的高度是變化的。
        //通過Path繪制貝塞爾曲線
        mPath.reset();
        mPath.moveTo(width, (height / 2 + 150) - (currentProgress * 300f / maxProgress));//通過此處根據進度設置高度
        mPath.lineTo(width, height / 2 + 200);
        mPath.lineTo(count, height / 2 + 200);
        mPath.lineTo(count, (height / 2 + 150) - (currentProgress * 300f / maxProgress));//通過此處根據進度設置高度
        for (int i = 0; i < 10; i++) {
            mPath.rQuadTo(20, 5, 40, 0);
            mPath.rQuadTo(20, -5, 40, 0);
        }
        mPath.close();
通過效果,只保留上層的重疊部分:
        //在初始化繪制路徑的畫筆上加入這個效果
        mPathPaint.setXfermode(new PorterDuffXfermode(PorterDuff.Mode.SRC_IN));
1. 在布局中定義控件和按鈕,點擊按鈕,進度開始自動增加。
2. Activity中點擊按鈕後增加進度。
public class MyProgressAnimationActivity extends Activity {
    private Button mButton;
    private MyProgressAnimation myprogressanomation;
    private static final int PROGRESS= 0X0003;
    //定義一個進度
    private int progress;
    private Handler handler = new Handler() {
        @Override
        public void handleMessage(Message msg) {
            super.handleMessage(msg);
            switch (msg.what) {
                case PROGRESS:
                    progress++;
                    if (progress <= 100) {
                        myprogressanomation.setCurrentProgress(progress);
                        sendEmptyMessageDelayed(PROGRESS, 100);
                    }
                    break;
            }
        }
    };
    @Override
    protected void onCreate(Bundle savedInstanceState) {
        super.onCreate(savedInstanceState);
        setContentView(R.layout.activity_my_progress_anomation);
        mButton = (Button) findViewById(R.id.button_start_myprogressanomation);
        myprogressanomation= (MyProgressAnimation) findViewById(R.id.myprogressanomation);
        mButton.setOnClickListener(new View.OnClickListener() {
            @Override
            public void onClick(View v) {
                handler.sendEmptyMessageDelayed(PROGRESS, 1000);
            }
        });
    }
}
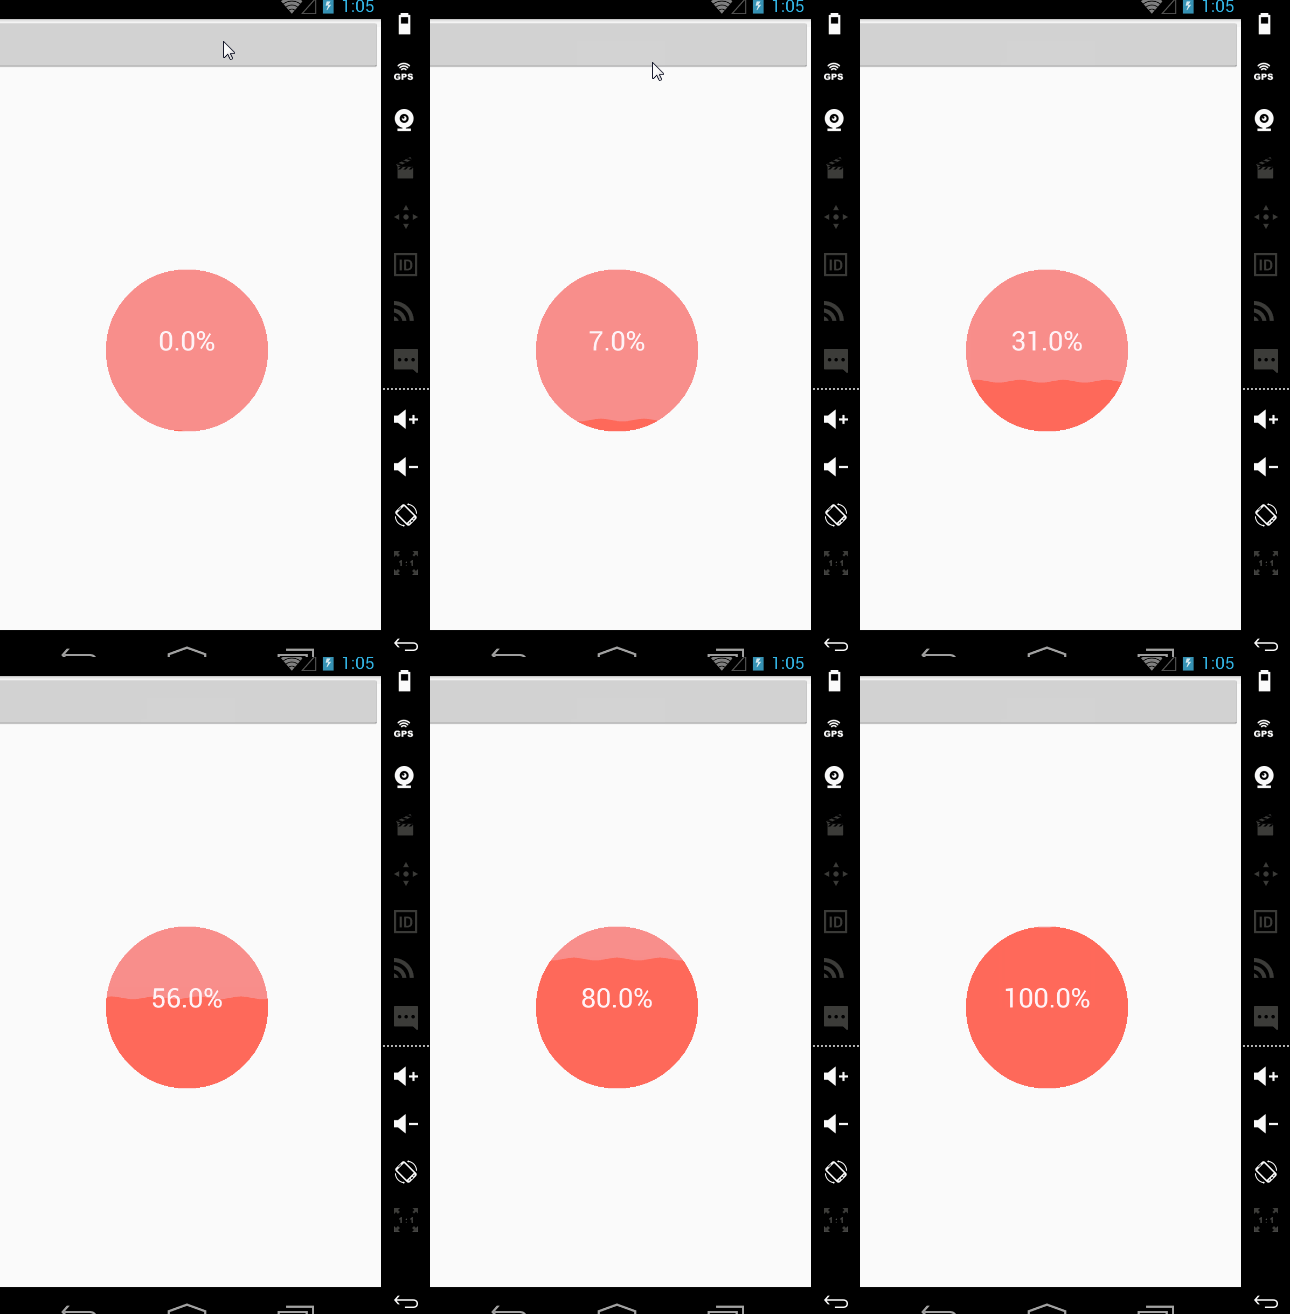
3. 實現效果如下:

 Android 5.0開啟省電模式的方法
你也許還沒有注意到,Android 5.0 Lollipop版本統正式加入了電池保護模式。這一功能的引進,幫助Android用戶徹底告別了需要尋找第三方
 OPPO Find7省電模式怎麼設置
打開OPPO Find7手機【設置】在【常規】欄目中找到並點擊【電量管理】,將【省電模式】開啟後,點擊【省電設置】。(如下圖) 2)找到【深度省電選項
 小米手機越來越卡怎麼辦?小米手機七大加速絕招介紹
手機越來越卡這種情況相信很多人都碰到過,甚至有些人在新買手機不久後就會察覺到這種情況,剛買手機是打開各個程序幾乎都是瞬間開啟,而現在點擊圖標後還要等上半秒或一
 安卓手機怎麼加速
安卓手機擁有著非常龐大的用戶群,用戶們用久了安卓手機會發現,手機會變得很慢,這不是系統配置的問題,而是這手機的垃圾變得非常得多,今天小編要分享的是安卓手機